Wednesday, March 23, 2022

How to clean junk files on windows 11


How to Get Rid of System Junk on Your PC

There are several methods, and most of them overlap. Here are the best ways to clear away junk files on Windows 11, starting with the easiest to perform.

Empty the Recycle Bin

This is an often overlooked way to clean up junk files, but it's the best first thing to address since you've already determined what's worthy of being erased. Every file you've deleted lands in the Recycle Bin, but nothing is erased for good until you empty it.

  1. Open the Recycle Bin. You can do this by double-clicking its icon on the desktop or typing it into the address bar in File Explorer.

  2. Select Empty Recycle Bin, and then confirm with Yes


    One way to avoid having to do this in the future is to hold down Shift when you delete things. Those files will instead skip right over the Recycle Bin, letting you clean up those junk files instantly.

    Delete Temporary Files

    Other junk files exist in Windows 11 in the form of temporary files. They're just as easy to delete as Recycle Bin data, with the added benefit of Storage Sense, a feature that will auto-delete temporary files (including Recycle Bin files).

  3. Open Settings (right-click the Start button) and go to System > Storage.

  4. Select Temporary files and then Remove files > Continue


    1. The Storage part of Settings also lets you see what's taking up all the space on your computer. Selecting Apps & features, for example, lets you sort the list of installed programs by size to identify which ones you could delete to regain the most space.

    2. Return to the previous screen through the back arrow at the top left, toggle Storage Sense on if it isn't already, and then select Configure Storage Sense.

    3. Ensure the first option is enabled: Keep Windows running smoothly. Also, turn on the button below Automatic User content cleanup.

    4. Scroll down this screen a bit and configure the cleanup schedules to your preference.

      For example, to automatically clean junk files every month, choose Every month from the first drop-down menu. You can also auto-empty the Recycle Bin as frequently as every day and clear out files from the Downloads folder on a schedule.

      Run Storage Sense now will perform these actions on-demand whenever you select it. 


      Run Disk Cleanup

      Disk Cleanup is a tool built-in to Windows 11 which does a great job at erasing junk files such as program files, temporary internet files, caches, and thumbnails. These are things you don't normally think of erasing, but they can be removed with ease to free up space and provide a snappier overall experience.

      This also serves as another way to empty the Recycle Bin and delete temporary files.

    5. Search for and open Disk Cleanup.

    6. Select Clean up system files, and then wait a few moments for Windows to calculate how much space you could save deleting these junk files.

    7. Put a check in the box next to whatever it is in that list you want to delete, and then select OK followed by Delete Files


      Run CCleaner

      The methods described above are authorized by Microsoft, but they're not the only ways to delete junk files in Windows 11. There are third-party tools arguably more useful for wiping away junk files because they contain far more options, though this also makes them riskier.

      CCleaner is a program we recommend for registry cleaning, but it also contains an entire section dedicated to junk file cleaning. Here's a quick overview on how to use it to delete temporary files and other things, from lots of places Windows' tools don't support:

    8. Install CCleaner and open it to the Custom Clean section.

    9. Check everything you want to clean. Items are separated in a Windows and Applications tab. The former is for MS-related things like Edge, IE, Explorer, and System areas, and the latter is useful for erasing junk files related to third-party programs like your web browsers and lots of other apps.

    10. Select Run Cleaner to start deleting junk files. Or, choose Analyze for a detailed look at what can be cleaned with CCleaner (nothing will be deleted). 


      Facebook 

       21thsoft

How to take screenshot on windows 11


 If you need to capture the contents of your Windows 11 PC’s screen (or a portion of it) for later reference, then it’s time to take a screenshot. You can use built-in screenshot features or third-party tools. Here are several different ways to do it.


Copy the Entire Screen to the Clipboard: Press Print Screen


In Windows 11, as in previous versions of Windows, you can copy an image of your entire screen into the clipboard (a temporary storage area for copying and pasting) by pressing the Print Screen (PrtScn) key. Sometimes, the Print Screen key will be labeled “PrtScn” or “PrtScrn” on your keyboard.

On desktop keyboards, you’ll usually find the Print Screen key to the right of the F12 key, along the topmost row of keys. On laptop keyboards, you might need to press a function (“Fn”) key while pressing the Print Screen key to make it work.

With a screenshot in your clipboard, you can paste the screenshot into any application that can receive pasted images. For example, you can open the Paint app that comes with Windows and paste the image with Ctrl+V. Then press Ctrl+S to save the screenshot as a file in your desired image format.


Save a Screenshot as a File: Press Windows+Print Screen:


If you’d like to instantly save a screenshot as an image file on your PC, press Windows+Print Screen on your keyboard. Windows will take a full-screen screenshot and automatically save it as a PNG file named “Screenshot (#).png” in the C:\Users\[User Name]\Pictures\Screenshots folder (where “#” is a number that counts up over time based on the number of screenshots you’ve taken).

And remember that if you have a laptop, you might need to hold the Function or “Fn” key while pressing Print Screen or “PrtSc” for it to work, so you might need to press Windows+Fn+Print Screen to capture your screen as a PNG file.


Copy the Active Window to the Clipboard: Press Alt+Print Screen:

 If you’d like to capture the currently active window to the clipboard (without having to select it or crop an image), press Alt+Print Screen on your keyboard. Once in the clipboard, you can paste the screenshot into any app that will receive images, like Microsoft Paint, Adobe Photoshop, or a free image editing app like Paint.NET.


Capture a Portion of the Screen to the Clipboard: Press Windows+Shift+S:


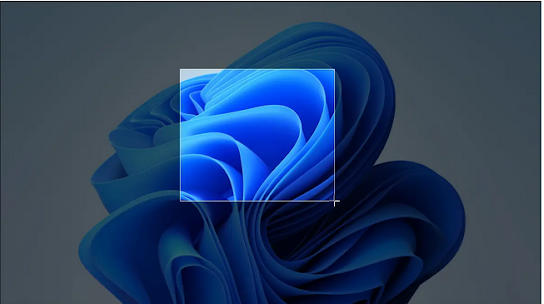
 If you’d like to capture a specific portion of your screen that you select yourself, you can use a special Windows 11 screen snipping tool. At any time, press Shift+Windows+s on your keyboard. The screen will darken, and you’ll see a small toolbar at the top center of the screen. From left to right, here’s what the options do:


  • Rectangular Snip: Select a rectangle-shaped free-form area of the screen to capture.
  • Freeform Snip: Select an irregular shape as a screenshot. The area around the irregular shape (in the rectangular image) will be black when you paste it.
  • Window Snip: Choose an application window and capture just that window.
  • Full-screen Snip: Similar to pressing Print Screen by itself, this option captures a screenshot of your entire screen.

To capture a rectangular selection of the screen, for example, click the leftmost icon on the toolbar, which looks like a rectangle with a plus in the corner.


Next, position your cursor near what you’d like to capture. Click and hold the mouse button, then drag your mouse (or finger on a trackpad) until you’ve selected the rectangular area you want to save.


 When you release your mouse button, the area you selected will be copied to the clipboard. If you have notifications turned on, you’ll see a small pop-up in the corner of the screen from Snipping Tool. If you click it, the screenshot you just took will open in the Snipping Tool app where you can annotate, crop, or save it as necessary (see the section below).


 If you ignore the pop-up notification, you’ll still need to paste the screenshot into an image editing program such as Microsoft Paint to be able to save it to a file. However, you can also paste the image directly into other applications, such as email clients and messaging apps.


Use Print Screen to Open Screen Snipping

Windows 11 includes a handy option that will allow you to launch the screen snipping tool (seen in the last section) by pressing Print Screen instead of having to press Windows+Shift+S. To enable it, open Windows Settings by pressing Windows+i. Then navigate to Accessibility > Keyboard. Scroll down and flip the switch beside “Use the Print Screen button to open screen snipping” to “On.”


 After that, close settings. Any time you want to open the screen snipping tool to quickly copy screenshots to the clipboard, just press Print Screen on your keyboard.

Take a Screenshot Using Snipping Tool

To take screenshots with more control that you can annotate, save, or share, you can use Windows 11’s Snipping Tool. To launch it, open the Start menu and type “snipping,” then click the Snipping Tool icon when you see it.


When the Snipping Tool opens, click “New” to start a new capture.


 Once you do, you’ll see a small toolbar at the top of the screen (like the one seen in the “Capture a Portion of the Screen” section above) that allows you to perform a rectangular snip, freeform snip, window snip, and full-screen snip. The difference here is that with the Snipping Tool app running, these tools don’t just copy the screenshot to the clipboard. Instead, you can save them to a file.


After capturing the screenshot using one of the methods in the toolbar, it will appear in the Snipping Tool window. You’ll have the opportunity to crop it, annotate it with a drawing pen, save it as a file, or share it with others using the toolbar at the top of the window.


 Also, if you need to capture something with a timed delay, Snipping Tool is ideal. Click the clock icon in the toolbar and select a delay time in the drop-down menu that appears.


 After selecting the time, click the “New” button, and a screenshot will trigger after the time period you selected. To save the file, click the floppy disk save icon on the toolbar and choose a location. Nice and easy!


 Facebook

21thsoft 


how to resize the windows 11 taskbar

How to Change the Taskbar Size in Windows 11:

 You can get small, medium or large taskbar and icons.


By default, Windows 11's taskbar is a decent size, but what if you want it a little bigger so you can see the icons better? Conversely, what if you want it a little smaller so you can fit more of your content on the screen at once?

The good news is that, using a simple registry tweak,  you can set the taskbar in Windows 11 to one of three sizes: small, medium or large, with the medium size being the same as the default. The size will effect both the bar itself and any icons within it, including the Start, search and task view buttons. 

The height may vary based on your screen resolution, but on our full HD screen, the default or medium taskbar height was 48 pixels, the large height was 72 pixels and the small height was 32 pixels. We originally published this article during the beta period, but we've tested with the release version of Windows 11 and this tip still works.


How to Change the Taskbar Size in Windows 11

1. Open Regedit. You can do by hitting Windows key + R and typing regedit or by searching for regedit, using the search menu.


 2. Navigate to HKEY_CURRENT_USER\Software\Microsoft\Windows\CurrentVersion\Explorer\Advanced


Create a new DWORD (32-bit) Value by right clicking in the right window pane and selecting New->DWORD (32-bit) Value.


 Name the value TaskbarSi


Set the value to one of the following to 0, 1 or 2 which give you small, medium or large. You set the value by double clicking on TaskbarSi.


Close Regedit and reboot.

You will now have the size of taskbar icons you set. If you don't like it, you can always go back and change it. And, if you want some more changes, you can always bring back the full context menu in Windows 11, move the taskbar to the top of the Windows 11 desktop or bring back the Windows 10 File Explorer in Windows 11.


 Facebook

 21thsoft

How to find MAC address in windows 11

 Every device has a unique address, if you know where to find it.


How to Find a MAC Address in Windows 11 Settings 

Settings is Windows 11’s and 10’s one-stop shop for the most commonly accessed, well, settings. The options presented here aren’t comprehensive, but the app can tell us our MAC address.

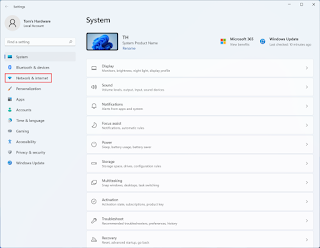
1. Navigate to the ‘Network & internet’ page in Settings. The fastest way to do this is to right-click the Start menu and select Network Settings from the pop-up menu. You can also search for Settings, open the app, then click “Network & internet” in the sidebar.  


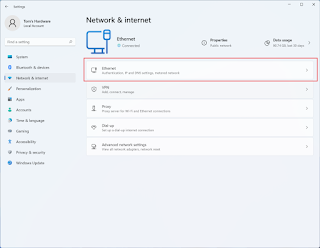
Open the Ethernet sub-menu if you’re looking for the Ethernet MAC address and go to step 3.


 If you’re looking for the Wi-Fi adapter MAC address, click Wi-Fi


Then selectHardware properties.


 Look for ‘Physical address (MAC)’ at the bottom of the page. Sometimes this setting is on-screen as soon as the Ethernet  or Wi-Fi / Hardware properties sub-menu is opened, but if it’s not, scroll down. The MAC address will be listed there as six alphanumeric pairs separated by hyphens. 


Finding a Windows 11 device’s MAC address in Control Panel 

Windows 11 and 10 before it don’t necessarily make it easy to find the legacy Control Panel, but the Settings app’s predecessor offers more options and could be more familiar to advanced users.

1. Open Control Panel. The quickest way to do this is via the Start menu’s search tool. 


Open the Network Sharing Center. This is most easily accessible via the “View network status and tasks” link under the “Network and Internet” heading. 


Select your connection type. Network Sharing Center should display your current internet connection type (Ethernet in our example) as a clickable link. Click it. 


Click the ‘Details…’ button. A window should appear with information about your connectivity options, current download speeds, etc. Click on the “Details…” button.


 Look for ‘Physical Address’. Windows 11 doesn’t identify the MAC address by name in this window, but the “Physical Address” entry should be correct, and is supposed to match the information provided via the Settings app and our next method. 


Finding a Windows 11 device’s MAC address via PowerShell 

Advertisement

Microsoft ships its cross-platform command shell and scripting language, PowerShell, with Windows 11 by default so people can perform common tasks without pointing and clicking.

1. Open PowerShell. The quickest way to do this is to right-click the Start menu and select “Windows Terminal” from the pop-up menu. (There’s also an admin version of the tool, but that’s overkill for our needs.) It can also be found by searching for PowerShell.


Enter the following command without quotation marks: “getmac /v”. The “getmac” portion of the command returns information about our hardware’s Physical Address and Transport Name, while the “/v” modifier tells Windows 11 to return verbose information, which means it will also provide the Connection Name and Network Adapter results.


  Look for ‘Physical Address’. Windows 11 omits any mention of MAC address, probably because the command makes it clear that’s what we’re after, but “Physical Address” should once again contain six pairs of alphanumeric characters separated by hyphens.


 Note that, if you have more than one network adapter, you will see all of them and their MAC addresses on this list. 


Facebook

21thsoft 

How to find WiFi password in windows 11


View Saved Wi-Fi Password Using Control Panel

You can view the saved Wi-Fi password using the classic Control Panel. This is useful if you want to view the password for the currently active Wi-Fi network profile.

  1. Press Win + R to open Run.
  2. Type control and click OK to open the Control Panel.
  3. Click on Network and Internet.
  4. Next,click on Network and Sharing Center.


  1. In the View your active network section, click on your Wi-Fi network profile.
  2. In the Wi-Fi Status dialog, click the Wireless Properties button. 


Next, open the Security tab in the Properties window.


Select the Show characters option to view the Wi-Fi password. You can copy the password to your clipboard and save it for later use. 


How to Find Wi-Fi Password Using Command Prompt:


The Control Panel method is helpful if you want to access the Wi-Fi password for the currently connected network. However, if you want to view the password for a specific Wi-Fi network profile stored on your PC, you can find it using the Command Prompt.

  1. Press Win + R to open Run.
  2. Type cmd and click OK to open Command Prompt.


  1. In the Command Prompt window, type the following command and press Enter to view the saved Wi-Fi network profile names:
    netsh wlan show profiles
  2. Note the network profile name for which you want to find the Wi-Fi password.
  3. Next, type the following command:
    netsh wlan show profile name=profilename key=clear
  4. In the above command, replace profilename with the user profile name. For example, to view the Wi-Fi password for the user TP-Link_Archer4, the final command will look something like this:
    netsh wlan show profile name= TP-Link_Archer4 key=clear
  5. In the output, check Key Content under Security Settings to view the password. 


How to Find Wi-Fi Password Using PowerShell:


The Command Prompt method allows you to view the password for the specified user profile. If you want to view the password for all the user profiles, run the following PowerShell script from GitHub.

To view your Wi-Fi passwords using PowerShell:

  1. Press Win+X to open the WinX menu.
  2. Click on Windows Terminal.
  3. In the Terminal Window, make sure the PowerShell tab is open. If not, click the drop-down button in the toolbar and select Windows PowerShell.
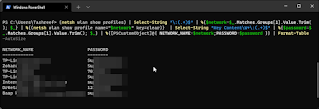
  4. Next, copy and paste the following command in the PowerShell window:(netsh wlan show profiles) | Select-String "\:(.+)$" | %{$network=$_.Matches.Groups[1].Value.Trim(); $_} | %{(netsh wlan show profile name="$network" key=clear)} | Select-String "Key Content\W+\:(.+)$" | %{$password=$_.Matches.Groups[1].Value.Trim(); $_} | %{[PSCustomObject]@{ NETWORK_NAME=$network;PASSWORD=$password }} | Format-Table -AutoSize
  5. Press Enter to execute the command.
  6. The PowerShell cmdlet will display all the Wi-Fi network profiles stored on your computer, including the password. 


       Facebook 

      21thsoft


how to add or remove optional features on Windows 11

 Here are the steps to manage optional features on your Windows 11 installation.


How to manage optional features via Settings

On Windows 11, the Settings app lets you install additional features to extend the system's functionalities. You will need an internet connection to download these features since the components are not stored in the default installation.

Add optional features

To download and install optional features through the Settings app, use these steps:

  1. Open Settings.
  2. Click on Apps.
  3. Click the Optional features page on the right side.


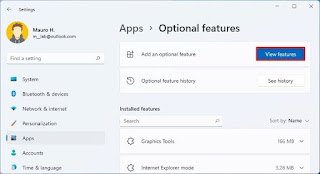
    Click the View features button for the "Add an optional feature" setting.


     Select the feature to install on Windows 11.


    1. Quick tip: Click the down-arrow button to see more details about the feature. You can select multiple features at one time.

    2. Click the Next button.
    3. Click the Install button.

    Once you complete the steps, the feature will install without restarting the computer (in most cases).

    Remove optional features

    To remove features from the "Optional features" settings, use these steps:

  4. Open Settings.
  5. Click on Apps.
  6. Click the Optional features page on the right side


     Under the "Installed features" section, select the feature to remove and click the Uninstall button.


    After you complete the steps, the feature will be removed from the installation.

    How to manage optional features via Control Panel

    The features available through the "Windows features" interface can also help you to extend the functionality of Windows 11. However, since these components come on every setup, you don't need an internet connection to enable them.

    Add optional features

    To turn on Windows features, use these steps:

  7. Open Settings.
  8. Click on Apps.
  9. Click the Optional features page on the right side.


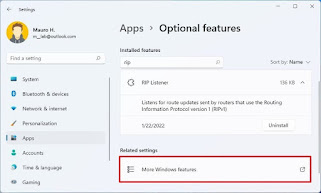
    Under the "Related settings" section, click the More Windows features setting.


    Check the Windows 11 feature to install.


    1. Click the OK button.
    2. Click the Restart button.

    Once you complete the steps, the computer will restart to finish applying the feature.

    On Windows 11, you can add a number of optional features, depending on your edition, since the Pro edition has more advanced components than the Home edition.

    Here are the Windows features you can turn on or off on Windows 11 Pro:

  10. .NET Framework 3.5 (includes .NET 2.0 and 3.0): Runs app built using Microsoft .NET software framework version 3.5 or older. You can safely enable this older support, but usually, it'll enable on demand when needed.
  11. .NET Framework 4.8 Advanced Services: Required for apps built with version 4.8 of the framework.
  12. Active Directory Lightweight Directory Services: Adds Lightweight Directory Access Protocol (LDAP) support for directory-enabled apps. This is an alternative to Windows Active Directory. Typically, you'll have to turn on this feature in specific corporate network scenarios.
  13. Containers: Provides services and tools to create and manage Windows Server Containers and Hyper-V containers.
  14. Data Center Bridging: This is an IEEE standard that enables converged fabrics in a data center, where network, storage, clustering, and traffic managements share the same Ethernet network infrastructure. Data center bridging is only useful in corporate networks.
  15. Device Lockdown: Adds services and tools for a more controlled experience, such as when setting up a kiosk or temporary workstation.
  16. Guarded Host: Creates an environment to provide stronger protection for virtual machines to prevent tampering and theft by malicious individuals and malware.
  17. Hyper-V: Virtualization component to create and manage virtual machines on Windows 11.
  18. Internet Information Services: It's known as "IIS," and it's a service that allows to set up an FTP server or a server to host websites with management services.
  19. Internet Information Services Hostable Web Core: Creates an environment to host apps on the web.
  20. Legacy Components: Adds support for old components, including DirectPlay, a feature formerly part of DirectX.
  21. Media Features: Allows you to add or remove the classic Windows Media Player app. This option is also part of the "Optional features" settings page.
  22. Microsoft Defender Application Guard: Creates up an isolated virtualized environment to test apps and browse untrusted sites to prevent old and newly emerging attacks on the physical machine.
  23. Microsoft Message Queue (MSMO) Server: Enables apps to run correctly on unreliable networks by queuing messages instead of sending them as they're generated.
  24. Microsoft Print to PDF: Allows printing to a PDF file instead of a physical printer.
  25. Microsoft XPS Document Writer: This is an old Microsoft feature similar to PDF. You can still print documents to XPS, but PDF is a format that's more widely supported.
  26. MultiPoint Connector: Allows you to monitor and manage a computer using MultiPoint Manager and MultiPoint Manager Dashboard applications.
  27. Print and Document Services: Adds printing services to Windows 11, including scan, fax, and network printing.
  28. Remote Differential Compression API Support: Provides synchronization algorithm that intelligently compares two files that are about to be synchronized and only updates the differences between them. Only specific apps can use this feature.
  29. Services for NFS: Provides file access using the Network File System (NFS) protocol. For example, when you need access files on Network Attached Storage (NAS).
  30. Simple TCPIP Services (i.e., echo, daytime, etc.): Adds support for additional TCP/IP protocol services, including "Echo," "Character Generator (CHARGEN)," "Daytime," "Discard," and "Quote of the Day (QUOTE)."
  31. SMB 1.0/CIFS File Sharing Support: Adds support to configure file and printer sharing for previous versions of Windows, including Windows XP and Windows Server 2003 R2.
  32. SMB Direct: Allows the use of network adapters with Remote Direct Memory Access (RDMA) capability to improve file-sharing support using SMB 3.x.
  33. Telnet Client: Enables command-line utility to connect to other devices, such as routers and switches, running a Telnet server. This network protocol isn't secure, and you shouldn't use it outside of your network.
  34. TFTP Client: Enables command-line utility to upload and download files using Trivial File Transfer Protocol. This protocol isn't secure, and you shouldn't use it unless required.
  35. Virtual Machine Platform: Add platform support for virtual machines, and you can leverage this feature to create MSIX app packages for App-V or MSI. You must enable this option to set up the Windows Subsystem for Linux 2 (WSL2).
  36. Windows Hypervisor Platform: Enables the virtualization components to run the Microsoft Hyper-V hypervisor.
  37. Windows Identity Foundation 3.5: This may be needed for apps created with older .NET technologies.
  38. Windows PowerShell 2.0: Enables or disables PowerShell scripting command-line application on Windows 11.
  39. Windows Process Activation Service: Installs services that may be required when using IIS web services.
  40. Windows Projected File System: Also known as (ProjFS), this feature allows an app (provider) to present hierarchical data from a backing data store into the file system, making it seem like files are in the file system.
  41. Windows Sandbox: Creates a lightweight virtual machine to test applications and navigate untrusted web pages in an isolated environment. When you close the sandbox, everything will be deleted. The next time you open the app, a new sandboxed instance will be created.
  42. Windows Subsystem for Linux: Installs the platform to install and run Linux distros alongside Windows 11.
  43. Windows TIFF iFilter: Allows the system to index and search Tagged Image File Format (TIFF) using optical character recognition (OCR), but it typically uses more system resources than traditional file indexing and searching.
  44. Work Folders Client: Allows file synchronization with network file servers.

Other features like RIP Listener, RAS Connection Manager Administration Kit (CMAK), and Simple Network Management Protocol (SNMP) are now part of optional features through the Settings app.

Remove optional features

To turn off Windows features, use these steps:

  1. Open Settings.
  2. Click on Apps.
  3. Click the Optional features page on the right side


     Under the "Related settings" section, click the More Windows features setting.


     Clear the Windows 11 feature to install.


    1. Click the OK button.
    2. Click the Restart button.

    After you complete the steps, the feature will no longer be available on Windows 11.


    Facebook

    21thsoft