Saturday, May 27, 2023

How to Format a Computer From A to Z


Back up your data. Although formatting your Windows 10 PC is super easy, the changes are permanent—you'll be deleting all of your apps, settings, and personal files and reinstalling Windows from scratch. Fortunately, it's also easy to back up the files you want to keep using tools that came with your PC. See How to Back Up Your Files in Windows 10 to learn how to create a backup to a DVD, CD, external hard drive, or the cloud. 


Open your Windows Settings
Windows Settings
.
You'll find this gear icon on the Start menu. 


Click update and security  .  It's the icon of two curved arrows. 


Click recovery . It's in the left panel. 


Click the get started button under "Reset this PC." It's the first button at the top of the right panel. 


Click remove everything . It's the second option on the blue screen. 


Click remove files and clean the drive. It's the second option. This option is the one you'll need to format the hard drive—the other option just erases and reinstalls the operating system without actually formatting the drive.
  • Cleaning the drive is important if you're planning to sell or give away this PC. That's because formatting the hard drive makes it hard for someone malicious to restore your deleted files. But if you want to keep the PC, you can click Just remove my files to skip formatting the drive.
  • Another more serious option for cleaning the hard drive is to use a third-party data-wiping tool like DBAN (Darik's Boot and Nuke). If you use a drive-clearing program, you'll need to make sure you have a Windows 10 recovery drive or DVD so you can reinstall the operating system. See How to Clean a Hard Drive to learn more about this option.


Click next on the warning screen. If you see a message that says the PC was upgraded to Windows 10, it means that reinstalling Windows makes it so you cannot go back to the previous version of Windows.[1]


Click Reset to format your PC. Depending on the size and speed of your hard drive, this part can take a while (anywhere from several minutes to several hours).
  • If you're using a laptop, make sure you plug it into a power source so the formatting is not interrupted.


Click Continue when the format is complete. Your PC is now formatted. If you'd like to reinstall Windows, follow the on-screen instructions to do so.  


Facebook

21thsoft 

Vulkan-1.dll Missing: How to Fix It or Download It Again


  • Users can encounter the Vulkan-1.dll missing error when launching a game.
  • Usually, the missing DLL is a result of a corrupt vulkan-1.dll file.
  • Reinstalling the driver with the Vulkan RT installer is often the best troubleshooting method.


What is Vulkan-1.dll?

The processes of the Vulkan-1.dll file are associated with the Runtime Loader used for rendering 3D graphics.

It is part of your graphics card driver and associated software installation. Though not a Microsoft product, it is an essential file for the system’s graphic performance.

Why is Vulkan-1.dll missing?

Some factors liable to be responsible for the Vulkan-1.dll missing error are:

  • Corrupt Vulkan-1.dll file – It is common for DLL files to be inaccessible or deleted by antivirus software when corrupt. So, the file may be missing due to its corrupted status.
  • Omitted from the driver pack – Sometimes, the Vulkan driver may not be installed alongside the driver pack. Hence, it will be missing because it has been omitted. Also, it could be in a different directory from where the other drivers are.
  • Outdated drivers for hardware – If graphics drivers and other hardware related to vulkan-1.dll or an app using it are outdated, their bugs can impede the file’s ability to run.

These factors can vary on different computers. Regardless, as we go further, we’ll take you through some detailed steps to help fix the Vulkan-1.dll missing error.


How can I fix the missing Vulkan-1.dll file?

Before trying any advanced troubleshooting steps, go through the following preliminary checks:

  • Restart your computer – Restarting the computer helps refresh its processes and fix temporary errors caused by malfunctioning system components.
  • Temporarily disable the antivirus – Sometimes, the antivirus might have flagged the DLL file and, as such, exclude it from installation. So, try disabling the antivirus and retry.
  • Add an exception for VulkanRT-Installer in Windows Defender Security Center – By doing this, the Force randomization for images (Mandatory ASLR) will be disabled. Hence, the installer will work.
  • Reinstall the app prompting the error – Reinstalling the software might download the DLL file alongside its app package.

If the Vulkan-1.dll missing error persists, proceed with the fixes highlighted below:


Download and reinstall the Vulkan driver

  1. After disabling your antivirus, Right-click the Start menu and click on Device Manager.


 Expand the display adapter, right-click the Nvidia / AMD driver, and click Uninstall device.


Click Uninstall to confirm and restart your PC.


 Go to Vulkan official page, then download the Vulkan Runtime Installer. (Depending on your PC) 


Once the download is complete, double-click on the installer to open the Vulkan Runtime.


  1. Click on I Agree to start the installation. Follow the on-screen instructions to complete it.
  2. Restart your PC and check if the error persists.

Further, some users claim they were able to run the installer through the following paths in File Explorer:

  • C:\NVIDIA\DisplayDriver\388.59\Win10_64\International\Display.Driver\VulkanRT-Installer.exe
  • C:\NVIDIA\DisplayDriver\390.65\Win10_64\International\Display.Driver\VulkanRT-Installer.exe
  • C:\AMD\Win10-Radeon-Software-Adrenalin-2020-Edition-20.2.2-Mar5\Packages\Drivers\Display\

Irrespective, if you don’t want to download online, you can try any of the above paths depending on your Windows version or graphics card manufacturer.


Downloading the Vulkan Runtime Installer will install the DLL file and other essential files needed for the system apps.

In conclusion, you may be interested in our review of the best corrupt file repair software for Windows PC. Also, we have a detailed guide about missing .dll files after Windows 10/11 Update and ways to fix it.

Should you have further questions or suggestions, kindly drop them in the comments section.


Facebook 

21thsoft 


Fix: D3DCompiler_47.dll is missing

 D3DCompiler_47.dll’ is a shared file that enables running of many games and is required by many applications in their operations.  The error “D3DCompiler_47.dll is missing” is very common in launching games, applications, or running a program for a specific purpose.


The workarounds involved to solve this error are very straight-forward and requires you to either download the DLL either directly or through Windows update. We will go through them one by one starting with the simplest one being the first.

Solution 1: Re-registering D3DCompiler_47.dll

If you are using a program which requires the DLL under discussion, normally it should automatically register the file for you. If the file isn’t present, it should have the capability to install it. If the application doesn’t have these features, we will try to manually register the file.

  1. Press Windows + R, type “command prompt” in the dialogue box, right-click it and select “Run as administrator”.
  2. Once in elevated command prompt, type the following commands:
regsvr32 /u D3DCompiler_47.dll

regsvr32 /i D3DCompiler_47.dll


The first command will unregister the file and the second command will 
register it. Do note that this method will only work if you already have
 the DLL present in the required directory. If you don’t, these commands
 will throw an exception. In that case, move on to the second solution.
 

Solution 2: Downloading the DLL

There are two ways through which you can install the required DLL on your system. Either you can do this manually using this solution or automatically using the 3rd one. Both solutions will work but you will have to do the searching yourself on this one.

  1. Download the DLL from the internet onto your computer. It is worth noting that there are many malicious sites out there which trick the users into downloading a virus instead of the authentic file. Be careful and only use trusted websites.
  2. After downloading the file, you have to check the architecture of your system. 32-bit and 64-bit architectures, both have different file locations where you have to paste the DLL. Press Windows + S, type “system info” in the dialogue box and open the settings.


  1. Look for the value of System Type. For 32-bit system type, you should paste the D3DCompiler_47.dll file you’ve downloaded to the folder “C:\Windows\system32”. Some users might have “C:\WINDOWS\system32”.

For a 64-bit computer, you should copy the D3DCompiler_47.dll (32-Bit) to the folder “C:\Windows\SYSWOW64”, and then paste the D3DCompiler_47.dll (64-Bit) to the folder “C:\Windows\System32”.


  1. Once you have pasted the DLL, perform the first solution and register the DLL accordingly. Restart your computer and see if the application works.

Solution 3: Installing Catalog Update KB4019990

Like we discussed above, Microsoft releases frequent updates targeting various problems or updating or adding modules to the existing components. The error “D3DCompiler_47.dll is missing” was noticed by Microsoft and it released an official update to fix the problem.


  1. Head over to Microsoft’s official website and download the update
  2. Install the update on your computer and restart your system entirely. Now check if the problem got solved.

You should also make sure that you are running the latest version of Windows. Press Windows + S, type “update” and open the system settings. Check for updates and if there are any, install them.

Note: You should also make sure that you have the latest version of Microsoft .NET framework.

Solution 4: Installing Microsoft DirectX

The module “D3DCompiler_47.dll” is known to be related with DirectX. DirectX is a collection of API’s meant for handling tasks related to multimedia, especially games. If you do not have the module installed already, you should add it to your system as soon as possible and see if this does the trick.

  1. Navigate to the official Microsoft website and download the file application package on your computer.


  1. Once downloaded, install the package and restart your computer completely.
  2. Now check if the problem still persists. If it does, you need to manually download the DLL and place it in the directories as shown in Solution 2. Don’t forget to register the DLL onto your computer as shown in Solution 1.

If you are still facing the error message, make sure that you performed all the steps and are using an administrator account.


Facebook 

21thsoft 


d3d8.dll Missing or Not Found? 5 Ways to Fix It


  • The d3d8.dll is linked to DirectX is being used by apps and games for decades.
  • When programs can't find the DLL, it's either the program's incompatibility or missing DirectX components to blame.
  • Those looking for a quick resolution should use a dedicated DLL repair tool, though we have a few other solutions.


Why is d3d8.dll not found?

Here are the primary reasons the DLL is not found in Windows:

  • Program not compatible with the OS: The errors with this particular DLL have been reported on forums as early as the year 2000, indicating that even the programs released back then required the DLL. So, incompatibility could be an underlying cause here.
  • Missing DirectX files: Since d3d8.dll is related to DirectX, issues with the software or missing files can lead to DLL errors.
  • DLL is unreadable: After repeated changes over time, a DLL may become unreadable to all or some programs.
  • Corrupt system files: A common reason you are getting the d3d8.dll error in ReShade is corrupt system files, and there are a few quick scans that might help.

Run the program in compatibility mode

  1. Right-click on the affected program’s launcher, and then select Properties.


 Navigate to the Compatibility tab, tick the checkbox for Run this program in compatibility mode for, and select a previous iteration of Windows from the list.


 Once done, click on Apply and OK to save the changes.


Often running a program in compatibility mode helps fix things when d3d8.dll is the faulting module. Remember, you may have to try out a few iterations before finding the one that works for the program.

3. Manually move the DLL from another device

Whenever a DLL is missing, experts recommend manually transferring it from another healthy device to the affected PC, given they both run the same operating system and the other computer has the DLL. For those wondering where do I put d3d8 dll, the file location is:C:\Windows\System32


 In some cases, the DLL will be found in the program’s directory instead of the System32 folder. Whatever the case, when transferring the DLL, make sure to copy it to both the System32 folder and the program-specific directory.


Download DirectX End-User Runtime Installer

  1. Go to Microsoft’s official website, select the desired language from the dropdown menu, and click Download.


 Run the setup, and follow the on-screen instructions to complete the installation.


  1. Once done with it, restart the computer for the changes to come into effect.

Since the DLL is linked to DirectX, missing software or components are just as likely to trigger issues with d3d8.dll in Rome Total War. And installing the DirectX End-User Runtime package should do the trick. 


Reinstall the affected program

  1. Press Windows + R to open Run, type appwiz.cpl in the text field, and hit Enter.

 Select the program that’s throwing the error, and click Uninstall.


  1. Choose the appropriate response when prompted and follow the on-screen instructions to complete the uninstallation.
  2. Once done, restart the computer and then reinstall the program from the official source.

Often the problem arises due to an improper app installation, especially when you have a missing d3d8.dll in Command and Conquer Generals. So, uninstall the application and then do a fresh install of it. You can also use an effective uninstaller software to clear leftover files and registry entries.

Besides, download one of the best DLL repair tools, as these will help prevent such errors from reappearing.

Tell us which fix worked for you in the comments section below.


Facebook 

21thsoft 


0xc00d36b4 Error Code: How to Fix It


  • 0xc00d36b4 error can appear in Windows Media Player, Movies & TV, and Groove Music Player because they all use the same media playback engine in Windows.
  • The error can occur due to an unsupported media file, codec problem, or media file issue.


What is error 0xc00d36b4?

Error 0xc00d36b4 is a specific error code associated with Windows Media Player and media playback issues. The error message associated with this error code may vary slightly depending on the media player you are using. 


The 0xc00d36b4 error in Windows Media Player can be caused by several factors. Here are some of the most common causes:

  • Missing codecs: One of the most common causes of this error is missing codecs. If your computer does not have the necessary codecs to play the media file, Windows Media Player cannot play it.
  • Corrupted media files: If the media file you are trying to play is corrupted or damaged, Windows Media Player may not be able to play it.
  • Outdated display or audio drivers: If you are using outdated drivers, they may not be able to properly decode the media file, which can result in an error message.
  • Codec conflicts: Some third-party codecs are known to interfere with the Windows Media Player, which can trigger the 0xc00d36b4 error.
  • Windows Media Player stuck into limbo state: Another occurrence of this problem is when Windows Media Player becomes stuck in a limbo state.


How do I fix error 0xc00d36b4?

Before going into the main suggested solutions, it is recommended to give these straightforward workarounds a try:

  • Check the File Format: The 0xc00d36b4 error is often due to unsupported file formats. While Windows Media Player and Movies & TV support many popular file types, they may not support all formats. To determine if the error is caused by an unsupported file, check the list of supported file types for Windows built-in players.
  • Convert the file format: If the media player doesn’t support the file, you can convert it to a compatible format using an online or offline converter. There are many free converters available online that can do this.

1. Re-enable Windows Media Player

 Press the Windows key, type windows features in the search bar, and select Turn Windows features on or off.


 On the Windows Features window, scroll down and expand the Media Features option.


 Then, uncheck the Windows Media Player option.


Click Yes to confirm.


Then, click OK to save the changes.click OK


  1. After disabling the feature, reboot your PC to complete the changes.
  2. Upon reboot, follow the same instructions and check the Windows Media Player option.


  1. Then, click OK and restart your computer to re-enable the Windows Media Player.

2. Change the default Audio format

Press Windows + R, type mmsys.cpl in the Run command, and click OK.
 

In the Sound control panel, go to the Playback tab, select the active sound device, and click Properties


  1. In the Sound Properties window, go to the Advanced tab and change the value under Default Format.
  2. Then, click Apply.


 Click Yes in the confirmation box.


  1. Try playing the media file once more using the same media player and see if the 0xc00d36b4 error is fixed.

3. Run Windows Troubleshooter

Press Windows + I to Windows Settings, go to System and select Troubleshoot.


Under Troubleshoot options, select Other troubleshooters.


Then, click the Run button next to Windows Media Player.


Follow the on-screen instructions to troubleshoot the player. 

If that doesn’t work, you could try running the Audio and Video Playback troubleshooters.

4. Update audio and display drivers

Open the Start menu, type device manager, and select Device Manager.

From the list of drivers, expand Display adaptors, right-click the driver, and select Update driver.


  1. Then, follow the on-screen instructions to update the driver.
  2. After that, expand the Sound, video and game controllers, right-click the audio device, and select Update driver.


5. Play the media file in a different media player

If none of the above methods had been able to fix the 0xc00d36b4 error, you can consider using a third-party media player. Several third-party media players can handle a wide range of media formats, such as VLC Media Player, KM Player, and so on.

If Nero Codecs are installed on your computer, they may interfere with the built-in Windows player. In such cases, completely uninstalling Nero Codecs may help resolve the issue.

In case you can’t find one, do check our curated list of the best media players for Windows.

If you have more questions or suggestions, leave them in the comments section below.


 Facebook

21thsoft 


How to Repair Code 19 “Windows cannot start this hardware device” Error


Part 1. Overview of Code 19 Error

Code 19 Error usually results from an error with the configuration information. This eventually leads to the failure of hardware devices from functioning along with the operating system. Changes within the registry could also affect the drivers. If you’ve recently installed or uninstalled a new operating system or performed an update, then notice the change within your PC thereafter; it may be the cause. You might also notice the error pop up multiple times when a particular hardware device is connected to your computer. This error could also be seen when your computer becomes sluggish or freezes upon the click of the mouse or a press on the keyboard.

The recommended fix of Windows for this error is to uninstall then reinstall the drivers. But there are also other existing ways to go about this problem. Keep on reading to find out how you can fix Windows Error Code 19.


Part 2. How to Fix Code 19 “Windows Cannot Start This Hardware Device Error?

Have a look below at 6 methods that can help you fix the code 19 error.


Method 1. Reboot Your System

Rebooting your system can solve a lot of issues that you usually face on your PC. So, if you are coming across Code 19 error on your PC, then you must try to resolve it by rebooting your system. Though Rebooting is a straightforward process, but still, we have listed below the steps that will help you with “How to Reboot Your System”!

To reboot your system, you need to:

Step 1. Go to the Start button on your desktop, which is represented by a Windows icon.

Step 2. Now, click on the Power button, and here you will see a list of options.

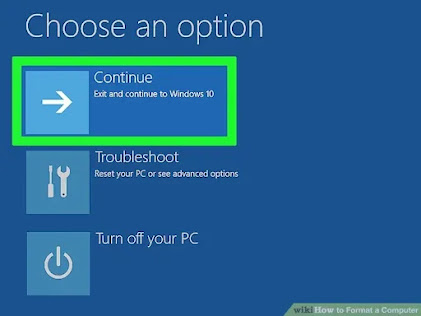
Step 3. From the pop-up list, click on the Restart option and wait until your PC turns on again.


When your PC turns on, check whether you are still facing the same issue or not. If the problem is fixed, then your PC is good to go, but if the issue still persists, try resolving it with the next method.

Method 2. Use System Restore

System Restore is a built-in feature created by Windows. This unique tool allows users to backup their system at a certain point in time. This way, if ever something goes wrong, they can always go back to a previous state of the system at a certain point in time. This is essential when doing troubleshooting on your computer. If ever something goes wrong, you can revert your system to an earlier version.

Step 1. Launch Run by typing it in the Search bar or pressing Windows + R on your keyboard. In the Run box, type in regedit and press OK. This will launch the Registry Editor.

Step 2. Find and click on Computer in the Registry Editor.

Step 3. At the top portion of the window, click File on the toolbar. Then, select Import. Choose the location where you stored a previous backup.

Step 4. Click on the Open button. This will restore the system to its original state at a certain point in time.

Method 3. Use Registry Editor

Step 1. Press Windows + R on your keyboard. This will launch Run. Type in regedit in the Run box and press OK. This will open Registry Editor.


Step 2. Now, the Registry Editor window will open.

Look for the HKEY_LOCAL_MACHINE folder. Under that folder, find System. Then, click on the CurrentControlSet folder. Now, go to the Control folder. Expand the folder and select Class. Then, click on {4d36e965-e325-11ce-bfc1-08002be10318}


Step 3. Locate the files named UpperFilters, LowerFilters. Make a right-click on the icons and click Delete in the drop-down menu.

Step 4. Exit Registry Editor and perform a reboot of your computer.

Method 4. Uninstall Faulty Drivers

Uninstalling and reinstalling faulty drivers could be the solution to your problem. Follow the instructions below to perform this:

Step 1. Press Windows + R on your keyboard to launch Run. Or simply type it in the search bar or look for it in the Start menu.

Step 2. The run box will now launch. Type in devmgmt.msc and click OK to open Device Manager.


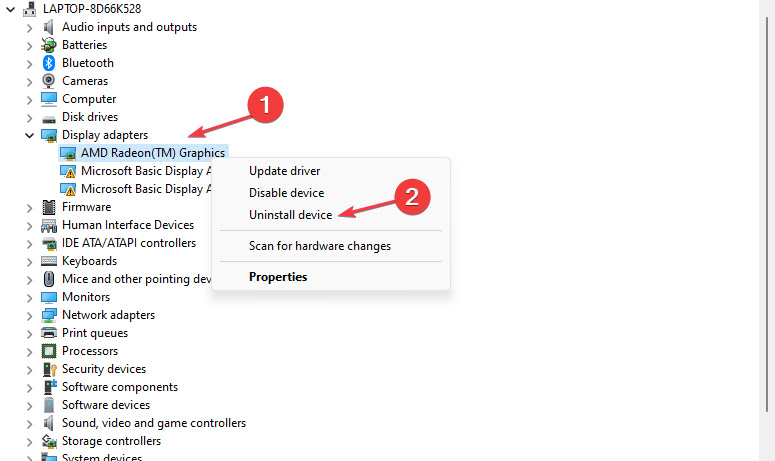
Step 3. Look for the files with a warning sign on the icon (yellow exclamation point). Right-click on the files and click on Uninstall in the drop-down menu.


Step 4. Confirm the uninstallation by clicking Yes.

Step 5. Do the same steps to uninstall the other files with the warning signs.

Step 6. On the toolbar of Device Manager, click on Action. Then, select Scan for hardware changes. This will reinstall the device drivers upon the next startup.

Step 7. Reboot your computer.

Method 5. Check if iTunes Is Causing the Issue

iTunes is one of the most popular utilities from Apple that can be used to listen to songs and audios. Though it is an Apple application, you can even download it on your Windows PC. Despite being a great software, iTunes has been known to cause pretty a mess in the registry. So, if you have iTunes software downloaded on your PC, then this might cause the Code 19 error, and you need to fix it. For this, you must follow a series of steps that involve:

Step 1. Go to Search Box and enter Control Panel to open it.

Step 2. To the top-right corner of your screen, switch to Large Icons view and click on Programs and Features.

Step 3. Under Programs and Features, find iTunes and tap on the Repair button from the top toolbar. Now, follow the wizard until the end and finally Reboot your device.

By the end of Step 3, your issue of Code 19 will be solved if iTunes software was the real reason behind it! But if the iTunes software is not the reason, you can try resolving the error by switching to the next method.

Method 6. Run a Hardware & Device Troubleshooter

Sometimes, the Code 19 error may occur due to a hardware issue in your PC. So, in order to fix it, you must run the Hardware & Device Troubleshooter. It is basically a built-in troubleshooting utility of Windows that helps you resolve any issue with the hardware or external drives of the computer. For running a Hardware & Device Troubleshooter, you need to:

Step 1. Press Windows + I key. This will open up the Settings app on your screen.

Step 2. Now, navigate to Update & Security and then move to Troubleshoot.

Step 3. On the right panel, find the Hardware and Devices option and tap on Run the Troubleshooter, as shown below.


Conclusion:

As always, create a system restore point or backup for your device before proceeding with any troubleshooting methods. This will avoid the unnecessary stress of any errors you might create when you attempt to fix the issue.

Your computer contains a lot of drivers to run your hardware devices. Sometimes, they become corrupt or go missing. This is usually from a system crash or a recent update or upgrade of your PC’s operating system. This may seem frustrating because it will disable you from taking control of your external device. Any of the methods above should help you fix this issue.


Facebook 

21thsoft