Wednesday, March 8, 2023

How to Change the Administrator in Windows 11


What to Know
Settings > Accounts > Family or Other users, > Change account type, select Administrator, and click OK.
Control Panel > Change account type > Change the account type > Administrator > Change Account Type.

This article explains how to change the administrator account on Windows 11, including how to disable and rename the default local administrator account.

How to Change the Administrator Account in Windows 11

There are a number of ways to change the administrator account on Windows 11, including through the Settings app and the Control Panel. Windows 11 can have more than one administrator account, so you turn a new account into an administrator without changing the current administrator account into a regular user account.


If you only want one administrator account, then you need to add administrator privileges to a regular user account into an administrator account and then change the current administrator account into a regular user account.


Alternatively, you can also change the administrator name on Windows 11. When you do that, the administrator account will have a new name, but other things like the administrator account’s personal files and desktop won’t change.

How to Change the Administrator Account in Windows 11 in Settings

Most of the important settings in Windows 11 are accessible through the Settings app, which provides a more modern interface than the Control Panel. While it is possible to change the administrator account in either Settings or Control Panel, many users will find the Settings app a little easier to navigate.


Here’s how to change the Windows 11 administrator account in Settings:


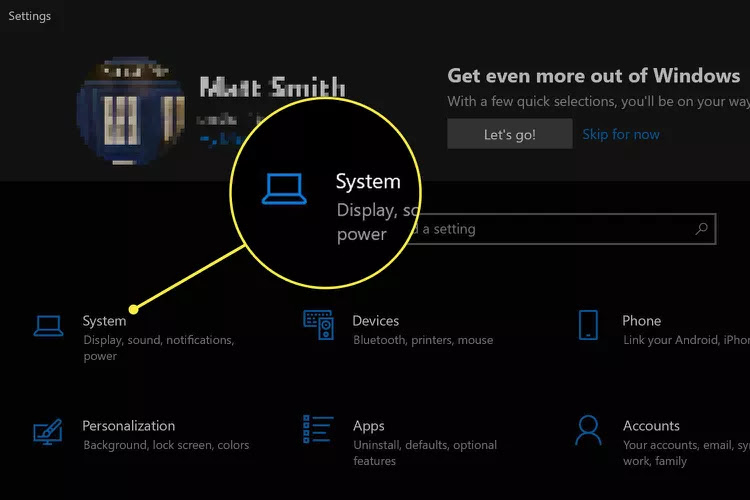
Right click Start and select Settings.


ou can also open Settings with the keyboard shortcut Win + I.


Click Accounts.


Click Family or Other users.


If you don't see the account you're looking for in one, check the other. The Family section includes users that are connected to your Microsoft family group, while the Other users section includes local accounts and other accounts that aren’t part of your family group.

Click the user you want to change.


Click Change account type.


Click the Account type dropdown box and select Administrator.


Click OK.


You can also switch an administrator account to a standard user account using this method if you select Standard user instead of Administrator on step five.
How to Change the Windows 11 Administrator Account in the Control Panel

Although Windows 11 has centralized most settings and options in the Settings app, the Control Panel also allows you to change the administrator account on Windows 11. If you’re having trouble with the Settings app, or you just prefer the Control Panel, this is a useful option to have.


Here’s how to change the administrator account on Windows 11 in Control Panel:


Click the magnifying glass on the taskbar, type control panel, and click Control Panel.


Click Change account type.


Click the account that you want to change.


Click Change the account type.


Select Administrator.


Click Change Account Type.


You can also change an administrator account to a user account using this method, just follow these instructions but select Standard instead of Administrator on step four.
How to Disable the Default Administrator Account in Windows 11

In addition to local and Microsoft accounts that can be turned into administrator accounts, Windows 11 also has a default administrator account named Administrator.


If you’ve changed your user account into an administrator, and you only want one administrator account on your computer, you can disable the default Administrator account. It will still exist, but it won’t show up as an option when logging into Windows.


You can still log into the Windows 11 recovery console even if you have disabled the default administrator account, so disabling this account won’t lock you out if you have a problem in the future.

Right click Start and select Computer Management.


Click System Tools > Local Users and Groups.


Click Users.


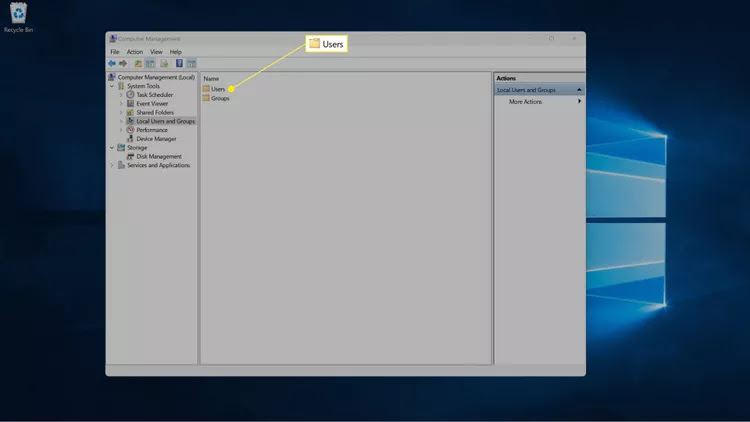
Right click Administrator, and select Properties.


Click the account is disabled box.


Click OK to save your changes.


How to Change the Administrator Name in Windows 11

If you want to keep the default administrator account but don’t want it to be named Administrator, you can change it to whatever you want.


To change the name of any other administrator account, use the standard process for changing a Windows local or Microsoft account.

Here’s how to change the name of the default Administrator account on Windows 11:


Right click Start on the taskbar and select Computer Management.


Click System Tools > Local Users and Groups.


Click Users.


Right click Administrator, and select Rename.


Type a new name.


Press Enter, and the new name will appear.


FAQ


How do I log in as administrator in Windows 10?


When logging in, select the administrator account's password pox on the sign-in screen, enter the password, and sign in. As long as your account has administrator access, you just log in as normal. If you don't have administrator privileges, change your account settings and allow them or ask an administrator to give you access.
How do I change the administrator password in Windows 10?


If you know the admin password but want to use something different, select Start > Settings > Accounts > Sign-in options > Change, then follow the prompts to enter a new password. If you can't remember the password, select I forgot my password on the sign-in screen and follow the directions given.


Facebook

21thsoft 

How to Turn Off Tablet Mode in Windows 10


What to Know
Swipe left on touchscreen to open the Windows 10 Action Center and tap the Tablet mode tile to turn the mode off.
To turn it off permanently: First, go to Start > Settings > System > Tablet. And then...
When I sign in to Never Use Tablet Mode & When I use this device as a tablet to Don't switch to tablet mode.

This article explains how to turn off tablet mode in Windows 10.

How to Turn Off Tablet Mode in Windows 10

Follow the steps below to turn off tablet mode in Windows 10.


Swipe left from the right side of the display to open the Windows 10 Action Center.

You can also open the Action Center by tapping the notification icon in the far lower right corner of the task bar.

The Windows + A keyboard shortcut will also open Action Center.


If you need a little more help, here's our primer on the Windows 10 Action Center.


A set of tiles can be found at the bottom of the Action Center. If the Expand text is found above them, tap it. If not, move to the next step.

The tiles are collapsed by default, which means the Tablet mode tile is not visible. Tapping Expand will make it visible.


Tap the Tablet mode tile to turn it off.

One tile in the Action Center will be labeled Tablet mode. It should be shaded in your Windows 10 theme color, which indicates it is on.


Tablet mode will turn off instantly. Once off, the Tablet mode tile in the Action Center will appear grey. Tap it again to turn Tablet mode back on.

How Can I Permanently Turn Off Tablet Mode?

The instructions above will quickly turn off Tablet mode, but your device may automatically turn the mode back on as you use it. For example, removing the keyboard on a Windows 2-in-1 with a detachable keyboard will usually turn on Tablet mode.


Follow these steps to turn off automatic Tablet mode.


Tap Windows Start to open the Start menu.


Open Settings. It will appear as a gear icon.


Tap System


Click Tablet


Open the When I sign in drop-down menu and change the setting to Never use tablet mode.


Open the When I use this device as a tablet drop-down menu and change the setting to Don't switch to tablet mode.


Your changes are saved automatically, so exit the settings menu when you are finished.


This will disable automatic Tablet mode, but you can still turn it on manually in the Windows Action Center.

What If Tablet Mode Won't Turn Off?

Tablet mode should turn off when you tap the tile in the Windows 10 Action Center. If it does not, or it turns back on automatically, first follow the steps to permanently turn off Tablet mode (listed above).


Should the problem persist, restart your Windows device or, if that fails, reset Windows.


The problem can also be caused by a hardware fault, in which case your device will need to be repaired by the manufacturer or a third-party repair shop.


Facebook

21thsoft

How to Fix It When Your Computer Is Making a Buzzing Noise


Many different reasons could cause a buzzing sound coming from your computer.
A loose component in the case
Fan-related issue
Failing hard drive
Power Supply


Usually, it'll be something innocuous and easy to fix, but there's always the possibility it could be a sign of something more serious going on.

Why Is My Computer Buzzing?

It very much depends on what kind of "buzzing" sound your computer is producing. Does it sound like an electrical buzz? Does it sound more like a vibration? Are the fans spinning up faster and louder than usual? Does the buzzing sound have a physical grinding sound to it?


These are all kinds of buzzing that could suggest other causes for the sound, but more importantly, different ways to fix it.

How to Fix Your Computer When It's Buzzing

A general buzzing sound isn't an apparent symptom of a problem. Therefore, it's not a great way to diagnose an issue. However, here are some things to check and look for and some potential solutions to those problems.


Rattling, vibration, buzzing: If you're hearing a buzzing sound that sounds like something is vibrating or rattling around inside your PC, it could be there's a loose screw or cable that's moving around or stuck in a fan.

An excellent way to test for this is to turn your PC off and tilt it forwards, backward, and side to side to see if you hear a screw or something else rattling around as it falls or moves around the case.

If it sounds like something's loose in there, all you need to do is unplug your PC's cables and open up the case. Then use a light to see if you can find the errant screw or object causing the rattling or buzzing sound. You should also check any fans you have to see if any cables or other things are obstructing them and causing them to make a noise when they spin up.


Loud fans with buzzing: If your computer's fans are running faster and louder than usual with a buzzing sound, it could be that they're clogged with dust, or the bearings are starting to go. The best way to check this is to turn off and unplug your computer, then open the side panel.

Look at the metal heatsinks on the graphics card and CPU and see if they've collected dust. It can also be good to check the intake vents at the front of the PC to see if any dust filters are clogged. If any of them are, use a can of compressed air to clean them out. You can also use a lint-free cloth to wipe down the fan blades, but be careful, as they are pretty delicate.

If the sound persists even after you've cleaned your PC in this way, it may be a specific fan's bearings are failing. The only way to fix that is to replace the fan.


Grinding, clicking, buzzing: If you hear an irregular ticking or grinding sound along with the buzzing, it could be that one or more of your hard drives (if you have them) are starting to fail. Before investigating further, be sure to back up any information to a separate drive or cloud storage option to ensure your data is safe. Then run a disk checking application to test the health of the drive. If it is starting to fail, you'll need to replace it.


High-pitched buzzing: If the buzzing you're hearing is high-pitched, it could be what's known as coil whine. It isn't necessarily a problem, even if it is annoying, as coil whine is merely an electronic phenomenon when components vibrate at the exact frequency to produce the high-pitched whine.

Unfortunately, there's not much you can do short of replacing the offending component, as most manufacturers don't offer warranties or guarantees for coil whine.


Buzzing from your power supply: Regardless of what kind of buzzing you're hearing, if you deduce it's coming from your power supply, then you should replace it with a high-quality PSU as fast as possible. Excessive coil whine, a broken fan, or other component degradation could lead to your power supply failing, which has the potential to damage the rest of your PC.


Facebook

21thsoft 


How to Change the Default Browser in Windows 11


This article explains how to change the default browser in Windows 11. The instructions are the same regardless of which browser you wish to use.

How to Change Your Default Browser in Windows 11

You can choose your default browser in Windows Settings:


In the Windows taskbar, select the Start menu and open the Settings app.


Select Apps in the left sidebar.


Select Default Apps.


Select the web browser you want to make the default.


Select Set default.


Check to make sure both the HTTP and HTTPS sections are set to your preferred default browser. If not, select them to change them manually.

All URL web links and HTML files will now open in your chosen browser. If you want, you can change the default browser for opening PDFs and other files. Select a file type to choose a browser.


When you select a web link in Windows Search or Windows News, it will always open in Microsoft Edge, even if you changed your default browser.

Why Change Your Default Browser?

Microsoft Edge is the default browser for Windows 11. You can download and use any browser you like, but any time you open a link in a document, it will automatically open in Edge. Certain files like PDFs will also open in Edge by default. If you regularly use a different browser, consider changing the default in Windows Settings to keep things consistent.


Facebook

21thsoft 

How to Remove Chat From Windows 11


What to Know
Right-click on the taskbar and choose Taskbar Settings. Toggle Chat to off.
To remove the taskbar chat icon, access Settings > Personalization > Taskbar > toggle Chat to off.
In the Windows search bar, type “Taskbar Settings”, press enter, and toggle Chat to off.


This article will teach you two different ways to remove the Chat icon from the taskbar in Windows 11.

How to Remove Chat From Taskbar

Windows 11 adds many new features and functions for you to take advantage of. One useful function is adding a Chat feature to the Windows 11 taskbar. By default, the chat feature allows you to access Microsoft Teams easily. But, if you don’t use Teams or just don’t want the icon on your taskbar, you can remove it.

Remove Chat Icon Directly From the Taskbar

The easiest way to remove the Chat from the Windows 11 taskbar is to right-click on the Windows taskbar and select Taskbar Settings. Next, simply toggle off the Chat option to disable it and free up space on your taskbar.


Remove Chat Icon Using Windows Settings

Follow these steps to remove the chat icon from your Windows taskbar.


Open Settings and navigate to Personalization.


Select Taskbar from the list of options.


Toggle the Chat option to off.


To turn the icon back on, simply repeat these steps and toggle Chat back to on.

Remove Chat Icon Via Windows Search Bar

In the Windows search bar, type Taskbar Settings,” press the return key switch chat to "off."

Why Did Microsoft Add a Chat Icon to My Taskbar?

The chat icon was added to the taskbar in Windows 11 to push Microsoft Teams to more users. Microsoft has been pushing to make Teams more adaptable for both businesses and individual users. The Chat icon was added to let users more easily access the Teams application. When activated, you can easily make calls and send text messages using Microsoft Teams from the Chat icon in Windows 11.


Facebook

21thsoft 


How to Reinstall Windows Defender in Windows 11


What to Know
You don't need to download Windows Defender, because it's integrated into Windows 11.
Enter this in a PowerShell window: Get-AppxPackage Microsoft.SecHealthUI -AllUsers | Reset-AppxPackage.
Or, go to Settings > Apps > Installed apps > Windows Security > three dots > Advanced options > Reset.


This article explains when and how to reinstall Windows Defender through the command line or Settings app in Windows 11.

How to Reinstall Windows Defender in Windows 11

Windows Defender (aka, Microsoft Defender) isn't installed on your computer like a typical program, so you can't reinstall it like you can regular software. Instead, follow these directions to use a PowerShell command to get the job done. It might take anywhere from 5 seconds to a few minutes to complete. If you can open Settings normally, there's an easier method after these steps.


Right-click the Start button and select Terminal (Admin).

If that doesn't work for whatever reason, use the search bar on the taskbar to search for PowerShell, and then right-click it to find the Run as administrator option.


Copy the command exactly as it's shown here, and then right-click in the PowerShell window to paste it (Ctrl+V works, too)


Get-AppxPackage Microsoft.SecHealthUI -AllUsers | Reset-AppxPackage

Press Enter to immediately start the process to reset Windows Defender to its original settings so that it performs as a freshly installed app.


You'll know when it's finished because you'll see the blinking cursor again on a new line below the command you entered. In the meantime, you might briefly see a Deployment operation progress message.


If you see lots of red text, and an "Access is denied" message, return to step 1 and make sure you're opening PowerShell as an administrator.

Another way to reset Windows Defender is through Settings. If Settings opens fine for you, you don't need to bother with a PowerShell command. Instead, go to Settings > Apps > Installed apps > Windows Security > three dots > Advanced options > Reset.


When to Reinstall Windows Defender

Technically, you're not really reinstalling the program because Windows doesn't actually let you uninstall it. That said, you might run the above command to reset Windows Defender if it's just not working correctly.


The most obvious sign you need to do this is if you see an error when you try to open it. If it's not opening as it should, and you see this message, the above command should fix it right away:


You'll need a new app to open this windowsdefender link Look for an app in the Microsoft Store


Or, maybe it does open, but some of its toggles won't turn on or off, or you can't even find a link to it on your computer. In these cases, the PowerShell command should refresh the tool back to working order.

Windows Defender Might Just Be Off

It's possible that you've considered reinstalling Windows Defender because it isn't catching malware, when in reality, it's just not turned on. You might think it's been uninstalled or is broken, but really it's just disabled.


This is completely possible since Windows 11 lets you turn off its built-in antivirus program if you'd rather not use it.


Learn how to turn Windows Defender on and off for specific directions.


Facebook

21thsoft