hi guys
this site is made in order to let you know the most important software in the net and also the software that is essential for the best functioning of an os ( operating system) so see you soon in my blog and i hope that you will like it.
Microsoft has made it a lot easier to get rid of bloatware in Windows 11. Here's how.
Unneeded built-in apps can be a nightmare for PC performance,
especially if running a low-end PC. Previously, Windows 10 users were
particularly frustrated with so many pre-installed Microsoft apps, but
luckily things have taken a turn for the better on Windows 11.
Microsoft has finally taken a step in the right direction by
drastically reducing bloatware applications on Windows 11. The few
pre-installed apps that do remain are very easy to remove. Read on as we
explain how you can safely remove bloatware applications from your
Windows 11 PC.
Uninstall Bloatware Using the Windows 11 Settings App
The most common method to remove unwanted Microsoft apps is through the redesigned Settings app.
The all-new Settings app in Windows 11 makes it very easy to uninstall
bloatware and other third-party applications. Here’s how to remove
bloatware using the Settings app on Windows 11:
Launch the Start menu and search for Settings.
Click on the Best match to open the Settings app.
Select Apps from the sidebar and then click on the Apps & features tab.
Find the app you want to remove from the App list, click on the three dots menu, and click on Uninstall.
You will then see a dialog box pop up; click on Uninstall once again to confirm your choice and remove the application permanently.
You cannot uninstall some pre-installed apps such as the Microsoft Store and Cortana through the Settings app.
Remove Pre-Installed Windows Apps Using the Start Menu
Another quick method to remove bloatware from your Windows 11 PC is
to uninstall apps from the Start menu. Here’s how you can quickly remove
pre-installed apps straight from the Start menu:
Launch the Start menu and click on All apps.
Find the app you want to remove by scrolling the app list or typing its name in the search bar.
Right-click on the app and click on Uninstall.
You will then see a pop-up box asking you to confirm app uninstallation; click on Uninstall once again, and the app will be uninstalled.
Remove Bloatware Using PowerShell
The above methods may not work for all pre-installed applications.
Some apps require a more hardcore approach to be uninstalled, so we’re
going to make use of Windows PowerShell. You cannot remove services and
apps such as OneDrive and Cortana via the methods discussed above, but
with the help of a Windows 11 debloating script, you can remove them
too.
The script developed by Sycnex
was initially intended to remove bloatware from Windows 10, but it also
works successfully on Windows 11. In our test run, we were able to use
Windows10Debloater to get rid of unnecessary packages. Still, it is not a
Microsoft-recommended method for uninstalling applications and
services, so proceed carefully and at your own risk.
To remove bloatware using the Sycnex script, we will use Windows PowerShell:
Search for Windows PowerShell in the Start menu, right-click on the Best match and click on Run as administrator.
In the PowerShell console window, type the below command and press Enter. It will download the necessary files from the repository and also create a System Restore Point. iwr -useb https://git.io/debloat|iex
Once the program launches, you will see different debloat options. If
you do not use Cortana and wish to remove it from your PC, click on Disable under the Cortana.
Similarly, you can also remove Microsoft OneDrive. To do so, click on Uninstall OneDrive, and the debloated script will remove OneDrive from your PC.
If you wish to stop tracking services running in the background, click on Disable Telemetry/Tasks.
To uninstall other applications, click on Customize Blocklist, and then only select the apps you want to be removed. Once you’ve made sure no necessary app is selected, click on Save custom Allowlist and Blocklist to custom-lists.ps1, then click on Remove Bloatware with Custom Blocklist. The debloater script will uninstall the selected apps from your PC.
We recommend restarting your PC once you’ve removed everything so that the changes can take effect.
Debloat Windows 11 for the Better
Windows 11 comes with considerably less bloatware compared to Windows
10, but there is bloatware nonetheless. Removing bloatware can free up
precious storage and reduce background memory usage considerably.
Sometimes due to a problem with configuration or due to a corrupt
Windows system file, you may not be able to access the power icon on
your Windows 10 computer.
If you receive the "There are currently no power options available"
error, there is no need to panic. The issue is fixable and, in this
tutorial, I will show you how to address it
Fixing "There Are Currently No Power Options Error" through Local Policy Editor
Windows 10 comes with a feature that allows users to prevent other people from accessing the power options while using their computers. If this feature is enabled, there is a possibility that this is why you are facing this error. To fix this, you can change a value in the Local Policy Editor. [You can access the Local Policy Editor if you have the Windows 10 Pro or Enterprise only]
Open the run box using the shortcut keys Win + R.
Type gpedit.msc in the type box and press Enter.
On the left pane of the Policy Editor, you will see various options. Click on these options in this order: User Configuration > Administrative Templates > Start Menu and Taskbar.
Once you do, you will find a bunch of options on the right pane. Locate Remove and prevent access to the Shut Down, Restart, Sleep, and Hibernate commands and double-click it.
Select Disabled.
Click Apply and then click OK.
Now, Restart your system.
Registry Editor
This method is for people using the Windows 10 Home version and does not have access to the Group Policy Editor.
Step-1: Open the Run box using the shortcut keys Win + R.
Step-2: Type regedit in the type box and press Enter.
Step-3: You will be asked, ‘Do you want to allow this app to make changes to your device?’ Click Yes.
Step-4: Enter the following path in the search bar at the top of the Editor window and press Enter:
Step-6: Once you do, an Edit String appears. In Value Data, type 0 (zero) and press OK.
Step-7: Close the Editor and restart your system.
Power Plan
Another cause of the ‘There are currently no power options available’
error could be problems with your current power plan configuration.
Resetting your power plan to the default might fix the issue.
Step-1: Go to the Start Menu and type cmd in the search bar.
Step-2: When the command prompt option shows up, select Run as administrator.
Step-3: You will be asked, ‘Do you want to allow this app to make changes to your device?’ Click Yes.
Step-4: Type the following command and press Enter:
powercfg -restoredefaultschemes
Fix No Power Options Available by Troubleshooting
Step-1: Go to the Start menu and click on the Settings cog. (Shortcut keys: Win + I)
Step-2: Select Update & Security.
Step-4: Click on Additional Troubleshooters.
Step-5: Under the heading Find and fix other problems, locate Power and click on it.
Step-6: Select Run the troubleshooter.
Wait for the troubleshooter to find and fix the issue.
Corrupt Files
Sometimes, a virus can corrupt files that can disrupt normal
functions work on your Windows 10 system. However, this can be easily
fixed.
Go to the Start menu and type cmd.
Select Run as administrator.
When asked, ‘Do you want to allow this app to make changes to your device?’ Click Yes.
Type the following command and hit Enter: sfc /scannow
Now, wait for the scan to run and fix any issues.
System Restore
This option allows you to put your system back to a previous, known good condition.
Step-1: Go to the Start menu and type Create a restore point.
Step-2: Click Open.
Step-3: In the System Protection tab, click on System Restore. [The option won't be greyed out for you if you have a backup restore available]
Step-4: System Restore Wizard starts. Click Next.
Step-5: Select the most recent restore point by clicking on it. Click Next.
Step-6: Select Finish.
Fix No Power Options Available By Resetting System
If nothing else works, then you can try resetting your system. This should be your last resort.
Open Settings using the shortcut keys Win + I.
Select Update & Security.
Select Recovery from the left pane.
Under Reset this PC, click Get Started.
Select the option that suits you. You can choose to remove your personal files or keep them.
Follow the instructions and wait for your PC to reset.
Hopefully, you will fix the "There are currently no power options available" error with one of the above options
The first — and easiest — is to just restart your computer. You can do this by holding down the power button, or by going through the Start menu.
If you've restarted your computer but it's still in Safe Mode, you should:
1. Press the Windows key + R to open the Run menu.
2. In the text box, type msconfig and press Enter.
3. At the top of the System Configuration menu, click Boot.
4. Underneath Boot options, make sure that Safe boot is unchecked. Once it is, click OK and restart your computer again.
Advanced Safe Mode Options for Troubleshooting
There are two advanced versions of Safe Mode:
Safe Mode with Networking. The networking option allows you to access the internet and other computers on your network while in safe mode.
Safe Mode with Command Prompt. The
Command Prompt option will, after login, bring you to a command prompt
window where you can conduct advanced troubleshooting.
Accessing either of these modes is accomplished by following one of the methods described above and then pressing 5 or 6 in the last step instead of 4.
Nearly every version of Windows has a Safe Mode feature.
This lets you start your computer with just the basic files and drivers
it needs to run. Most extra features will be disabled, and programs
will run more slowly. By default, you won't even have internet access.
Safe
Mode isn't meant to be used every day. You'll use Safe Mode when your
computer isn't working correctly, or when it won't start up at all. By
only loading the essentials, it'll help you narrow down what's causing
the problem, which can include the system itself or something you
installed.
Here's how to boot in Safe Mode, and exit it when you're done.
How to boot in Safe Mode in Windows 10
There are many ways to enter Safe Mode. Here are the three easiest:
Using the Power icon
If you're signed in:
1. Click the Windows icon in the bottom-left corner.
2. Hold down the Shift key, click the Power icon and then Restart.
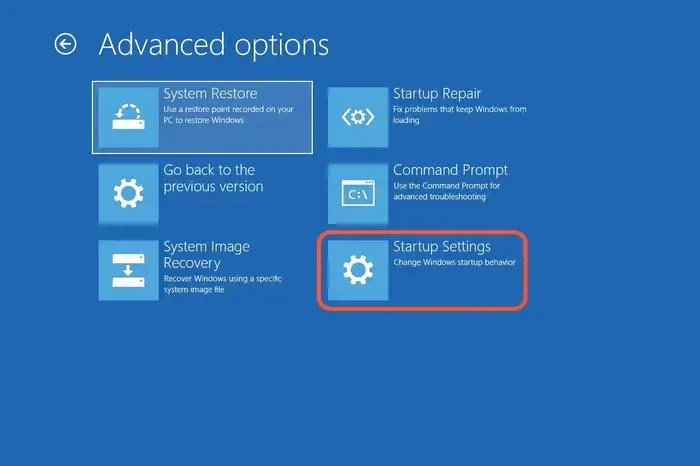
3. Your computer will restart and open to a blue screen titled Choose an option. Select Troubleshoot, and then Advanced options.
4. Click Startup Settings, and then Restart. Your computer will turn off and on again.
5. Once the screen comes back, you'll be given a few options. Press 4 to start your computer in Safe Mode, or 5 to start Safe Mode with internet access.
Using the Settings app
1. Open the Settings app by pressing the Windows key + I.
2. Click Update & Security, and then Recovery.
3. On this page, underneath Advanced startup, click Restart now.
4. Your computer will restart on the Choose an option screen. Here, click Troubleshoot, and then Advanced options.
5. Select Startup Settings and then Restart.
6. When your computer boots back up, you'll be given some startup options. Press 4 to start your computer in Safe Mode, or 5 to start Safe Mode with internet access.
Holding down the power button
This is the method to use if you can't boot into Windows normally.
1. Press your PC's power button to turn it on.
2. As
soon as you see something appear on the screen — probably the
manufacturer's logo — hold down the power button until the PC turns off
again.
3. Do this two more times, and then turn your PC on. As it's starting, the words Preparing Automatic Repair will appear at the bottom of the screen. Let your PC go through this process — it should eventually boot into the Choose an option screen.
4. On this screen, select Troubleshoot, Advanced options, and then Startup Settings. When prompted, click Restart.
5. When the computer turns back on, press 4 to start your computer in Safe Mode, or 5 to start Safe Mode with internet access.
As reported by many users, this problem is generally encountered when
you try to turn on your computer after putting it into hibernation. But
it all depends on the underlying cause.
You may also be unable to access the login screen when booting the Windows after shutting down the PC.
In this case, there isn’t much you can do except finding and executing a concrete fix that resolves the issue once and for all.
Of course, after solving this problem, you can also learn how to get Windows 11 to auto-login and escape this loop alltogether.
But before we head to that, it’s imperative that you understand the problems that lead to the error.
What causes the Windows 11 no login screen error?
Listed below are the most common issues that lead to this error:
Problems with the present version of Windows 11
Outdated drivers
Fast startup
Incompatible applications installed on the PC
Corrupt user profile
With a basic understanding of the underlying problems that cause the
no login screen error, you are in a far better position to fix it.
How do I execute the fixes listed here?
With you being locked out of the PC, it wouldn’t be possible to do much unless you boot the Windows in Safe Mode. There are a bunch of ways to get into the Safe Mode, but only a few would work here since you are unable to access anything.
The first option is to create a bootable USB drive for Windows 11
and then boot into Safe Mode via the installation media. This is a
fairly complex method and will require both effort and patience from
your end but is far safer.
f you already have a
bootable USB drive at your disposal, go ahead with the first option
since the second one involves minor risks.
The second option is rather simple but carries a certain amount of
risk in case things go wrong. Proceed with it only if the first one
isn’t feasible. Here’s how you can boot Windows 11 into Safe Mode when
locked out of the computer without an installation drive.
As soon the screen lights up, again hold the power button to force shut down the computer.
Repeat the same process thrice, and when the PC turns on the fourth time, it will enter the Automatic Repair mode.
Wait for the Startup repair to identify and fix problems with your computer. Once it’s done running, click on Advanced options.
Next, click Troubleshoot.
Select Advanced options.
Select Startup settings from the six available options.
Click on Restart.
Press either F5 or simply the number 5 key to boot Windows 11 into Safe Mode with Networking.
After the system boots into Safe Mode, go ahead and execute the fixes.
However, you would only be required to get into the Safe Mode, if the
workaround listed in the first fix doesn’t work. Try it first, and if
the situation is unchanged, you already know how to boot into Safe Mode.
How do I fix the no login screen error on Windows 11?
1. Reload the login screen
When stuck on the login screen, press Ctrl + Alt + Del
to reload the interface and access the sign-in windows. You can now
select the user profile, enter the password for it, and log in to your
system.
However, do remember that this is not a permanent fix but merely a workaround.
2. Update Windows 11
Press Windows + I to launch the Settings app.
Select Windows Update from the tabs listed on the left.
Click on Check for updates to scan for any available pending updates. If there are any, download and install them to your computer.
You would often encounter errors when running an outdated version of
Windows or if there is a bug in the present one. Both these issues can
be fixed by updating to the latest available version.
Microsoft identifies bugs in the version released by it and introduces patches for them in the subsequent updates.
If the first fix works, you would be able to access and update
Windows in normal mode. However, if it doesn’t, you will have to go with
Safe Mode with Networking for the job. And, you already know how to access it from the last section.
Enter regedit in the text field and click on OK or hit Enter to launch the Registry Editor.
Click Yes on the UAC prompt that appears.
Next, navigate to the following path or paste it in the address bar at the top and hit Enter.Computer\HKEY_LOCAL_MACHINE\SOFTWARE\Microsoft\Windows NT\CurrentVersion\Winlogon
Check if there is a DefaultUserName string present.
If you couldn’t find one, right-click on the empty space, hover the cursor over New, select StringValue from the context menu, and name it as DefaultUserName.
Double-click on the string, enter your account username under Value data, and click on OK to save the changes.
Create another string value and name it DefaultPassword.
Double-click on it, enter your account password under Value data, and click on OK to save the changes.
Check if there is a AutoAdminLogon string present. In case there isn’t one, create it as discussed earlier.
Double-click on the string and enter 1 under Value data.
Close the Registry Editor.
Expert tip:
SPONSORED
Some PC issues are hard to tackle, especially when it comes to
corrupted repositories or missing Windows files. If you are having
troubles fixing an error, your system may be partially broken. We recommend installing Restoro, a tool that will scan your machine and identify what the fault is. Click here to download and start repairing.
From now on, every time the computer is turned on, you wouldn’t be
required to enter the password, rather the sign-in would be automatic.
Also, you can always delete the three strings in case you want Windows 11 to ask for the password when signing in.
Enter Control Panel in the text field at the top and click on the relevant search result.
Click System and Security.
Select Power Options.
Click on Choose what the power buttons do on the left.
Click on Change settings that are currently unavailable.
Untick the checkbox for Turn on fast startup (recommended) and click on Save changes.
ast Startup considerably reduces the time taken by Windows to boot.
When it’s enabled, your computer doesn’t fully shut down and some
drivers and other features keep running in the background, thus reducing
the loading time for Windows.
However, it’s known to cause a few errors, and it’s recommended that
you disable it in case you encounter one. If this doesn’t fix the issue,
you can re-enable it and head to the next method.
5. Perform a Startup Repair
NOTE
Only perform the Startup Repair if you were able to bypass the error by pressing Ctrl + Alt + Del
at log in. In case you forced shut down the system thrice to access the
Safe Mode, Windows has already performed Startup Repair, and you can
head to the next fix.
Press Windows to launch the Start menu.
Click on the Power button, press and hold the Shift key, and click Restart.
Your system will now enter the Windows RE (Recovery Environment).
Click on Troubleshoot.
Select Advanced options.
Click on Startup Repair.
Choose an account to proceed.
Enter the password and click on Continue to initiate the Startup Repair.
The repair process should begin in a few moments.
Startup repair is a built-in utility that allows users to run a scan
and fix the problems preventing Windows from booting. It can be accessed
from the Windows RE.
6. Disable startup apps
Press Ctrl + Shift + Esc to launch Task Manager.
Navigate to the Startup tab.
Select each of the programs listed here one by one and click on Disable to prevent the programs from loading at startup.
If there’s a problematic application that’s leading to the Windows 11
no login screen error, disabling it from launching at startup is likely
to fix the error.
Apart from disabling it from loading alongside Windows at startup, you can also uninstall the application.
7. Perform a system restore
Whenever you encounter an error on Windows and the fixes don’t seem to work, a simple trick is to perform a system restore. In this case, your system is taken back into a time to a point when the error didn’t exist.
The restore process may remove some of the configured settings or
uninstall applications that have been installed recently, but it doesn’t
affect the files stored on the system.
You can perform a system restore both from the dedicated tool and the
Windows RE (Recovery Environment), in case the computer doesn’t start
properly.
If nothing else works, it’s highly likely that your current user
account is corrupted. In which case, you will have to create a new one.
You can use both a Microsoft or a Local Account on Windows 11. Each has its share of pros and cons, and the decision to choose one solely depends on your preference and use.
After creating a new user account, the Windows 11 no login screen error should be fixed.
How can I prevent the no login screen error from reoccurring?
You can employ certain measures that will not just prevent the no
login screen error but will also boost your computer’s performance.
You must first update the drivers on Windows 11. Outdated drivers are likely to cause a bunch of issues. We recommend using DriverFix, a dedicated tool that will scan for updates and keep the installed drivers up-to-date.
Another rule you must follow is to shut down your computer
after each session. When you shut down the computer, it gives a break
to the various components and they start fresh when you turn on the PC.
Malware disguised as applications and tools is also known to cause a bunch of errors. It’s recommended that you use a good antivirus to keep your system secure.
The above methods will, in all likelihood, fix the no login screen issue. If it persists, you can reset Windows 11 to factory settings in order to get rid of the problem.
It wouldn’t take more than half an hour to an hour to fix the issue,
assuming you have tried most of the methods listed here before the
problem is resolved.
So far, we have seen a lot of errors from the previous OS creeping its way in Windows 11. You can also read our comparison of Windows 10 and Windows 11 to understand the similarities and differences between the two.
Let us know your experience in the comments section below.