Monday, April 25, 2022

How to Change Folder Icons in Windows 11


This article explains how to change the icon for folders in Windows 11 for regular folders, special desktop icon folders (e.g., Recycle Bin and This PC), and hard drives. Windows has its own set of icons you can pick from, but you can also make custom folder icons.

How Do I Change Folder Icons in Windows 11?

There are three icon types we'll look at: Standard ones using the default yellow folder icon; special folders like This PC, Network, and Recycle Bin displayed on the desktop (if you have them enabled); and hard drive icons visible in the This PC folder.

How you edit these folder icons depends on the folder type:

Standard Folders

The icon for regular folders is changed via the folder's properties window.

Right-click the folder and select Properties.


Go into the Customize tab at the top of the window, and then choose Change Icon from the bottom.


 Scroll through the list to find an icon to use. Choose OK on a selection when you've decided.


Select OK on the Properties window to save the changes and return to the folder in File Explorer. 


The new folder icon is reflected immediately. If it isn't, use the refresh button near the file path at the top of File Explorer to force it to change.

Desktop Icons

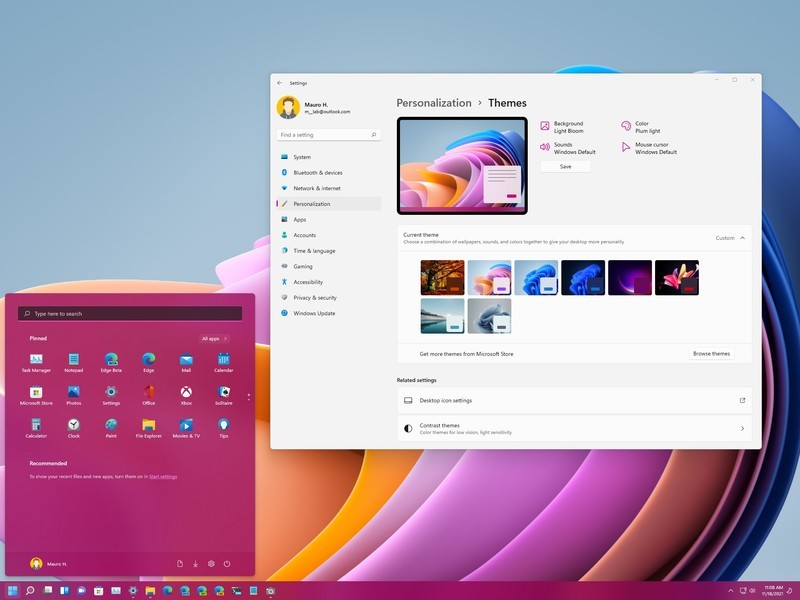
To change desktop icon folders for the Recycle Bin and other special folders, you'll go to a dedicated section in Settings.

  1. Open Settings. One quick method is the WIN+i keyboard shortcut.

  2. Select Personalization from the left-side menu and then Themes from the right.


    Choose Desktop icon settings.

    Pick one of the desktop icons and then choose Change Icon to pick a new icon.

 Select OK on the open windows to save.


Drive Icons

Another folder-like icon you can change in Windows 11 is the one used for hard drives. However, because there isn't an easy-to-access setting to do this, you have to change the Windows Registry.

Copy the path to the ICO file you want to use as the icon. Then, right-click the file and select Copy as path to capture it in the clipboard.


Open Registry Editor by searching for regedit from the taskbar.

Using the registry keys on the left side of Registry Editor, find your way here:

HKEY_LOCAL_MACHINE\SOFTWARE\Microsoft\Windows\CurrentVersion\Explorer\DriveIcons 
 
 Right-click DriveIcons from the left pane and go to New > Key.
 

  1. Name the key whatever drive letter corresponds to the drive for which you're changing the icon. For example, name it C or D if that's the drive letter.

  2. Right-click the letter key you just made and then make another key (New > Key) called DefaultIcon.

  3. With DefaultIcon open, double-click the (Default) registry value from the right pane.

  4. In the Value data text box that's now open, paste the path to the icon file you copied earlier.


     Select OK to save. The changes are reflected immediately.


Using Custom Folder Icons

There are plenty of built-in icons to choose from when changing a folder's icon, but they're the same ones found on every Windows 11 computer. To add something different to your setup and maybe even help identify your folders more quickly, you can make custom icons.

There are four things you need to do:

  • Ensure the icon is square. Downloading icons from sites made for this, like Flaticon, is ideal, but you can also crop pictures yourself.
  • It should be in the ICO format. A free tool like FileZigZag can perform this type of conversion.
  • Put the ICO file in a folder that won't be moved or deleted in the future. If Windows can't find the icon file in its original folder, the icon will automatically revert to its default form.
  • Change where Windows looks for folder icons. For example, use the Browse button in the steps above instead of picking from the selection provided.
  •  

  •  

    21thsoft  
  •  
  • Facebook

How to change Windows 11 background


On Windows 11, you can customize many settings to change the desktop's appearance and other elements to make the experience a little more personal or quickly refresh the feel to avoid the same look every day.

Although the experience is not as customizable as on Windows 10, you can still change the desktop background with a personal picture or a theme from the Microsoft Store. You can switch between the dark and light color modes or use a custom accent color across the desktop. You can organize your favorite apps in the Start menu. And you can change the alignment of the Taskbar, decide what items appear in the experience, tweak the system tray settings, and a lot more.

In this Windows 11 guide, we will walk you through the different ways to customize the appearance to make your computer experience a little more personal.


How to change background on Windows 11

On Windows 11, the quickest way to make the desktop look different is by changing the background image, configuring a slideshow, or choosing a solid background color. If you are using the virtual desktops feature, it's now possible to set a custom background for each desktop.

Change desktop wallpaper

To change the desktop background on Windows 11, use these steps:

  1. Open Settings.
  2. Click on Personalization.
  3. Click the Background page on the right side.


    1. Under the "Personalize your background" setting, select the Picture option.
    2. Click the Browse photos button.


      1. Select the background image to use on the desktop.
      2. Click the Choose picture button.
      3. (Optional) Use the Choose a fit for your desktop image setting and select the Fill option to ensure the image covers the entire screen. Other options include Fit, Stretch, Tile, Center, and Span.

      Alternatively, you can also right-click an image and select the Set as desktop background option to apply the image as the new desktop background.

      Configure desktop slideshow

      To set a slideshow on the desktop, use these steps:

    3. Open Settings.
    4. Click on Personalization.
    5. Click the Background page on the right side.


      1. Under the "Personalize your background" setting, select the Slideshow option.
      2. Click the Browse button.


        1. Select the folder with the images to show on the desktop.
        2. Click the Choose this folder button.
        3. Use the Change picture every setting and select how often to rotate images. Options include one, 10, or 30 minutes, one or 6 hours, or one day.
        4. (Optional) Turn on the Shuffle the picture order toggle switch.
        5. (Optional) Use the Choose a fit for your desktop image setting and select the Fill option to ensure the image covers the entire screen. Other options include Fit, Stretch, Tile, Center, and Span.

        Once you complete the steps, the desktop will rotate the collection of pictures in the background at the intervals you specified in the settings.

        Configure desktop solid color

        To apply a solid color on the Windows 11 desktop, use these steps:

      3. Open Settings.
      4. Click on Personalization.
      5. Click the Background page on the right side.


        1. Under the "Personalize your background" setting, select the Solid color option.
        2. Select a background color.


    1. (Optional) Under the "Custom colors" setting, click the View colors button.
    2. Create a custom color.


      1. Click the Done button.

      After you complete the steps, the desktop will show a solid color background.

      Configure background per desktop

      On Windows 11, it's also possible to set a different background for each virtual desktop to make it easier to differentiate between them.

      To set a different background per desktop (not monitor), use these steps:

    3. Open Settings.
    4. Click on Personalization.
    5. Click the Background page on the right side.


      1. Under the "Personalize your background" setting, select the Picture option.
      2. Right-click the image, select the Set for desktop submenu, and select the desktop to apply the background.


        Once you complete the steps, each virtual desktop will include a different desktop background.

        Configure background per monitor

        You can also set a different background image per monitor. However, the option won't be available while using virtual desktops.

        To set a custom background per monitor on Windows 11, use these steps:

      3. Open Settings.
      4. Click on Personalization.
      5. Click the Background page on the right side.


        1. Under the "Personalize your background" setting, select the Picture option.
        2. Right-click the image, select the Set on monitor (N) option.


          After you complete the steps, you may need to repeat the instructions to apply another image to the remaining displays.

          How to change colors on Windows 11

          Windows 11 lets you choose different colors for elements across the desktop. You can choose between the light or dark mode, or you can select a custom accent color that will appear in the Start menu, Taskbar, Notification Center and Quick Settings, title bars, borders, and apps.

          Enable light or dark color mode

          To switch between the dark or light system on Windows 11, use these steps:

        3. Open Settings.
        4. Click on Personalization.
        5. Click the Background page on the right side.


          Use the "Choose your mode" setting and select the Light or Dark color mode option.


          After you complete the steps, the desktop experience (including Taskbar, Start menu, and apps) will switch to the color mode you selected.

          Configure custom color mode

          To apply a custom system color mode, use these steps:

        6. Open Settings.
        7. Click on Personalization.
        8. Click the Background page on the right side.


          1. Use the Choose your mode setting and select the Custom color mode option.
          2. Use the Choose your default Windows mode setting to decide if Start, Taskbar, and other elements should use the light or dark color mode.


            1. Use the Choose your default app mode setting to decide whether apps should use the light or dark color mode.

            After you complete the steps, the custom color mode will apply on Windows 11, depending on your configuration.

            Enable or disable transparency effect

            Some elements like the Start menu, Taskbar, Quick Settings, Notification Center, and apps can show semi-transparency effects, and in the "Colors" page, you can decide whether or not to use these effects.

            To configure transparent effect on Windows 11, use these steps:

          3. Open Settings.
          4. Click on Personalization.
          5. Click the Colors page on the right side.


            Use the Choose your mode setting and turn on or off the Transparency effects toggle switch.


            Configure custom color accent

            To apply a custom color accent to your Windows 11 experience, use these steps:

          6. Open Settings.
          7. Click on Personalization.
          8. Click the Colors page on the right side.


             Use the "Accent color" setting and select the Manual option.


            1. Select a custom accent color.
            2. (Optional) Click the View colors button for the Custom colors setting.
            3. Create a custom color.


              1. Click the Done button.
              2. (Optional) Use the "Accent color" setting and select the Automatic option to allow the system to use a color based on the colors of the current desktop background.

              After you complete the steps, system icons, links, buttons, and many other elements will reflect the new automatic color.

              Show accent color on Start menu and Taskbar

              If you want the Start menu, Taskbar, Notification Center and Quick Settings, and other elements to use the same color scheme, instead of the system color mode, use these steps:

            4. Open Settings.
            5. Click on Personalization.
            6. Click the Colors page on the right side.


              1. Use the "Accent color" setting and select the Manual option.

                Quick tip: You can also use the Automatic option.

              2. Select a custom accent color.
              3. Use the "Choose your mode" setting and select the Dark or Custom option.


              Quick tip: If you use the custom option, make sure to use the Dark option for the "Choose your default Windows mode" option.

              Under the "Accent color" setting, turn on the Show accent color on Start and taskbar toggle switch.


              1. (Optional) Turn on the Show accent color on title bars and windows borders toggle switch to show the accent color in borders and title bars (except in File Explorer).

              Once you complete the steps, the Start menu, Taskbar, and other visual elements will now use the color accent you selected in the settings.

              Show accent color on title bars and borders

              To enable accent color for title bars and borders, use these steps:

            7. Open Settings.
            8. Click on Personalization.
            9. Click the Colors page on the right side.


              Turn on the Show accent color on title bars and windows borders toggle switch to allow the accent color to show in borders and title bars.


              After you complete the steps, the accent color will show in the application's border frames and title bars (except in File Explorer).


          21thsoft 

          Facebook 

How To stop windows 11 update


The introduction of Windows 11 saw Microsoft make several notable changes to the Windows experience that had become so familiar. However, one key area remained the same as Windows 10: its approach to updates.

By default, Windows 11 continues to download and install various updates automatically. You may not notice this is happening until you go to turn off your device, with a restart required for most updates to be applied.

However, you might prefer to have more control over which updates are installed on your PC, and when downloads take place. Whether you just need a brief break from updates or something more permanent, here are four ways to turn off automatic updates in Windows 11.

Stop Windows 11 automatic updates temporarily in Settings

This is by far the simplest method, but it’s also the most limited. If you’re getting bombarded with updates right now but don’t want to have to check manually long-term, it’s worth trying:

  1. Open Settings
  2. Select Windows Update from the left pane – it's usually at the bottom of the list
  3. Under ‘More updates’, you’ll find an option to ‘Pause updates’. Click the button marked ‘Pause for 1 week’, after which automatic updates will continue again

However, this setting completely disables updates for seven days, or until you resume them. There’s no option to continue installing them manually, unlike the other methods explained in this article.

Disable Windows 11 automatic updates via Windows Services

If you’re looking for something a little longer term, using Windows Services is worth considering:

  1. Hit the Windows Key + R to bring up the ‘Run’ window
  2. Type ‘services.msc’ in the box and hit Enter

Within ‘Services (Local), scroll through the list until you find ‘Windows Update’ and double-click it


Under the ‘General’ tab of the Properties window that opens, click the drop-down next to ‘Startup type’ and choose ‘Disabled’


  1. Click ‘Apply’, then ‘OK’ to save the changes

Automatic updates will now be disabled, but you can still install them manually via Settings. If you ever want to turn them back on, just repeat this process, choosing 'Manual’ or ‘Automatic’ instead.

Set up a metered connection to stop Windows 11 automatic updates

A metered connection is essentially any internet connection which has a limit on the amount of data you can use. As you might expect, creating a metered connection in Windows 11 means updates won’t download automatically in the background. Here’s how to set one up:

  1. Open Settings and select ‘Network & internet’ from the left pane
  2. At the top of the page, click ‘Properties’ next to the network you’re using


  1. Once that’s done, click ‘Windows Update’ from the left pane, then ‘Advanced options’
  2. Next the section named ‘Download updates over metered connections’, click the toggle to turn it on


Without setting any limit for the metered connection, your regular browsing experience shouldn't be affected. However, other background processes that rely on the internet may also be turned off.

Turn off Windows 11 automatic updates by editing the registry

The fourth and final method involves making changes to the registry. As such, it’s important to proceed with caution and follow these steps carefully:

  1. Hit the Windows Key + R to bring up the ‘Run’ window
  2. Type ‘regedit.exe’ in the box and hit Enter


  1. From the pop-up that appears, click ‘Yes’ to confirm you allow changes to be made
  2. Just above all the folders, you’ll find an address bar. Delete everything you see there and replace it with ‘HKEY_LOCAL_MACHINE\SOFTWARE\Policies\Microsoft\Windows\WindowsUpdate\AU’, before hitting Enter once more
  3. Right-click any blank space in the right half of the screen and select New > DWORD (32-bit) Value


  1. Give it the name ‘NoAutoUpdate’ and hit Enter
  2. Now, double-click this new value and set its ‘Value data’ to 1


  1. Click ‘OK’ to confirm, then restart your device to apply the changes

As you can see, there are plenty of options when it comes to disabling automatic updates in Windows 11. All are reversible, meaning you can easily turn them back on if the manual update process is wearing thin.


21thsoft

Facebook