Wednesday, August 31, 2022

How to Use ActiveX Filtering in Internet Explorer 11


Even though Microsoft Edge is the default browser for Windows 10, Internet Explorer 11 is still available with the OS. If you experience issues with websites that contain ActiveX, use IE 11 to troubleshoot ActiveX problems. Here's how to use ActiveX Filtering in Internet Explorer.

Microsoft no longer supports Internet Explorer and recommends that you update to the newer Edge browser. Head to their site to download the newest version.

IE11 Safety Menu

ActiveX technology aims to simplify the playback of multimedia, including animations and other file types. Because of security concerns, ActiveX Filtering is available in Internet Explorer to prevent the installation and use of these ActiveX apps. Use ActiveX Filtering to run ActiveX on only the sites you trust.

How to Use ActiveX Filtering

To use ActiveX Filtering, open Internet Explorer 11 and apply the following settings:

These instructions apply to Internet Explorer 11 on Windows 10, Windows 8, and Windows 7.

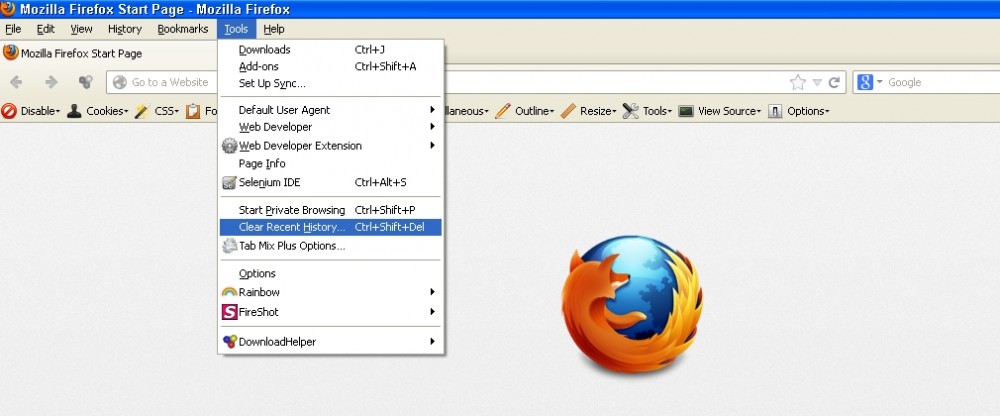
Select Tools (the gear icon, located in the upper-right corner of the browser window). 


Select Safety in the drop-down menu. 

When the submenu appears, locate ActiveX Filtering. If there's a check mark next to the name, ActiveX Filtering is enabled. If not, select ActiveX Filtering to enable it. 


Turn off ActiveX Filtering for Individual Sites

You can enable ActiveX Filtering in Internet Explorer and then disable it for specific websites.

  1. Open the site.

  2. Select the Blocked button on the address bar.

    If the Blocked button doesn't appear in the address bar, no ActiveX content is available on that page.


    Select Turn off ActiveX Filtering


    Turn off ActiveX Filtering for All Sites

    You can disable ActiveX Filtering in Internet Explorer at any time.

    Open Internet Explorer and select Tools, the gear icon located in the upper-right corner of the window. 


     Select Safety in the drop-down menu. 


    Select ActiveX Filtering to remove the check mark and disable ActiveX Filtering. 


    Adjust ActiveX Settings in Internet Explorer

    Internet Explorer provides advanced settings that let you customize ActiveX controls.

    Changing some advanced security could make your computer vulnerable to security threats. Only change advanced ActiveX settings if you are confident about increasing these risks.

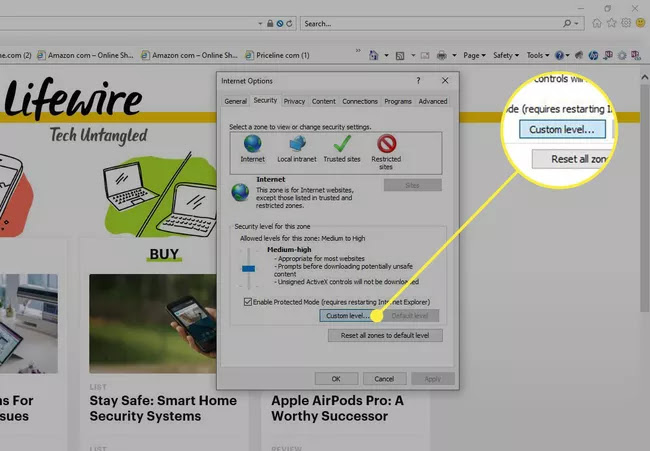
    Select Tools, the gear icon located in the upper-right corner of the browser window. 


    Select Internet Options


    Select Security


    Select Custom level


    Under ActiveX controls and plug-ins, select Enable (or if available, select Prompt if you want to be notified each time.) to choose one of the following:

    • Automatic prompting for ActiveX controls.
    • Display video and animation on a web page that doesn't use an external media player.
    • Download signed ActiveX controls.
    • Run ActiveX controls and plug-ins.
    • Script ActiveX controls marked safe for scripting.                                                                                                                                                                                                                                


     Select OK to apply the changes and then select OK again to close Internet Options


    21thsoft

    Facebook 

How to Clear the Cache in Firefox


What to Know

  • On desktop, use the Ctrl+Shift+Del (Windows) or Command+Shift+Delete (Mac) keyboard shortcut or head to Options and then Privacy & Security in the menu.
  • On mobile, head to Clear private data (Android) or Data Management (iOS).
  • Once there, select Cache only and then tap or click OK.

Instructions in this article apply to Firefox version 79 but should work similarly in other versions. Update to the latest version of Firefox to follow along.

How to Clear the Firefox Browser Cache

Follow the simple steps below to clear the cache from the Firefox browser. It's an easy process that takes less than a minute to complete.

Clearing the cache in Firefox is safe and shouldn't remove any data from your computer. To clear the Firefox cache on a phone or tablet, check out the next section.

Open Firefox and select the three-lined menu button in the upper-right corner of the program, then choose Options.

In Firefox for Mac, open the Firefox menu, then choose Preferences.

Or, on a Windows or Mac computer, enter about:preferences in a new tab or window.​ 


If Options isn't listed in the menu, select Customize and drag Options from the list of Additional Tools and Features over to the Menu.

Select the Privacy & Security or Privacy tab on the left. 


In the History section, choose Clear History


If you don't see that link, change the Firefox will option to Remember history. Change it back to your custom setting when you're done.

Select the Time range to clear drop-down arrow and choose Everything, or choose a different option that's relevant to how much of the cache you want to delete. 


In the History section, clear the checkboxes for everything except Cache.

If you want to clear other stored data, like the browsing history, select the appropriate check boxes. These are cleared with the cache in the next step.​ 


Don't see anything to check? Select the arrow next to Details.

Select OK or Clear Now to delete everything you checked in the previous step. 


Wait for the window to disappear, which signifies that the saved files (the cache) are cleared and that you can use Firefox.

If the internet cache is large, Firefox may hang while it finishes removing the files. Be patient—it eventually finishes the job.

Clear the Cache From the Firefox Mobile App

Clearing the cache in the Firefox mobile app is similar to the desktop version. The option to delete the Firefox cache is in the settings, and you can choose what type of data to erase in addition to the cache, like browsing history and cookies.

On Android, tap the three-dot menu button at the upper-right corner of the Firefox app, then tap Settings. On iOS, tap the three-lined hamburger menu in the lower-right corner, then tap Settings


  1. Select Clear private data on Android, or Data Management on iOS.

  2. Select Cache and any other items you want to clear.

  3. Choose Clear Data on Android. For iOS, select Clear Private Data, and then OK


    What Is the Firefox Cache?

    The Firefox cache contains locally saved copies of web pages you visited recently. This way, the next time you visit a page, Firefox loads it from the saved copy, which is faster than loading it again from the internet.

    Clearing the cache in Firefox doesn't need to be done every day, but it can solve or prevent certain problems. If the cache doesn't update when Firefox sees a change on the website or the cached files are corrupted, it can cause web pages to look and act strangely.

    Tips for Clearing the Cache in Firefox

    You can save time and clear the cache as specifically as you want with some advanced methods and shortcuts.

  4. Some older versions of Firefox have similar processes for clearing the cache, but you should keep Firefox updated to the latest version.
  5. Use the Ctrl+Shift+Delete combination on the keyboard to immediately go to Step 5 above.
  6. If you don't want to delete all the cache stored by Firefox, choose a different time range at Step 5. Choose either Last Hour, Last Two Hours, Last Four Hours, or Today. In each instance, Firefox clears the cache if the data was created within that time frame.
  7. Malware can sometimes make it difficult to remove the cache in Firefox. You might find that even after you instruct Firefox to delete the cached files, they still remain. Scan your computer for malicious files and then start over from Step 1.
  8. To view cache information in Firefox, enter about:cache in the address bar.
  9. Press and hold the Shift key while refreshing a page in Firefox (and most other web browsers) to request the most current live page and bypass the cached version. This can be accomplished without clearing out the cache as described above.


 21thsoft

Facebook 


How to Enable Java in Chrome


What to Know

  • Newer Chrome versions don't support Java, so you'll need a plug-in.
  • Enable Java by installing the IE Tab Chrome extension and following the on-screen instructions.
  • Or, install the CheerpJ Applet Runner Chrome extension to run Java applets from within Chrome.

This article explains how to enable Java in Chrome version 42 or later now that Chrome no longer supports web pages with embedded Java applets. Solutions include using the IE Tab Chrome extension or the CheerpJ Chrome extension.

How to Use the IE Tab Chrome Extension

One way to enable Java in a newer Chrome browser is to install the IE Tab Chrome extension.

The IE Tab extension opens the page using the Internet Explorer engine inside of the Chrome browser. Since IE still supports Java, the page will also successfully load the Java applet.

Microsoft no longer supports Internet Explorer and recommends that you update to the newer Edge browser. Head to their site to download the newest version.

Install the IE Tab Chrome extension from the Chrome web store. 


Restart the Chrome browser and visit the Java version test website. You'll likely see the failure status page. Select the IE Tab icon in your browser menu to re-open the tab using the new extension.

Now you'll see the Java version successfully displayed. 


When you visit the test page, you may need to select the link to upgrade your version of Java if you don't have the latest installed. If you need to upgrade, make restart the Chrome browser before opening the test page again.

How to Use the CheerpJ Applet Runner Chrome Extension

The CheerpJ extension for Chrome lets you run Java applets inside of the Chrome browser, without even having to install Java on your system at all.

This Java applet Chrome extension is especially convenient because you don't have to reload the web page in a new tab. You simply enable loading Java applets and all applets on the page will run as normal.

This extension requires Javascript be enabled in Chrome. To do so, go to Settings > Advanced > Privacy and security > Site Settings > Javascript, then make sure Allowed is enabled.

  1. Install the CheerpJ Applet Runner Chrome extension. Once installed, the extension appears as a shield icon in the Chrome toolbar.

  2. When you visit a page with a Java applet, select the CheerpJ icon, then select Run Applets to enable the Java applets on the page. 


     Once enabled, you'll see all of the applets run inside your Chrome browser as they normally should. 


    21thsoft

    Facebook 

How to Change Home Page and Startup Behavior in Windows


What to Know

  • Chrome: In the three-dot menu, select Settings. Enable Show home button. Choose Enter custom web address and enter a URL.
  • IE 11: Select the Settings gear and choose Internet options. Enter a URL in the Home page section. Select Start with home page.
  • Edge: Go to three-dot menu > Settings > On startup > Open a Specific page or pages > Add a new page. Enter URL and select Add.

This article explains how to change the home page and startup behavior in Windows 10, Windows 8, and Windows 7 using Google Chrome, Firefox, Opera, Edge, and Internet Explorer 11.

How to Change the Google Chrome Home Page

Most web browsers for Windows provide the option to designate any website as your home page. In Google Chrome, you can choose one or multiple pages to launch at startup:

Select the three dots in the upper-right corner of Chrome and choose Settings from the drop-down menu. 


 Scroll down to the Appearance section and select the Show home button toggle to enable it (if it's not already enabled).

Select Enter custom web address and enter the URL for your desired home page.


Alternatively, scroll down to the On startup section and select Open a specific page or set of pages to designate which pages you want to open when you open Chrome.

Select Continue where you left off to restore the previous browsing session, loading all tabs and windows that were open the last time you used Chrome.


How to Change the IE 11 Startup Page

The final version of Internet Explorer allows you to set a custom home page.

Microsoft no longer supports Internet Explorer and recommends that you update to the newer Edge browser. Head to their site to download the newest version.

Select the Settings gear in the upper-right corner of IE 11 and choose Internet options from the drop-down menu. 


Go to the General tab and, in the Home Page section, enter the URL that you wish to set as your home page.

To open multiple pages in separate tabs, enter each URL on a separate line.


In the Startup section, select Start with home page


How to Change the Home Page for Microsoft Edge

The default browser for Windows 10, Microsoft Edge, makes it easy to control what page or pages load at startup.

Select the three dots in the upper-right corner of Edge. 


 Choose Settings from the drop-down menu. 


In the Settings pane, select On startup


 Select Open a specific page or pages, then select Add a new page


Enter the URL for your desired home page, then select Add.

Select New tab page under Settings to control what page Edge displays when a new tab is opened.


How to Change the Firefox Startup Page

Mozilla Firefox's startup behavior is controlled through the browser preferences.

Select the hamburger menu in the upper-right corner of Firefox and choose Options from the drop-down menu.

You can also enter about:preferences in the address bar to access the Firefox settings.


Go to the left pane and select Home


Select the Homepage and new windows drop-down menu and choose Custom URLs.

Scroll down to the Firefox Home Content section to customize the default Firefox home page.


 Type the URL for your desired home page. Changes are saved automatically, so you can close the Firefox settings.


How to Set the Home Page for the Opera Browser

Opera offers you the choice to display its Speed Dial interface or a page of your choosing each time the application starts up.

  1. Select the O in the upper-left corner of the browser and then choose Settings from the drop-down menu.

    You can also get to the Opera settings by using the keyboard shortcut Alt+P.

  2. Go to the left pane and select Basic


    Scroll down to the On startup section and select Open a specific page or set of pages


    Select Add a new page


     Enter the desired URL, then select Add


21thsoft

Facebook