Wednesday, September 14, 2022

How to Fix It When Wi-Fi Keeps Disconnecting on Windows 10


A Windows 10 laptop or computer that keeps disconnecting from a Wi-Fi internet connection can be frustrating and inconvenient. This article will walk you through what could be causing the Wi-Fi disconnected errors and how to fix any Windows 10 or internet issues that you uncover.

There are some other tips you may want to try first if you’re having trouble making the initial connection to a Wi-Fi network.

Why Does My Wi-Fi Keep Disconnecting?

If your Windows 10 computer keeps disconnecting from Wi-Fi connections at home, in the office, or elsewhere, such as a café or airport, many potential causes could be at play. However, they usually fall under one of the following categories:

  • A weak or limited Wi-Fi connection
  • An overwhelmed router or tethered smartphone
  • A combination of Windows 10 conflicts or incorrect settings

How to Fix Windows 10 Wi-Fi Disconnected Problems

Here’s what to do when your Windows 10 Wi-Fi keeps disconnecting again and again. Make sure to work through this list of solutions in order: Starting with the fastest and easiest tips to more advanced and time-consuming fixes.

  1. Turn your Wi-Fi off and on again. If your Windows 10 computer keeps disconnecting from Wi-Fi, turn it off via the Action Center, waiting a minute, and then turn it back on again. Doing this will make a new connection to the Wi-Fi hotspot.

  2. Move closer to the Wi-Fi source. The further you are away from the Wi-Fi broadcast, the weaker and less stable your internet connection will be. Try to move as close as possible to it and aim to get as strong a signal as possible by checking the internet icon in the Windows 10 taskbar.

  3. Restart your Windows 10 computer. A classic tech tip but an effective one. Performing a basic restart can fix a variety of issues.

  4. Disable Bluetooth. Sometimes a connection to a Bluetooth device can cause conflicts which can make a Wi-Fi connection disconnect.

  5. Check the website or service. Your Wi-Fi connection and Windows 10 device may be fine, and it could just be the service you’re trying to access that’s down. Thankfully, there are many ways to check if Paramount+ is down, Amazon is offline, Twitch is glitching, and many other services are down. Even YouTube TV can go down from time to time.

  6. Cancel any active downloads on your Windows 10 device. Many public Wi-Fi connections, and those in cafes and other small businesses, often place significant restrictions on how much and how fast you can download content. If you’re using such a connection, try sticking to basic web browsing and app usage.

  7. Try a different Wi-Fi connection. Many public wireless internet options, such as the Wi-Fi offered by McDonald's and Starbucks, can be poor quality with slow speed, download restrictions, and an inability to cope with a high number of users connecting at the same time. Search for a nearby alternative signal or move to a location with better internet access if it comes to it.

  8. Cancel any downloads on your smartphone. If your computer keeps disconnecting from Wi-Fi while it’s tethered to your smartphone, it may be that your phone is overwhelmed by too much activity. Stop any updates or downloads that you may have going on your phone, and try not to use it while accessing the internet on your computer.

  9. Check your router. Recurring Windows 10 Wi-Fi disconnected errors may not have anything to do with your computer. Inspect your internet router to make sure that it’s working correctly and that all of its LED lights are showing a strong connection.

  10. Reboot your router. A quick router reboot can often fix any Wi-Fi disconnection problems.

  11. Change your VPN location and privacy settings. Switch your VPN location to a different state or country and reducing the level of security or privacy, and see if this improves your Wi-Fi stability.

  12. Disable your VPN. Your VPN may be interrupting your Wi-Fi connection. Turn it off and see if that fixes the problem. If your disconnection issues persist, feel free to turn your VPN back on again.

  13. Update Windows 10. Downloading and installing the latest Windows 10 update can fix a variety of bugs in addition to making your device more secure when accessing the internet.

  14. Run a troubleshooter. Open Settings and click Update & Security > Troubleshoot. Run any recommended troubleshooters. Then click Additional troubleshooters and run the ones for Internet Connections, Incoming Connections, and Network Adapter.

  15. Update Windows 10 drivers. Your device drivers may be damaged or in need of an update. Try updating drivers relating to Network adapters.

  16. Change network discovery from Public to Private. Changing this setting will make your Windows 10 device more visible to other users around you, but it can also fix Wi-Fi disconnected problems.

  17. Reset your Windows 10 WLAN AutoConfig settings. Press Windows + R, type services.msc, and click OK. Once the new window pops up, double-click WLAN AutoConfig, choose Automatic from the Startup type menu, click Apply, and then click OK.

  18. Try a Windows 10 network reset. This should be your last resort, as it reinstalls every network adapter on your device. 


    Facebook 

    21thsoft 

How to Fix Slow PC Startup


You don't need to get used to system lag. Instead, learn how to fix a slow PC startup with these tips, and you'll be able to get your PC back into fighting shape in no time.

Why Does My PC Take So Long to Startup?

It could be your boot drive is getting a bit full, and not operating at peak performance. You might have too many programs trying to start alongside Windows, or your hardware could just be getting a bit old.

It's hard to know which is which until you start applying solutions, to see what sticks.

How Can I Speed Up My Computer Startup?

  1. Disable unnecessary startup programs: One of the main reasons your PC might be taking a while to startup is because of all the applications it's trying to load right off the bat. Many of these are likely unnecessary, so edit the Windows 10 startup options and disable the ones that you really don't need.

    Look out for any marked as High impact as these will have a greater impact on your PC's startup speed.

    The process is a little different on Windows 11, so follow these steps for specific help with that operating system.

    Upgraded? The Windows 11 startup options are different than in Windows 10.

  2. Do a malware scan: It's possible malware is eating up system resources when your PC starts. Make sure to scan for malware on a regular basis.

  3. Clear some space on your boot drive: If your boot, or C drive, is getting close to full, it can dramatically affect performance. Make sure to free up space on your Windows PC as it gets low.

  4. Tweak your BIOS: There are some BIOS settings you can enable to improve startup speed, like Fast Boot. You can also disable startup logos, which can inhibit startup performance a little.

  5. Reinstall Windows: If none of the above works, then you may need to revert to a Windows system restore point, or reinstall Windows altogether. Either will probably fix any startup problems you have.

  6. Upgrade SSD/memory: If you're still using a hard drive as your main boot drive, or are trying to run a modern Windows 10 or 11 PC with 8GB or less memory, then it might be time to upgrade. Changing your boot drive to an SSD, and upgrading RAM can have a dramatic effect on startup speed. 


    Facebook

    21thsoft 


How to Schedule a Text Message on an iPhone


What to Know

  • You can use the Shortcuts action to schedule text messages to be sent later and regularly.
  • Select the Automation tab > Create Personal Automations and follow the prompts to compose and schedule a message.
  • There are also third-party apps available to let you schedule your text messages in advance.

This article includes instructions and information to help you schedule a text message to send later on your iPhone, including how to use the Shortcuts app to schedule a text and information about other apps that might be available for message scheduling.

Can You Schedule an iMessage?

The short answer is no. You cannot use iMessage to schedule a text message to be sent at a later time. However, some workarounds will let you send messages at a future time. Those require using either the Shortcuts app or a third-party application designed specifically for scheduling text messages.

How Do You Schedule a Text on iPhone?

The Shortcuts app is one way to send a text message to someone automatically. It's free, but it's slightly complicated and probably not exactly what you're looking for, but here's how to do it just in case you decide this is your best option.

  1. Open the Shortcuts app on your phone.

    The Shortcuts app comes preinstalled on iPhones running iOS 13 or later. If your phone is running an earlier version of iOS, you'll need to download the Shortcuts app from the Apple App Store.

  2. Choose the Automation tab at the bottom of the page.

  3. If you've never created an automation before, you can tap Create Personal Automations.

    If you have previously created an automation, you won't see this option. Instead, tap the + in the upper right corner and then tap Create Personal Automation.

  4. Select the Time of Day option. 


    1. Adjust the time for when you would like to send the message.

    2. The tap Month and scroll down to adjust the date you want the message sent on. When you're finished, tap Next.

      Scheduling messages in iMessage this way will set up an automatically recurring message to go out on the same date at the same time each month. If you plan for this to be a one-time event, you'll need to go in and delete the automation (or turn it off) once your scheduled message has been sent.

    3. On the next screen, tap Add Action


    4. On the Actions menu, check a contact from the Send Message section and then tap Next.

    5. In the Message field, type the message you want to send, and then tap Next.

    6. Review the New Automation to be sure it contains the correct details. One thing to pay particular attention to here is the option to Ask Before Running. It is enabled by default. You can tap the toggle next to Ask Before Running to turn this off if you want the automation to run automatically without any input from you.

    7. When you're satisfied, tap Done, and that automation will be set up to run according to the settings you chose when completing the steps above.

      Remember, this method sets up an automation that will send the same text message to the same person on the same day and time every month. If this is not what you intend, you should remember to go back and delete the automation once it has run. To delete it, slide your finger from right to left on the automation and tap Delete.


      How Do You Send a Delayed Text on iPhone?

      If you're trying to send a delayed but non-recurring text message, then downloading a third-party app might be the best option for you. These apps allow you to create and schedule text messages for one-time sends or recurring sends. Some of the top-rated apps in the App Store include:

      Each of these apps will work differently, and while all of them are free to download, they include in-app purchases, so they probably aren't entirely free. However, they should work similarly by giving you the option to create and schedule messages to anyone in your contacts list or for whom you have a phone number. 


      Facebook 

      21thsoft 

How to View Blocked Profiles on Facebook


This article explains how to view the list of profiles you have blocked from your Facebook account's news feed.

How to View Your List of Blocked Profiles on Facebook

If you've already blocked people before and want to see who's on your blacklist, the following steps will help.

How to See Your Blocked List in a Browser

Click your profile image in the upper-right corner of the page and select Settings & privacy


 Select Settings


Once on the Settings page, select Blocking from the menu on the left side of the screen. 


Click Edit at the Block users menu option. 


 This will open a separate prompt where you can click See your blocked list.


 While viewing your Blocked list, click Unblock to remove someone.


How to View Your Blocked List in the App

  1. Tap the hamburger menu. In iOS, this menu is at the bottom of the screen; on an Android device, it's at the top.

  2. Select the Settings gear. 


    Scroll down to and tap the Blocking option.

    Here you will see the list of Blocked People you have on your Facebook account. You can unblock users or add new users to the block list from here. 


    How Long Until You Can Block a Recently Unblocked Account?

    So you've tried to give someone a second chance and their actions online have reminded you why you blocked them in the first place. If that's happened, you won't be able to banish them back to your blocked list for a little bit. Under Facebook guidelines, the company does not allow its users to re-block a recently unblocked account until after at least 48 hours.

    Alternate Actions to Blocking Users

    Blocking someone should be considered the social media equivalent of the "nuclear option." They'll know they've been either blocked or unfriended once they search for you in their friends list, leading to some potentially uncomfortable conversations in the real world. That being said, there are other less intrusive ways of weeding someone from your daily news feed.

    Snoozing

    If you're sure the person in question is just having a bad day or needs time to vent, you can use the snooze functionality to temporarily hide them from your sight. You can do that by tapping or clicking on the three dots at the top right of one of the users' posts and selecting Snooze (user's name) for 30 days. Once enabled, you won't see their posts for a month, but you will still show up on their news feed and on their friend list.

    Unfollow

    If you want to continue effectively snoozing someone beyond the initial 30 days, then unfollowing is what you are after. Start by clicking or tapping on the three dots at the top right of one of the users' posts. By unfollowing someone, you can hide their posts from your news feed, but you can still keep in touch. This is easily reversed.

    Unfriend

    If you're completely done with a person's antics online, you can completely remove them from your digital life. Start the unfriending process by finding the person in question and visiting their profile page. On the top right corner, under their cover photo, click the blue Friends button. Select the Unfriend option to cut ties online.


Facebook

21thsoft 

How to Ban Someone From a Facebook Page


What to Know

  • You must be an admin of the Facebook page to ban and unban.
  • On Facebook page: Click Members tab > scroll to person > click three dots next to name > Block from group.
  • From member's post: Hover cursor over person's name > click three dots to right of profile card > Block.

This article explains how to ban someone from a Facebook page.

How to Ban Someone on a Facebook Page

Facebook's group management tools make it easy to add and subtract from your group's roster of members. Whether you're on a desktop computer or mobile device, you can manage who gets to take part in your profile and who will be left out of the conversation.

How to Ban Using the Members Page

As a page admin, you have a range of moderation tools at your disposal. If suspensions and activity limitations aren't enough to alleviate the issue, it takes a few mouse clicks to remove someone from the group.

From the group page, select the Members tab to access the group's entire roster.


Once in the Members page, scroll to the individual you want to block from the page. Click the three buttons to the right of their profile listing and click Block from group


Confirm your selection to finish blocking the person.

How to Ban Someone from Their Post

In the event a person posts something so egregious that it warrants immediate action, you can block them directly from the post in question.

Scroll to the offending post in question and click the three buttons at the top right and then select Remove post and block author


A warning pop-up will confirm that you want to go through with removing that individual.

From this screen, you can delete the last seven days of their activity in the group and/or block the user's future profiles.


How to Ban Someone In the App

Scroll to the offending post and tap the three dots to the top right of the post. A menu will pop up from the bottom of the screen with a long list of options. Select Delete post and block user. Then, you will be brought back to the page with a pop-up window confirming you want to block that person from the page.

How to Unban Someone from a Facebook Group

Sometimes a person makes good and is willing to play by your group's rules. If that's the case, you can always unban and unblock them from your page.

Unbanning on the Website

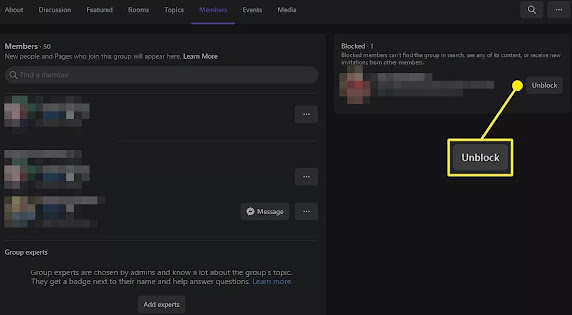
From the group page, select the Members tab to access the group's entire roster. To the right on the Members page is the list of blocked individuals. Click on the Unblock button next to the appropriate user and confirm you want to bring them back into the group. 


Unbanning via Mobile Device

While on your group's main page, tap on the Members option to see the whole roster of users. Once there, tap on the Blocked button to see all blocked individuals. Then, find the correct person you'd like to bring back into the group and tap Remove block. You will have to confirm your selection. 


Facebook

21thsoft 


How to Block Someone on Facebook Messenger


What To Know

  • Facebook.com: Messages icon > See All... > find the person > three dot icon > Block Messages > Block Messages
  • Mobile: Find the person > press and hold their name > More > Block > Done

This article explains how to block someone from abusing your Facebook Messenger inbox, making it so that you no longer receive the messages. It covers both the Facebook website and the mobile app, along with unblocking someone as well.

How to Block Messages on the Facebook Website

Select the person you want to block from the Contacts section on the right side of the screen. 


When the contact window opens, select the down arrow next to the person's name at the top.

A new menu will open. Choose Block.


 A new box will pop up asking you which type of block you want, just Messenger or all of Facebook. Pick Block Messages and Calls to block the person on Messenger alone. 


Finally, Facebook will give you one last message asking you to confirm the block. Press Block to confirm.

Another Option on the Facebook Website

You might not see all of your conversations in the Contacts box on your Facebook homepage. That's alright. You can see all of your Messenger conversations and block any problematic ones by doing the following:

From your Facebook homepage, select the Messenger icon in the upper-right of the page. 


Choose See All in Messenger


Facebook will switch over to a full-screen version of Messenger. Find the person you want to block from the list to the left.
When you hover over their name, you'll see a three horizontal dot "more" icon appear to the right of their name. Select it. 


Select Block Messages


 Facebook will ask you to confirm blocking the person. Press Block Messages to confirm. 


How to Block Messages on the Messenger App

  1. Scroll to the individual you want to block, and hold your finger on their name until a pop-up dialog appears.

  2. Select the option to Block messages, and tap Done


    What Happens When You Block Someone?

    When you block someone on Messenger, you no longer receive messages or chat requests from the blocked individual. You are also unable to contact the sender. Additionally, if the person you block is participating in a group conversation, you are notified before entering the chat. If you decide to join a chat with someone you have blocked, the person can converse with you within the context of that conversation.

    Blocking someone on Facebook Messenger does not block the person on the entire Facebook platform — only from contacting you via the Messenger platform.

    If you have decided that you want to block an individual, follow the appropriate instructions to do so from either the Facebook website or mobile app.

    While Facebook does not explicitly inform an individual that you blocked them, it may not be difficult for the individual in question to discover the truth.

    How to Unblock on the Facebook Website

    You can unblock an individual and allow them to communicate with you if you change your mind or blocked them by mistake.

    To unblock someone from sending you messages using the Facebook website:

    Select the arrow in the top right corner of the Facebook home page. 


    Choose Settings & Privacy from the menu. 


    Click Settings


    Select Blocking in the left panel. 


    In the Block Messages section, choose Unblock next to the name of the person you want to unblock. 


    Unblocking in the Messenger Mobile App

    You can also unblock someone you previously blocked from sending you messages on your mobile device using the Messenger app.

  3. Tap your Messenger profile photo in the upper left corner.

  4. Select Privacy.

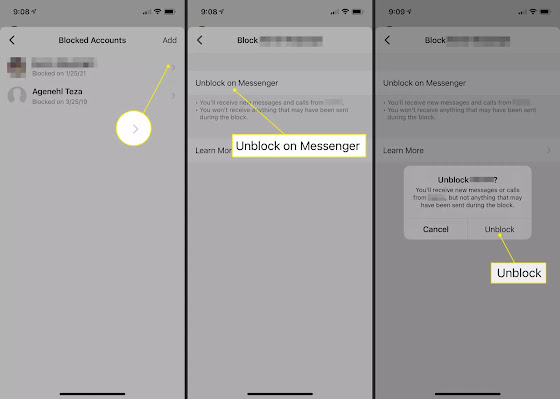
  5. Choose Blocked Accounts


    1. Select the person you want to unblock.

    2. Tap Unblock on Messenger on the next screen.

    3. Tap Unblock to confirm. 


      Alternative to Blocking Someone

      If you don't want to block someone, you can ignore their messages entirely. When you ignore people, they see that their messages went through. On your device, you do not see their messages immediately. Instead, they go to the Message Requests Inbox.

      To Ignore someone on Messenger, follow the exact steps for blocking someone, but when prompted, choose Ignore Messages instead of blocking them.

      To reverse the process, select their message in the Message Request inbox and tap the Reply button at the bottom of the message to return their conversation to your regular inbox. 


      Facebook 

      21thsoft