hi guys
this site is made in order to let you know the most important software in the net and also the software that is essential for the best functioning of an os ( operating system) so see you soon in my blog and i hope that you will like it.
If you took a break from your computer and returned to a black screen,
the device is probably in sleep mode, conserving energy. However,
sometimes no matter how hard you try, your PC won’t wake.
Problems with waking your computer from sleep are unfortunately not
unknown to Windows 11 users. Here’s what you can try to get back to your
files when your device is unresponsive.
How to Wake Windows 11
Putting
your computer to sleep is a great option when you want to step away
from your device but don’t want to shut it down. Your PC will save all
your work, and you can continue exactly where you left off. Generally,
you can wake your Windows 11 in the following ways, depending on the
device:
Press the power button
Press any key on your keyboard
Move your mouse
Click your mouse button
Open the lid (in the case of a laptop)
There
could be many reasons why your computer has decided it still needs
“just five more minutes” of shuteye. See the below fixes to troubleshoot
common issues. Before tackling them, ensure your desktop or laptop is
plugged into a power source.
Check Your Mouse
If
you usually wake your computer using your mouse, consider whether the
issue might not be with your computer at all. If your computer isn’t
reacting to your clicking or moving the mouse, try the following things:
If you have a USB mouse, unplug it, then plug it back in and try waking your device.
For
a wireless mouse, check whe
ther its battery might have died while your
computer was asleep. Recharge your mouse and try waking Windows again.
Mind Your Keyboard
Like
a mouse, keyboards can cause similar issues. If your computer isn’t
reacting to the keyboard button you usually press, one of two things
could be at play: a lost USB connection or a permission issue. Try
unplugging your USB keyboard and then plug it back in to see if that
solves the problem.
If this is an external laptop keyboard, you
might need to enable it to wake your computer. Try to wake your device
with your laptop’s keyboard instead. If you succeed, make sure you
enable your external keyboard, so you don’t experience this issue in the
future.
Open your Control Panel and look for “Device Manager.”
Double-click your external keyboard under the “Keyboard” category.
Switch to the “Power Management” tab in the popup window.
Check “Allow this device to wake the computer” and save the changes.
Reboot Your PC
So, you checked your mouse and keyboard, and
they aren’t the ones to blame. In this case, a hard reboot is the most
straightforward short-term solution when your computer won’t wake up
using the usual method.
Press and hold the power button of your desktop or laptop until you hear the device completely turn off.
Wait a few seconds. Push the power button again.
This solution isn’t ideal as you might lose some of your unsaved work by powering off the device, but desperate times call for desperate measures. Update Drivers
Outdated or incompatible drivers might interfere with your mouse’s or keyboard’s normal functions. They can also easily cause problems with waking your computer. If you believe this is the case, try updating your drivers:
Open your Control Panel and then “Device Manager.”
Find the component you want to update, such as a mouse or keyboard.
Right-click the component and select “Update Driver.”
Press “Search automatically for drivers.”
Install any available updates and restart your PC.
Update Your Windows
You might not be the only one struggling
with waking up your computer, and Windows might have released an update
that patches up the issue. Check whether you’re running the latest
version of Windows 11:
Press the search button in the taskbar.
Type “Windows updates” in the search bar.
Open “Windows Update settings.”
Hit “Check for updates” and install any available update.
Restart your PC.
Change Your Settings
If the issue with waking your computer
persists, try configuring the power management settings. Many users
found that this tweak solved their problem.
Open your Control Panel and find “Power Options.”
Click “Change plan settings” next to the plan you’re using.
Press “Change advanced power settings” on the next screen.
Look for the “PCI Express” option in the popup window.
Under “PCI Express,” open “Link State Power Management” and turn it off in the dropdown menu.
Save the changes.
If this doesn’t resolve the issue, turning off sleep mode until you
find a fix will spare you some headaches. Disable sleep mode in the
following way:
Go to your Control Panel and select “Power Options.”
Press “Change plan settings” next to whichever plan you’re using.
Select “Never” next to “Put the computer to sleep.”
Rise and Shine
If your PC is not listening to your gentle
persuasion that it’s time to wake up, try the fixes outlined above.
First, check that the issue is not related to your mouse or external
keyboard, then perform a hard reboot if necessary. Once your computer
wakes up, try configuring the settings.
Which of these fixes did
the trick for your PC? Are you going to continue using sleep mode? Let
us know in the comments section below.
Windows Defender not opening or working correctly could mean you can't
edit any of its settings in Windows Security, or malware can run amok on
your system because you don't have the proper security in place. Below
are several reasons why Windows Defender doesn't open and how to get it
working again.
Why Windows Defender Won't Open in Windows 11
Here are some examples of situations where Microsoft's anti-malware app won't open or work properly:
There's a temporary memory-related issue where the app won't scan for malware.
Windows Security opens normally, but then promptly closes a few seconds later.
Another software program is "fighting" with Windows Defender, and it's throwing error messages.
You see an error that says, "You'll need a new app to open this windowsdefender link."
You recently installed or uninstalled another virus protection program, and now Windows Defender won't open.
Windows Defender is called Microsoft Defender in Windows 11, and it's
managed through Windows Security. These names are used interchangeably
in this article, but we're referring to the same tool.
How to Fix Windows 11 Defender Not Working
There are several things you can try, but follow this list in the order it's presented to address the easier solutions first:
Restart your computer. This is a very
common first step when troubleshooting basically anything in Windows,
and it might just be all you have to do to get Windows Defender working
again.
Turn off Windows Defender, and then turn it back on. Or, if it was off to begin with, that article shows you how to turn it on.
Microsoft Defender won't catch active malware unless you have Real-time protection turned on.
This step is useful if, in your situation, "Windows Defender not
working" simply means that it isn't checking for malware. If you can't
open Windows Security in Settings, then move on to the next step.
Repair or reset Windows Security.
A repair will have Windows attempt to fix whatever is going on, and a
reset will erase all the app's settings and start over as if Windows
Defender was just installed.
Follow that link for two methods—one uses Settings, like in the image
below, and the other uses a PowerShell command that's helpful if you
can't open Windows Security at all.
Update Windows. This is how Microsoft delivers bug fixes, so an update you've yet to install could address the Windows Security issue.
If that doesn't work, you can try an offline Microsoft Defender update. Choose the latest version from that list, likely called Update for Microsoft Defender Antivirus antimalware platform.
To avoid getting an update you don't need, you can check your current version from Settings > Privacy & security > Windows Security > Open Windows Security > Settings > About.
This step is for when your problem is so specific the only issue you're running into is you can't seem to clear out the Protection history screen in Windows Security, or you're told a threat was found, but there's nothing to clear out.
To address this, open the following folder. One easy way to do this is to paste this path into the Run dialog box (WIN+R):
Select everything in the Service folder (Ctrl+A), and then press Delete to clear it out.
Temporarily disable any other antivirus programs you have installed. How
this works is different for every app, but doing so should give you
some time to see if Windows Defender's troubles were due to a
compatibility issue with the other anti-malware tool.
If you find the other program is to blame, or you suspect it might be but disabling it didn't help, use a program uninstaller tool to completely delete the software.
If you still can't start Windows Defender, there are a couple of
registry keys you can delete to re-enable it. This might happen after
uninstalling another antivirus program.
Your computer might not have these registry values, since they most
likely exist only if security settings have been implemented via group
policy (e.g., an IT department). If so, just move on to the next step.
Run the SFC /scannow command
to repair system files. This will invoke the System File Checker tool
to see if there are any problems with protected Windows files, and then
replace them if so.
Use Reset This PC to reinstall Windows 11.
Although this will reinstall Windows and reset all your programs back
to their factory default state, that's exactly what you want in this
situation.
This is a sure fix for whatever problem is affecting Windows Defender,
just make sure you wait until you've tried all the above before
completing this drastic step.
Choose carefully to keep or wipe your data when resetting your PC.
FAQ
How do I add an exclusion to Windows Defender in Windows 11?
Go to Settings > Privacy & Security > Windows Security > Virus & threat protection > Manage Settings. Under Exclusions, select Add or remove exclusions.
Is Windows Defender the same as Windows Firewall?
No, not technically. Windows Firewall is a feature of the Windows Defender software. There is no separate Windows Firewall program.
How do I turn off Microsoft Defender SmartScreen?
To turn off SmartScreen in Microsoft Edge, go to the three-dot menu > Settings > Privacy, search, and services. Under Services, turn off Microsoft Defender SmartScreen.
WIN + A is the fastest way to open Quick Settings.
Choose a button from the menu to toggle that feature on/off. Arrows provide additional options.
Select the pencil icon to edit an item's position or visibility in the panel.
This article explains how to open Windows 11 Quick Settings, what all
the available options are for, how to edit what you see in the menu, and
in which ways it's both useful and limited.
How to Use the Quick Settings Menu in Windows 11
We'll go over all of what the Quick Settings menu can do further down
this page, but let's start with how to open it and use it for something
simple like turning Bluetooth on and off.
Specific steps may differ based on the operating system version you're running, but the basic process will be the same.
Open Quick Settings by selecting the network, volume, or battery icon next to the clock on the taskbar. You can also use the Windows key + A shortcut, or if you're on a touchscreen, swipe up from the lower right bottom of the screen.
Select the Bluetooth icon to turn it on (colored) or off (white).
The Not connected message is seen directly below the
toggle when Bluetooth is on but isn't actively connected to a device.
This is replaced by the device's name when it's connected to your
computer.
This toggle should be visible by default. See the directions below if you don't see it.
Select the arrow next to the toggle to view available Bluetooth devices.
This is also where you can see the estimated battery life remaining on
your devices.
Not all toggles have an arrow because some of them are just simple on/off switches.
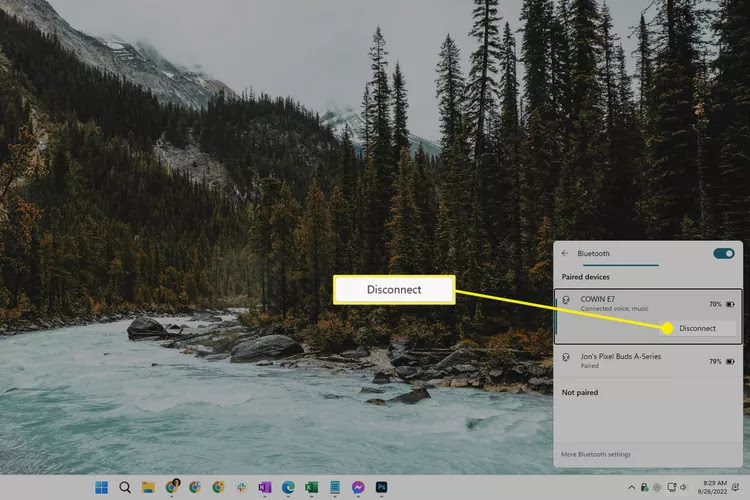
Select a device from the list to connect to it. Devices you've already paired are separated from ones that aren't yet paired.
Or, if you're currently connected, select it to find the Disconnect button to stop using that device (you won't need to repair the device later; this just terminates the connection right now).
This panel is one way to quickly access the other Bluetooth settings available in Windows 11. Use the More Bluetooth settings link at the bottom to do more, like view printers and other devices.
To close out of Quick Settings, select anywhere outside the panel or use the WIN+A shortcut.
Everything You Can Do With Quick Settings
There are several settings shortcuts available in this menu. A few are present only if your device runs on a battery.
These are the primary toggles:
Wi-Fi — choose a network to connect to, or turn Wi-Fi on or off
Bluetooth — choose a device to connect to, or turn Bluetooth on or off
Accessibility — access magnifier, color filters, narrator, mono audio, live captions, and sticky keys
Cast — show your screen on a different display
Mobile hotspot — share your internet connection with nearby devices
Nearby sharing — share files and website links over Bluetooth or Wi-Fi
Night light — when turned on, this shows warmer colors at night that are easier on your eyes
Project — decide how to use extra displays, like duplicate or extend from the primary display
Rotation lock — allow or prevent the screen from rotating with the device (laptops only)
There's also sound control, and others for laptops:
Sound icon — mute the sound
Volume slider — adjust the volume
Output device icon — switch to a different output device (e.g., headphones vs speakers)
Brightness slider — adjust the screen brightness (laptops only)
Battery life — open the power & battery settings (laptops only)
Finally, along the very bottom of the menu are two options:
Pencil icon — triggers edit mode (this is covered below)
Settings icon — opens Settings for a lot more options
You can also right-click or press-and-hold any toggle to find Go to Settings.
This opens the specific window within the Settings app that pertains to
that feature. Doing this for a night light, for example, will jump you
right into Settings > System > Display, from where you can adjust the feature's strength and scheduling.
Shortcuts work for some of these things. For example, WIN+K for Cast, WIN+P for Project, and WIN+i for Settings.
How to Edit the Quick Settings Panel
You can hide toggles you don't want to see, add new ones you do want to see and reorganize the panel according to your preference.
With Quick Settings open, select the pencil icon at the bottom. Or, right-click anywhere in the menu and select Edit quick settings.
Select the pin next to any toggle to instantly hide it. Or, select Add to see what else is available to include in Quick Settings.
To change how everything in the menu appears, select and drag one of the toggles. If you'd rather have Airplane mode's option on the bottom, for example, just drag it down and then let go.
Choose Done when you're finished to save and exit.
Quick Settings Benefits & Limitations
The name "Quick Settings" pretty much gives away its benefit: it's a quick way to access the most important system settings.
The alternative would be to open the Settings app and make your way
through its menus just to do something simple like connecting to a Wi-Fi
network.
The fact that this menu can be accessed through keyboard shortcuts also means it's easy to use. WIN+A opens the panel, arrow keys let you move to a specific toggle, and the space bar
triggers whatever you've selected. Doing this means you could very
easily turn on Bluetooth, enable night light, etc., without ever
reaching for your mouse.
Quick Settings is just a shortcut menu. Everything you can do within it, you can also do elsewhere in Windows. You can turn on Bluetooth and connect to a network in Windows 11 through Settings, for example. The same goes for all the other toggles listed above; they're all accessible in Settings.
This also means this menu is very limited. With regard to what else you
can do in Windows, this panel provides just a glimpse. Open the Settings
app to accomplish other tasks, like updating the operating system, adding a printer, etc.
FAQ
How do I change my Quick Access settings in Windows 10?
To add something to Quick Access, find the file or folder in File Explorer and right-click it, then select Pin to Quick access from the drop-down menu. To remove something, right-click it and select Remove from Quick access. If you want to adjust viewing options so only pinned items appear, select View > Options > Privacy and turn off the options for recently used files and recently viewed folders.
How do I change my Quick Print settings in Windows 10?
Open User Preferences, then select Printing. From there, set your Quick Print options to match your preferences and select OK when finished.
Are you having trouble with your computer randomly restarting? If so, you’re not alone. Many Windows 10 and 11 users have been struggling with this issue for a while now.
There are a few different reasons why
your computer might be randomly restarting. It could be a problem with
your power supply, a faulty component, or even a virus. Whatever the
cause, it can be frustrating to deal with.
Check out our guide below if you’re
sick of your computer randomly restarting. We’ll show you how to fix the
issue in simple steps.
Windows 10 and Windows 11 Reboot Automatically, Random Restart
Windows 11 has the highest-grade software architecture of Microsoft Windows, but it's not perfect. Windows 11
may randomly restart without warnings or blue screen of death (BSOD)
errors. The number of Windows 11 users who experience random restarts is
relatively small, and the problem is more likely to occur on a computer
with an older processor.
Nevertheless, there are many ways you
can fix this issue. If you are experiencing random restarts on your
Windows 10/11 computer, there are several things you can try to fix the
problem:
Update your drivers
Check for hardware issues
Run a virus scan
Perform a clean boot
Reset your PC
Check your power supply
And more!
Continue reading to find the detailed
steps needed for restoring your Windows 10 or Windows 11 operating
system and stop unexpected reboots.
What Should I Do if My Windows 10/11 PC Randomly Restarts?
You can try a few different things if
your Windows 10 or 11 PC is randomly restarting. These issues have
different solutions that we'll be discussing below. Here are some
general troubleshooting tips to fix random restart, automatic restart,
and similar problems on Windows 10 and Windows 11:
Check for driver updates. Outdated drivers can cause all sorts of problems, including random restarts.
Check
for hardware issues. This is especially important if you recently
installed new hardware or changed your computer’s components.
Uninstall recently installed apps or undo recent deep system changes.
Use the built-in troubleshooters and Windows Security to fix the error.
If you're unsure how to perform any
of the steps above, continue reading for detailed instructions on each
troubleshooting method! You can also reach out directly to our experts
at SoftwareKeep to guide you through the steps needed to restore your
Windows 10 or Windows 11 computer.
What Causes Random Restarts on Windows 10 and Windows 11?
Many different things can cause your computer randomly restarting issue. These range from simple issues like outdated drivers to more complex problems like hardware faults or viruses.
Some of the most common causes of random restart include:
Outdated drivers
Faulty hardware
Power supply problems
Viruses or malware
Third-party applications
System file corruptions
Bugs in Windows Updates
If you're unsure of what's causing
your computer to randomly restart, we recommend trying a few different
troubleshooting methods until you find a solution that works for you.
How To Fix Windows 10 and Windows 11 Randomly Restarting
If you're experiencing random restarts on your Windows 10
or 11 computer, it's likely due to a problem with your power supply,
drivers, or hardware. Here are some troubleshooting tips to help you fix
the issue.
Method 1. Disable Automatic Restart
One of the first things you should do
when your computer starts randomly restarting is to disable the
automatic restart feature. Here's how to disable automatic restart in
Windows 10 and Windows 11:
Type Advanced settings into the Windows Search bar, then click Advanced system settings from the list of results.
Switch to the Advanced tab, and then click the Settings button inside the Startup and Recovery section.
In the System failure section, make sure to uncheck the Automatically restart option. Click OK to finalize your changes.
To safeguard the system from
additional corruption, you can also disable the automatic restart
option, which shuts down the system in the event of a system failure.
Method 2. Disable the Fast Startup Feature
If you're using Windows 10, you may
be able to fix the issue by disabling the Fast Startup feature. This is a
power-saving mode that's enabled by default on most computers.
While it can help save energy, it can also cause problems like your device randomly restarting.
Here's how to disable Fast Startup in Windows 10 and Windows 11:
Click on the Windows icon in your taskbar, and then search for the Control Panel. Launch the application from the search results.
Click on Power Options. If you can’t see this, make sure to switch the view mode to either Large icons or Small icons.
Click on the Choose what the power button does link in the left-side pane. You’ll be redirected to a new page.
Before you can make changes, you need to click on the “Change settings that are currently unavailable” link. This will unlock your options.
Make sure to uncheck the Turn on fast startup (recommended) option. Make sure to click the Save changes button to apply the changes before restarting your computer.
Method 3. Change Your Power Settings
Your power settings may also be
causing your computer to randomly restart. To fix the issue, try
changing your power settings. Here's how:
Press Windows + R to bring up the Run utility, then type in “control” and click the OK button. This is going to open the Control Panel.
Make sure that your view mode is set to Category, and then click on the Hardware and Sound heading.
Click on the Change when the computer sleeps link from the Power Options section.
Click on the Change advanced power settings link. A new window should pop up on the screen.
Scroll down and expand the Processor power management section, then expand Minimum processor state.
Click on the current percentage (for example, 100%) and change it to a number lower than 100. For example 80%. When you’re done, click the Apply button, then close the window.
Restart your computer and check if you’re still dealing with the automatic or unexpected reboots after making this modification.
Method 4. Update Your Drivers
Some of your drivers may be outdated,
missing, or damaged. Many users have reported that the problem was
fixed after updating drivers for display adapters, chipsets, sound
cards, and other devices. Here's how you can update your drivers:
If you're not comfortable manually
updating your drivers, you can use a driver updater tool like Driver
Easy. This software will automatically scan your system and update all
of your drivers with just a few clicks.
Update drivers using Windows Update
Click on the Windows icon in the bottom left of your screen to bring up the Start menu. Choose Settings, or alternatively use the Windows + I shortcut.
In the Settings app, click on the Update & Security tile. This is where you can find most of your Windows Update settings.
Go to the Windows Update section, and then click on the View optional updates link if available.
Expand the Driver updates
section, and review what drivers currently need an update. To update
the drivers, simply place a checkmark next to them, and then click the Download and install button.
Allow Windows to update your drivers, and then reboot your computer.
Update drivers using the Device Manager
Press Windows + X keys on your keyboard and click on the Device Manager option from the WinX menu.
Right-click on the driver you want to
update. If the problem was caused by a graphics card driver, for
example, you would need to extend the Display adapters section. Choose Update Driver from the context menu.
Select Search automatically for drivers
from the options. This will allow Windows to connect to the internet
and locate the latest drivers for your device. You may be prompted to
select a driver if multiple updates are found.
Wait for the driver installation to complete and restart your computer to apply the changes.
Method 5. Update Group Policies
Windows 10/11 is still restarting
randomly? You may be able to troubleshoot the problem by making a few
modifications to your Group Policies. This happens especially if you
have incorrectly migrated group policies.
Right-clicking on the Start menu icon and selecting Command Prompt (Admin). When the UAC prompt appears, select Yes to grant admin access. Click here to learn how to make your account into an administrator.
Input the gpupdate command and hit Enter on your keyboard to execute it.
Wait for the command to finish updating your Group Policy, and then check if you’re still having random or unexpected reboots.
Method 6. Scan Your Computer for Malware
If you're still having problems, it's
possible that your computer is infected with malware. To fix the issue,
you'll need to scan your system for viruses and remove any malicious
programs.
To scan your computer, you can use the built-in Windows Defender application. We recommend investing in a dedicated antivirus software if you want to do a deep scan.
Here’s how to scan your computer using Windows Defender on both Windows 10 and Windows 11 operating systems.
Open the search bar in your taskbar by clicking on the magnifying glass icon. You can also bring it up with the Windows + S keyboard shortcut.
Type in Windows Security and launch it from the search results.
Switch to the Virus & Threat Protection tab using the home screen or the menu in the left-side pane. Click on the Scan Options link.
Select the Full scan
option. This is going to check every single file on all of your drives
to ensure no threats can hide. Take note that this scan may last over
1-2 hours, depending on how many files you have on your system.
Click on the Scan now
button to begin the scan. If a threat is detected, Windows will
automatically quarantine or remove it entirely. You can review the scan
results afterward.
Method 7. Run the System File Checker (SFC Scan)
If none of the above methods worked,
you can try running the System File Checker. This is a built-in Windows
tool that can fix corrupt system files. Here's how to run the System
File Checker:
Open the search bar in your taskbar by clicking on the magnifying glass icon. Press Windows + S on your keyboard as a shortcut.
Type Command Prompt in the search box. When you see it in the results, right-click on it and choose Run as Administrator. If you're using a local account that doesn't have administrator permissions, click here to learn how to grant admin access.
When prompted by the User Account Control (UAC), click Yes to allow the app to launch with administrative permissions. Type in the following command and press Enter to execute it: sfc /scannow
Wait
for the System File Checker to finish scanning your computer. In the
case of a discrepancy, the utility will restore system files and fix all
errors related to them.
Method 8. Run the CHKDSK Command
Still no luck? You can try running
the CHKDSK command. This is a utility that can fix errors on your hard
drive and help improve its overall performance and health, and fix
various problems. Here's how to run the CHKDSK command:
Open the search bar in your taskbar by clicking on the magnifying glass icon. You can also bring it up with the Windows + S keyboard shortcut.
Type Command Prompt in the search box. When you see it in the results, right-click on it and choose Run as Administrator. If you're using a local account that doesn't have administrator permissions, click here to learn how to grant admin access.
When prompted by the User Account Control (UAC), click Yes to allow the app to launch with administrative permissions.
Type in the following command and press Enter to execute it: chkdsk C: /r
Wait for the scan to complete.
Method 9. Stop Overclocking
Many users have reported that their computer starts randomly restarting after they overclocked their CPU or GPU.
Overclocking is the process of
pushing your hardware beyond its limits to increase its performance. If
you're overclocking your computer, try resetting your clock speeds back
to their default values and see if that fixes the problem.
While overclocking is a great way to
get more out of your hardware, it's not without its risks. If you're not
careful, you can damage your hardware. That's why we recommend that you
only overclock your computer if you're an experienced user and know
what you're doing. Misconfigured settings can lead to a lot of issues, like making your computer automatically restart.
Recover Lost Files After Random Restart
The most frustrating part of your
computer randomly restarting is that you may lose unsaved work or open
files. But don't worry, there are ways to recover lost files after a
restart. More often than not, these files are impossible to recover,
leading to hours of lost work.
There are a few things you can try to recover lost files after an unexpected restart:
Check the Recycle Bin: The first place you should look is the Recycle Bin. If you accidentally deleted a file, it may be there.
Restore previous versions: If
you have System Restore enabled, you can try restoring your computer to
a previous point in time when the file was not deleted.
Use data recovery software:
Data recovery software can help you recover lost files that were not
saved before the restart. We recommend using data recovery software like
Disk Drill to scan your computer for lost files. Disk Drill is a
powerful data recovery tool that can recover lost files from any storage
device, including your hard drive, external hard drive, USB drive,
memory card, and more.
We hope this guide has helped you fix
your lost files after the random restart issue. If you're still having
trouble or have any questions, feel free to reach out to our experts
here at SoftwareKeep for help!
Summary: How To Fix Random Restart Problems in Windows 11?
First, check your power supply. If
it's not providing enough power to your computer, that could be causing
the random restarting. Make sure all the cables are plugged in properly
and that the power supply is switched on.
Next, check your drivers. Outdated or
corrupted drivers can often cause problems like this. Update all your
drivers and see if that fixes the issue.
Finally, check your hardware. If you
have any damaged or defective hardware, that could be causing the random
restarting. Try replacing the hardware with a working one to see if
that solves the problem.
If none of these troubleshooting tips help, you may need to contact a computer technician for further assistance!
Final Thoughts
That’s it: This article has shown you how to fix random restarts on Windows 10/11.
We hope that at least one of them worked for you!
Now, we’d like to turn it to you.
Were you able to fix your computer restarting randomly with these methods? Are you still having trouble or have any questions?
Feel free to reach out to our experts
here at SoftwareKeep for help. We're always happy to assist our
customers in any way we can!
Thank you for reading this guide!
One More Thing
Follow ourBlog and ourHelp Center for more great articles like this one and other information on how to troubleshoot various issues.
Sign up for our newsletter and get
early access to our blog posts, promotions, and discount codes. We hope
to see you again soon.