
I used In this example
TP-Link Archer D50 Router
Note a Bene ( the forwarding port section may vary from router to router )
so see manual instructions for specific router
in order to open ports in your TP-Link Archer D50 router, you need to:
- Set up a static IP address on the device or computer you are forwarding these ports to.
- Log in to your TP-Link Archer D50 router.
- In your TP-Link Archer D50 router, navigate to the Virtual Servers section.
- Find the Advanced tab located near the top of the screen and click it.
- Find the NAT Forwarding tab at the left of the screen and click it.
- Click Virtual Servers.
- Create a Virtual Servers entry.
The process of opening ports in your router may seem like a difficult task. If so, you are not alone! We are here to help walk you through the steps to open a port in the TP-Link Archer D50 router.
Step 1 - Setup A Static IP Address
In order to ensure that your ports remain open in your device even after it reboots, it is important to set up a static IP address in your device.
Setting up a Static IP Address for Windows 10:
step 1:
Open up the Windows 10 start menu by pressing the Windows key on your keyboard. You can also open this menu by clicking the windows icon in the lower left corner of your screen. When the start menu appears simply type cmd on your keyboard and press enter.

Step 2:
A window similar to the one you see above should appear on your screen. It's okay if it doesn't look exactly like the one you see above. In this window you need to type ipconfig /all and press enter.
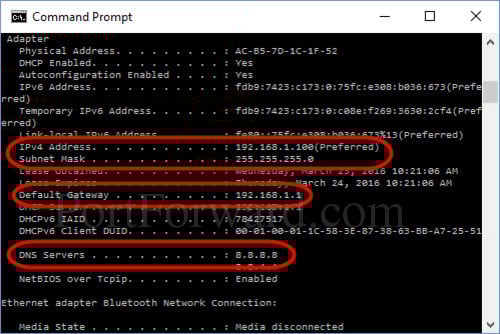
Step 3:
There are three things I want you to write down from the window. Write down the IPv4 address, Subnet Mask, and the DNS Servers. Make sure to note which is which. You will need this information a little later.
Type exit and press enter to close the command prompt.
Step 4:
Once again open the Windows 10 start menu by pressing the windows key on your keyboard. This time type the words Control Panel and press enter.
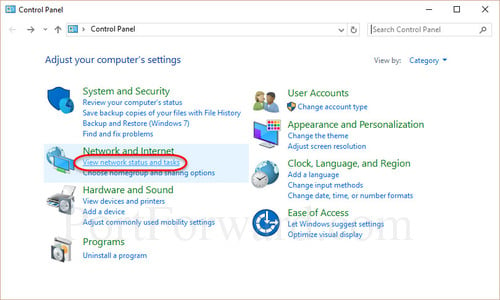
Step 5:
Click the link titled View network status and tasks under the Network and Internet heading.
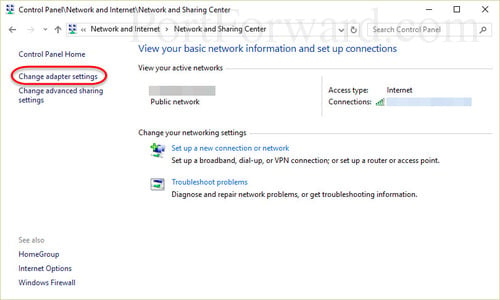
Step 6:
Click the link on the left of the window labeled Change adapter settings.
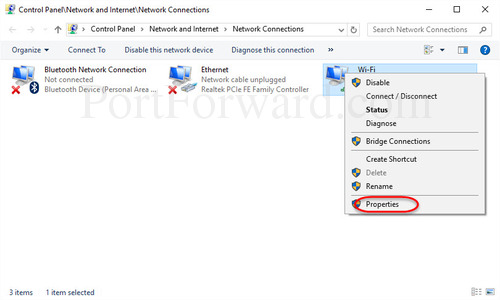
Step 7:
You might have more than one Internet connection listed in this window. If this is the case you'll need to determine which one is your connection to the Internet. Once you have found it, right click on your network adapter and choose properties to open up the properties window of this Internet connection.
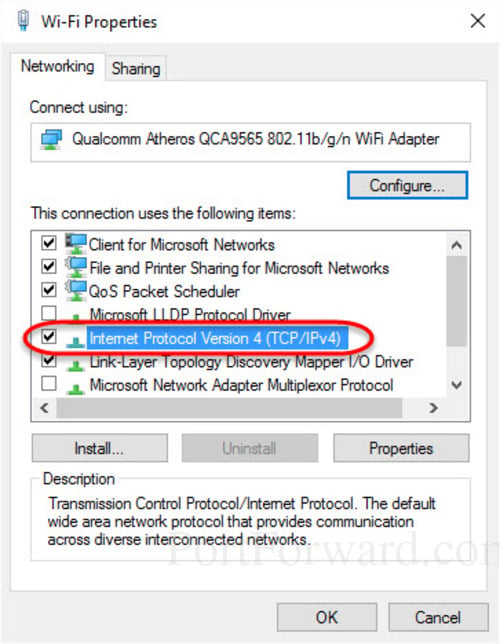
Step 8:
Find the option of Internet Protocol Version 4 (TCP/IPv4) and click on it. Then choose the option under that titled Properties.
Step 9:
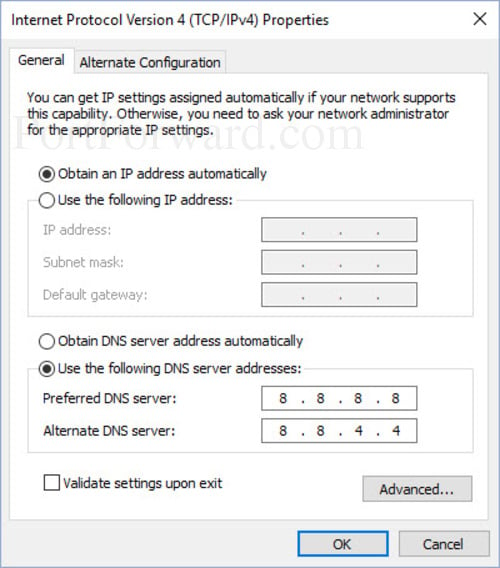
You should now see a screen similar to the one you see above. Before making any changes you should write down all the settings you see in this window. This is in case something goes wrong you can simply put it back the way it was. Like the image above you should see a dot in the circle next to Obtain an IP address automatically. If not, then you are already setup for a static IP address. Simply close this window because you are done.
If your screen looks like the one above then you need to choose a static IP address to use for this computer. First, click the circle next to Use the following IP address:. Then enter a new IP address in the box labeled IP address. This address needs to be similar to the router's IP address. Just make sure the last number is different. For example if your router's IP address is 192.168.1.1 then maybe you choose 192.168.1.10 This new IP address should end between the number 1 and 254. It should not be the same as your router's IP address. Every device on your network needs to have it's own IP address or neither device will be able to connect to the Internet.
Remember those numbers you wrote down from the command prompt window? Time to use those. Enter the Subnet Mask you wrote down in the Subnet mask box. The Default Gateway number should go into the Default gateway box. Finally, enter the DNS Servers you found into the two DNS Server boxes.
Click OK when you are finished.
If after doing this you find you can't use the Internet it is probably the DNS servers you wrote down. Give your ISP a call and ask them what DNS servers to use. They get this question all the time and should be able to give you an answer right away.
That's it, you did it. If you still find you are having problems getting on the Internet you can always go back and put everything back to how it was originally.
Step 2 - Login To Your TP-Link Router:
The TP-Link Archer D50 router uses a web interface to display router settings. In order to login to the TP-Link Archer D50 router you need to use a web browser.
Open your favorite web browser. If you don't have a favorite or are not sure what this means, open up Chrome, Firefox, or Edge. If you are already in a browser window, go ahead and open up a new tab.
Find the address bar in your browser window. This is usually found at the top of the page, like in the image below.
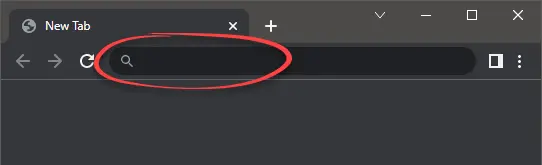
Above is an example of what a web browser address bar looks like. Find the address bar in your web browser and type in your router's IP address.
The TP-Link Archer D50 router's default IP address is: 192.168.1.1
Once you have finished entering your router's IP address into the address bar, click the enter button on your keyboard. A box similar to the one below should appear.

Go ahead and enter the username and password for the TP-Link Archer D50 router in the spaces available. Remember if you have changed them in the past, you need to enter those values.
- The default TP-Link Archer D50 Router Username is: none
- The default TP-Link Archer D50 Router Password is: created during initial setup
Enter your username and password, and then click the Login button to log in to your TP-Link Archer D50 router.
Step 3 - Find The Port Forwarding Section
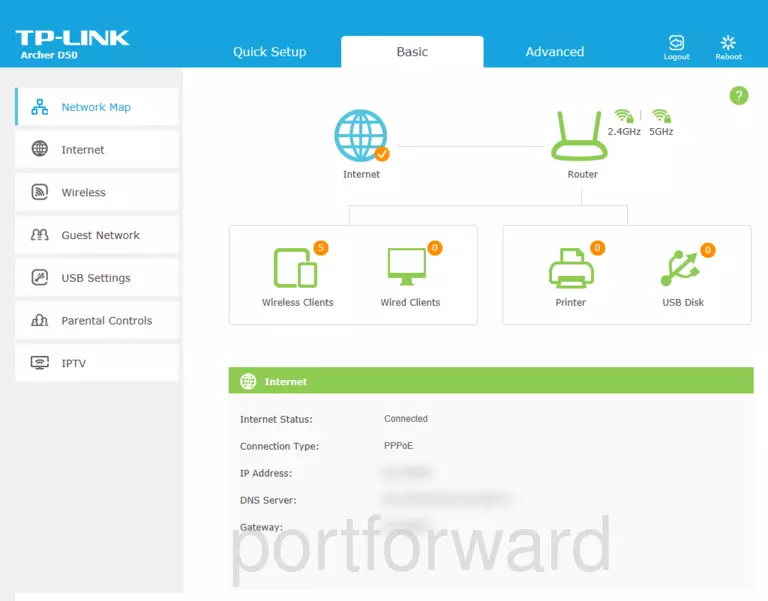
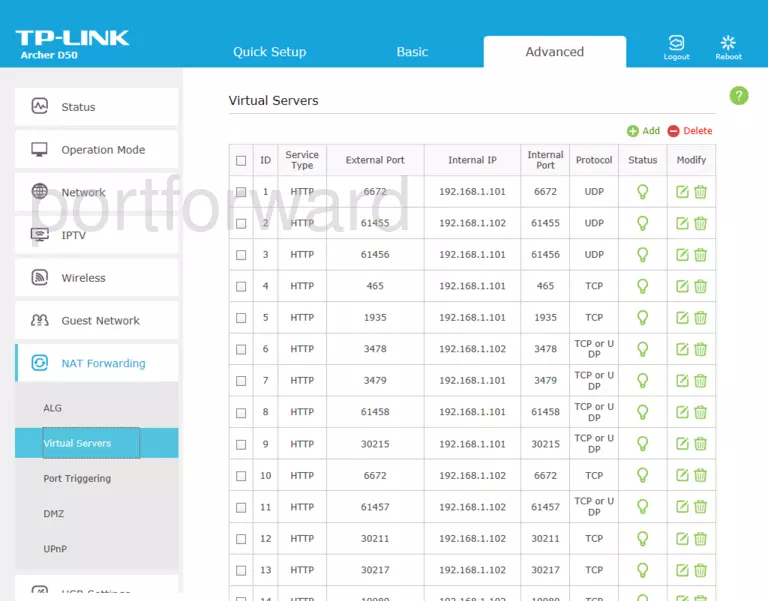
After successfully logging in to your TP-Link Archer D50 router you should see the router's home page on your screen. Find the Virtual Servers section of your router.
- Click on the Advanced tab, which is at the top of the screen.
- Find the NAT Forwarding tab at the left of the screen and click on it.
- Click on Virtual Servers.
You should now be on a page called Virtual Servers.
Step 4 - Create A Port Forward Entry
Make sure that you must open a port in your router before doing so since this will allow data to come through the firewall portion of your router to a specific device. It is possible that this could lead to malicious traffic on your network. However, don't let this warning stop you from making this change if you need it because the risk is very low.
Here are the ports to forward for Emule :
- TCP Ports: 54799
- UDP Ports: 35636
-
Click the Add link.
-
Choose your internet interface from the Interface Name drop-down list. If you have more than one option and you're not sure what to select, the Status page should tell you something.
-
Type in a name for this forward in the Service Name box. Choose a name that will help you remember why this forward was set up since it does not affect the functionality of the forward.
-
You can enter either a single number or a range of numbers in the External Port box. If you are forwarding a single port number, you can enter it into the External Port box. To forward a range of ports, you can enter the lowest number of that range into the External Port box, followed by a hyphen, followed by the largest number. An example would look like this: 1000-2000.
-
Find the Internal IP box and enter the IP address that you want ports forwarded to. This can be either the IP address of your computer or any other IP address for devices on your network that you want to forward ports for.
-
Leave Internal Port blank.
-
Use the Protocol dropdown box to select the protocol type of the ports you are forwarding. If your router has the option of Both, then choose that. Otherwise, choose either TCP or UDP as needed. If you need to forward a port for both TCP and UDP and your router does not have Both, then you have to create two entries.
-
Put a check in the box named Enable this Entry.
-
Click the OK button at the bottom of the page when you are completely finished to apply these changes.
No comments:
Post a Comment