
Install Windows 11 in a virtual machine with VMware Workstation
A virtual machine is a virtualized environment that runs on a physical machine and has the same characteristics as the latter (CPU, RAM, hard disk, network card, etc.). You can install any operating system (another version of Windows or a Linux distribution) even if it is different from the one installed on your computer. For example, you can create a virtual machine and install Windows 11 in it on a computer that is running Windows 10. Back to Windows 11. Since build 22000.194 and build 22458, Microsoft has also imposed the minimum Windows 11 requirements for virtual machines that were previously spared by the mandatory presence of a TPM 2.0 and Secure Boot. Worse still, VMs previously created with Windows 11 Insider Preview builds may no longer receive new builds if they don't meet all of the minimum requirements. Luckily, WMware Workstation – the virtualization application that helps create virtual machines – allows adding a TPM security chip and enabling Secure Boot in virtual machines to make them 100% compatible with Windows 11. Currently, VirtualBox – the competing application – does not allow adding a TPM and therefore installing Windows 11. Want to test and install Windows 11 in a virtual machine? In this tutorial, we will see how to install Windows 11 in a virtual machine using the VMware Workstation application.
Prerequisites
VMware Workstation Pro
Windows 11 ISO
Install Windows 11 in a virtual machine with VMware Workstation To install Windows 11 in a virtual machine using VMware Workstation,
follow these instructions:
Install VMware Workstation on your PC and then run it.
If you have a license key for VMware Workstation, select I have a license key for VMware Workstation and enter it. Otherwise, select I want to try VMware Workstation for 30 days to try the app for 30 days.
On the Home tab, click Create a New Virtual Machine.

Select Custom (advanced).


In Virtual Machine Hardware Compatibility, leave the default options then click Next.


Select Install disc image file (iso) then go find the ISO image of Windows 11 that you downloaded before.


Select Microsoft Windows and Windows 10 x64.


Name the virtual machine Windows 11.


Select the UEFI firmware, then check the Secure Boot box.


At a minimum, choose 1 processor and 2 cores per processor. If your computer's CPU capacity allows it, increase the number of processors and cores to have a faster virtual machine.


Allocate at least 4096 MB of random access memory (RAM).

Choose Use network address translation (NAT) as the network type.

Choose LSI Logic SAS as the I/O controller type.

Choose NVMe as the disk type.

Select Create a new virtual disk.

Allocate at least 60 GB of disk space. Leave the Allocate all disk space now box unchecked and the Split virtual disk into multiple files option enabled.
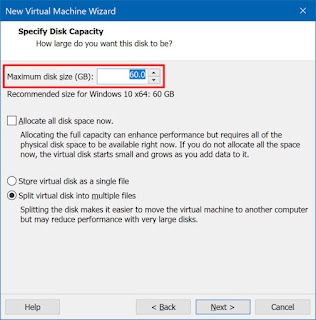
Leave the default name assigned to disk files.

Click the Finish button.

In the Windows 11 virtual machine tab, click Edit virtual machine settings.

In the Options tab, select Access Control then click on the Encrypt button.

Enter the password that will encrypt and decrypt the virtual machine, then click the Encrypt button.

In the Hardware tab, click on the Add button.

Select Trusted Platform Module, then click Finish.

A TPM has been successfully added to the virtual machine

Click OK to close the virtual machine settings.
Click Power on this virtual machine to power on the virtual machine.

On startup, press any key to launch the Windows 11 installer.

For convenience, enable the Keep Aspect Radio Stretch option so that the virtual machine screen automatically adapts to the window size.

Follow the installer instructions to install Windows 11 in the virtual machine.

Windows 11 has been successfully installed in your virtual machine.

Now, install VMware Tools, a suite of utilities that improves virtual machine performance and allows you to use advanced features (improved graphics performance, shared folders, copy-paste between host and guest, etc.) . To do this, click VM > VMware Tools.
In the Windows 11 guest machine, open File Explorer > VMware Tools DVD Player and double-click setup64.exe.

Install VMware Tools then restart the virtual machine.


By opening System Information (msinfo32.exe), you will notice that Windows 11 is installed in UEFI mode and that Secure Boot is activated.

Similarly, by opening the TPM management console (tpm.msc), you will notice that the TPM is indeed activated.

Congratulations: you have installed Windows 11 in a virtual machine thanks to VMware Workstation.
No comments:
Post a Comment