On Windows 11, you can customize many settings to change the desktop's appearance and other elements to make the experience a little more personal or quickly refresh the feel to avoid the same look every day.
Although the experience is not as customizable as on Windows 10, you can still change the desktop background with a personal picture or a theme from the Microsoft Store. You can switch between the dark and light color modes or use a custom accent color across the desktop. You can organize your favorite apps in the Start menu. And you can change the alignment of the Taskbar, decide what items appear in the experience, tweak the system tray settings, and a lot more.
In this Windows 11 guide, we will walk you through the different ways to customize the appearance to make your computer experience a little more personal.
How to change background on Windows 11
On Windows 11, the quickest way to make the desktop look different is by changing the background image, configuring a slideshow, or choosing a solid background color. If you are using the virtual desktops feature, it's now possible to set a custom background for each desktop.
Change desktop wallpaper
To change the desktop background on Windows 11, use these steps:
- Open Settings.
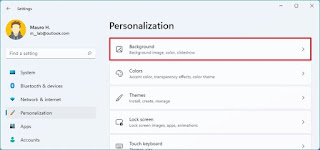
- Click on Personalization.
Click the Background page on the right side.

- Under the "Personalize your background" setting, select the Picture option.
Click the Browse photos button.

- Select the background image to use on the desktop.
- Click the Choose picture button.
- (Optional) Use the Choose a fit for your desktop image setting and select the Fill option to ensure the image covers the entire screen. Other options include Fit, Stretch, Tile, Center, and Span.
Alternatively, you can also right-click an image and select the Set as desktop background option to apply the image as the new desktop background.
Configure desktop slideshow
To set a slideshow on the desktop, use these steps:
- Open Settings.
- Click on Personalization.
Click the Background page on the right side.

- Under the "Personalize your background" setting, select the Slideshow option.
Click the Browse button.

- Select the folder with the images to show on the desktop.
- Click the Choose this folder button.
- Use the Change picture every setting and select how often to rotate images. Options include one, 10, or 30 minutes, one or 6 hours, or one day.
- (Optional) Turn on the Shuffle the picture order toggle switch.
- (Optional) Use the Choose a fit for your desktop image setting and select the Fill option to ensure the image covers the entire screen. Other options include Fit, Stretch, Tile, Center, and Span.
Once you complete the steps, the desktop will rotate the collection of pictures in the background at the intervals you specified in the settings.
Configure desktop solid color
To apply a solid color on the Windows 11 desktop, use these steps:
- Open Settings.
- Click on Personalization.
Click the Background page on the right side.

- Under the "Personalize your background" setting, select the Solid color option.
Select a background color.

- (Optional) Under the "Custom colors" setting, click the View colors button.
Create a custom color.

- Click the Done button.
After you complete the steps, the desktop will show a solid color background.
Configure background per desktop
On Windows 11, it's also possible to set a different background for each virtual desktop to make it easier to differentiate between them.
To set a different background per desktop (not monitor), use these steps:
- Open Settings.
- Click on Personalization.
Click the Background page on the right side.

- Under the "Personalize your background" setting, select the Picture option.
Right-click the image, select the Set for desktop submenu, and select the desktop to apply the background.

Once you complete the steps, each virtual desktop will include a different desktop background.
Configure background per monitor
You can also set a different background image per monitor. However, the option won't be available while using virtual desktops.
To set a custom background per monitor on Windows 11, use these steps:
- Open Settings.
- Click on Personalization.
Click the Background page on the right side.
- Under the "Personalize your background" setting, select the Picture option.
Right-click the image, select the Set on monitor (N) option.

After you complete the steps, you may need to repeat the instructions to apply another image to the remaining displays.
How to change colors on Windows 11
Windows 11 lets you choose different colors for elements across the desktop. You can choose between the light or dark mode, or you can select a custom accent color that will appear in the Start menu, Taskbar, Notification Center and Quick Settings, title bars, borders, and apps.
Enable light or dark color mode
To switch between the dark or light system on Windows 11, use these steps:
- Open Settings.
- Click on Personalization.
Click the Background page on the right side.

Use the "Choose your mode" setting and select the Light or Dark color mode option.
After you complete the steps, the desktop experience (including Taskbar, Start menu, and apps) will switch to the color mode you selected.
Configure custom color mode
To apply a custom system color mode, use these steps:
- Open Settings.
- Click on Personalization.
Click the Background page on the right side.

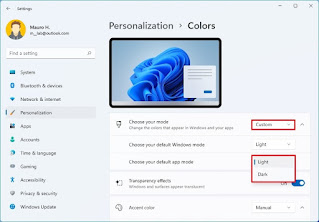
- Use the Choose your mode setting and select the Custom color mode option.
Use the Choose your default Windows mode setting to decide if Start, Taskbar, and other elements should use the light or dark color mode.

- Use the Choose your default app mode setting to decide whether apps should use the light or dark color mode.
After you complete the steps, the custom color mode will apply on Windows 11, depending on your configuration.
Enable or disable transparency effect
Some elements like the Start menu, Taskbar, Quick Settings, Notification Center, and apps can show semi-transparency effects, and in the "Colors" page, you can decide whether or not to use these effects.
To configure transparent effect on Windows 11, use these steps:
- Open Settings.
- Click on Personalization.
Click the Colors page on the right side.

Use the Choose your mode setting and turn on or off the Transparency effects toggle switch.
Configure custom color accent
To apply a custom color accent to your Windows 11 experience, use these steps:
- Open Settings.
- Click on Personalization.
Click the Colors page on the right side.

Use the "Accent color" setting and select the Manual option.
- Select a custom accent color.
- (Optional) Click the View colors button for the Custom colors setting.
Create a custom color.

- Click the Done button.
- (Optional) Use the "Accent color" setting and select the Automatic option to allow the system to use a color based on the colors of the current desktop background.
After you complete the steps, system icons, links, buttons, and many other elements will reflect the new automatic color.
Show accent color on Start menu and Taskbar
If you want the Start menu, Taskbar, Notification Center and Quick Settings, and other elements to use the same color scheme, instead of the system color mode, use these steps:
- Open Settings.
- Click on Personalization.
Click the Colors page on the right side.

Use the "Accent color" setting and select the Manual option.
Quick tip: You can also use the Automatic option.
- Select a custom accent color.
Use the "Choose your mode" setting and select the Dark or Custom option.

Quick tip: If you use the custom option, make sure to use the Dark option for the "Choose your default Windows mode" option.
Under the "Accent color" setting, turn on the Show accent color on Start and taskbar toggle switch.

- (Optional) Turn on the Show accent color on title bars and windows borders toggle switch to show the accent color in borders and title bars (except in File Explorer).
Once you complete the steps, the Start menu, Taskbar, and other visual elements will now use the color accent you selected in the settings.
Show accent color on title bars and borders
To enable accent color for title bars and borders, use these steps:
- Open Settings.
- Click on Personalization.
Click the Colors page on the right side.

Turn on the Show accent color on title bars and windows borders toggle switch to allow the accent color to show in borders and title bars.
After you complete the steps, the accent color will show in the application's border frames and title bars (except in File Explorer).


No comments:
Post a Comment