Thursday, May 4, 2023

Set custom scaling in Windows 11


If the default scaling values do not fit your taste and you need something in-between, Windows 11 allows setting a custom display scaling.

To set a custom DPI for the display scaling level, do the following.Right-click the desktop and then select Display Settings


Click the Scale section.
Find the Custom Scaling option and enter the value you need between 100 and 500%.


Click the button with a checkmark to apply changes.
Click the Sign out now link.

You are done. Unlike default scaling options, you need to sign out and sign back in when enabling or disabling custom scaling in Windows 11.

Note: When setting a custom scaling level, you might get poor image rendering in some apps, as some of them may not support this feature properly. Also, if use a huge scaling factor, some of the controls and buttons may disappear from screen or overlap with other elements. The safest option is to set values between those available in the scaling drop-down list described earlier.


Finally, if you need to adjust the display scaling and DPI in a Registry tweak, it is also possible. The next chapter describes the procedure in detail.
Change display scaling in the RegistryLaunch Registry Editor using the Win + R shortcut and the regedit command.
Go to HKEY_CURRENT_USER\Control Panel\Desktop. You can copy the path and paste it into the address bar in Windows Registry Editor.


Find the "LogPixels" value and edit it.
Switch the Base option from Hexadecimal to Decimal


Change the its value data to one of the following numbers:96 = default 100%
120 = medium 125%
144 = larger 150%
192 = extra-large 200%
240 = custom 250%
288 = custom 300%
384 = custom 400%
480 = custom 500%
Next, find the Win8DpiScaling value and open it. Set its value data to 1 if you use LogPixels value other than 96.


Restart Windows 11 to apply changes.

You are done.

If you want to restore default changes, use a prebuilt registry file. It will let you reset custom scaling in Windows 11 with a single click.

That's it!


Facebook

21thsoft

How to Change DPI Display Scaling in Windows 11


Here is how you can change the DPI display scaling in Windows 11. Increasing or decreasing the display scaling in Windows 11 is how you make UI elements in Windows 11 smaller or bigger. Windows 11 calculates the scaling factor for your monitor automatically, that may not follow you preferences, especially if you have a large display with a high resolution.


Modern devices often include high resolution displays. Even if you have got a small Ultrabook or a Windows tablet, its display resolution can be 1080p or more. Or you may have a desktop monitor with 4K resolution. In this case, Windows 11 will automatically adjust DPI scaling so everything on your screen becomes larger.

DPI stands for Dots per inch. It is the physical measurement of number of pixels in a linear inch of a display. DPI defines a scale factor that Windows uses to resize the running apps and documents. Today, most popular scaling factors are in range 96-125 DPI.

Let's review how to change Display Scaling in Windows 11.


Change DPI Display Scaling in Windows 11

You can adjust the DPI scaling level on Windows 11 using a number of methods. First of all, Windows 11 allows changing it via the Settings app. Secondly, you can configure it directly in the Registry.
Change DPI in Windows 11 using SettingsRight-click the Start menu button and select Settings. Alternatively, press the Win + I shortcut.


Go to the System section and click the Display button. You can also get there directly by right-clicking the desktop and selecting Display Settings.


Find the Scale option and pick a new value from a drop-down list


Windows 11 will instantly apply the new DPI scaling value.

Note that the number of available scaling options depends on your monitor size and resolution. The Recommended percentage value is the default scale size. Also, you may be unable to change the display scaling in Windows 11 if a GPU driver is missing.

Windows 11 applies the new scaling immediately and without the need to restart the system or sign out of your profile. Still, you might need to reopen some apps that do not support per-monitor DPI-awareness version 2. You can read more about how to find DPI-aware apps in Windows 11 in our dedicated article. It also describes various DPI-awareness states and how apps behave in them.


Facebook

21thsoft

Check HDR support in Windows 11


To check HDR support in Windows 11, do the following.

  1. Press Win + I to launch the Settings app. Alternatively, right-click the Start menu button and select Settings.
  2. Go to the System > Display page.


 Find the Brightness and control section and click HDR.


  1. If you have more than one monitor, select the one you need from the “Select a display to view or change it settings” drop-down list.
  2. If the selected monitor supports HDR, it will show Supported next to Play streaming HDR video and Use HDR.


You are done. That is how you check HDR support in Windows 11.

Note that playing HDR content on an HDR-compatible laptop or tablet can cause significant battery drain. HDR uses significantly higher peak brightness, which causes your laptop or table to consume more power.

Some devices disable HDR to preserve the charge. Be sure to check the battery saver settings to allow your computer to use HDR when working from the battery.

Now, let's see how to enable or disable HDR in Windows 11.


Facebook

21thsoft 


Enable Auto HDR in Windows 11


To enable the Auto HDR feature in Windows 11, do the following.

Right-click the Start button and select Settings from the menu.


  1. Head up to System > Display.
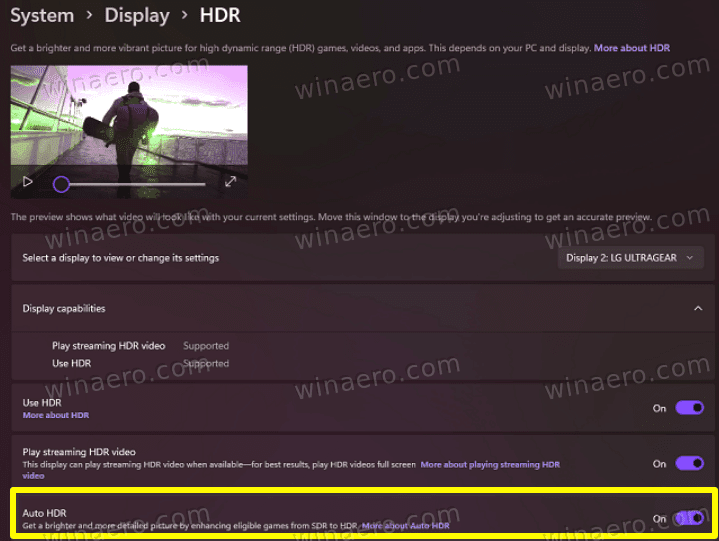
  2. Ensure that the Use HDR option is enabled. Click the small right arrow next to its toggle option.
  3. On the next page, turn on the Auto HDR option.


You are done.

The Auto HDR is now enabled. Now it will automatically improve the video picture when you play a compatible game in Windows 11.

Finally, you can use the Xbox Game Bar to enable Auto HDR.

Enable Auto HDR with Xbox Game Bar

  1. Launch the Xbox Game Bar app (Win + G).
  2. Click on the Settings button on the main bar.
  3. On the left, select Gaming features.
  4. In the right pane, turn on (check) the Use Auto HDR with supported games option.


 That's all about enabling the HDR feature on Windows 11.


Facebook 

21thsoft 

How to Enable HDR in Windows 11


In this post, we will see how to check HDR support, and how to enable HDR in Windows 11. HDR or high dynamic range is a screen technology that allows a display to show more details in extremely bright and dark scenes. Besides, it significantly raises the peak brightness in games or movies for a more immersive experience. HDR-compatible monitors and TVs also can render more rich and contrasty colors.


Windows 11 has a dedicated HDR settings section in the Windows Settings app. It allows you to learn whether your laptop or monitor supports HDR.

Before we start, it is worth mentioning that HDR is not just a software feature you can bring to any computer via driver updates. To enable HDR in Windows 11, you need a compatible monitor and a recent driver from AMD, Nvidia, or Intel.


Enable HDR in Windows 11

You can use Windows 11 Settings, Xbox Game Bar, and a keyboard shortcut to enable HDR in Windows 11. Let's review each of the methods in detail.

Enable HDR in Windows 11 Settings

To enable HDR in Settings, do the following.

Right-click the desktop and select Display Settings from the menu


  1. In Windows Settings, on the Display page, scroll down to find the Use HDR toggle switch.
  2. Turn on the Use HDR option.


 To access advanced HDR options, click the small arrow next to the toggle switch. There, you can adjust more settings, e.g. enable HDR for video streams.


Done!

There are a few more options to turn on HDR in Windows 11. One of them is a special keyboard shortcut.


Enable HDR using a keyboard shortcut

To enable HDR, press Win + Alt + B.  The screen will flicker for a moment, and the HDR feature will be enabled. Pressing the same hotkey will disable HDR.


 As you can see in the screenshot, the shortcut is implemented by the Xbox Game Bar app.

This is probably the most convenient way to enable the HDR feature. Additionally, you can use the Xbox Game Bar app. When your hadrware supports HDR, you can enable it from Game Bar settings.


Turn on HDR in Xbox Game Bar settings

  1. Press Win + G to open the Xbox Game Bar.
  2. Click the Settings button with the gear icon.


  1. In the Settings dialog, click on the Gaming features tab on the left.
  2. Turn on the Use HDR with compatible display option.


You have successfully enabled HDR.

Speaking about games, you can also enable the Auto HDR feature to improve the image quality for games initially designed for SDR. While modern titles are made with HDR by default, there are a galore of classic cool games what are SDR only. The Auto HDR feature is a newest addition to Windows that signiificantly improves the image quality by enabling HDR for such games.


Facebook

21thsoft 

Restore the default bootloader in Windows 11


Going back from the legacy boot menu to the modern one is the same. The only difference is the command you use in Windows Terminal.

  1. Run Windows Terminal as Administrator. Press Win + X and select Windows Terminal (Admin).
  2. Open Windows Terminal to the command prompt. Or, you can open the Start menu, type cmd, and click "Run as Administrator."


 Enter the following command: bcdedit /set {current} bootmenupolicy standard. Press Enter.


  1. Restart your computer to see the updated boot menu.

That is it. Now you know how to enable the Windows 7-like boot menu in Windows 11. It is also worth mentioning that this guide also works in older Windows versions, such as Windows 10, 8.1, and 8.

Windows 8 was the first operating system with a new blue boot menu. Ten years since the release, many users still prefer the classic variant.


Facebook 

21thsoft 

Enable Windows 7-like Legacy Boot Menu in Windows 11


Here's how to enable the classic Windows 7-like legacy boot menu in Windows 11. It helps avoid double restart when switching between the installed operating systems.

Users that update from Windows 7 to Windows 10 and 11 will notice that Microsoft has fully redesigned the boot menu in newer operating systems. Instead of the simple classic menu with the black background and a list of available operating systems, Windows shows a more modern interface that requires an additional restart.

This article will show you how to how to restore the Windows 7-like boot menu in Windows 11. It prevents Windows from restarting when choosing another OS.


 This is useful for those who use more than one operating system on a single computer (dual-boot). The procedure is straightforward and only requires a couple of commands in the Command Prompt.


How to Enable Legacy Boot Menu in Windows 11

Launch Windows Terminal with Administrator privileges. Right-click the Start menu button and select Windows Terminal (Admin).


 Switch Windows Terminal to the Command Prompt profile. Click the arrow-down button on the tab strip and select Command Prompt.


 Enter the following command: bcdedit /set "{current}" bootmenupolicy legacy. Press Enter to execute the command.


  1. Restart your computer to see the changes in action.

You are done. One simple command turns on the legacy Windows 7-like boot menu on systems with Windows 11.


Facebook

21thsoft