Thursday, February 23, 2023

How to Fix It When Windows 11 Won't Shut Down


Powering down a device is a common first step when troubleshooting nearly any tech issue, and Windows 11 is no exception. But what do you do if you can't shut down? Fortunately, there are several easy fixes.

Why Is My Computer Not Shutting Off?

A computer that stays on when you try to shut down is often due to a problem related to software. Either the operating system is experiencing a bug or a program is interfering with the PC's ability to work properly.

Another reason for a computer to not shut down is a broken power button. This is a rare occurrence most people don't need to worry about, but even so, there are other ways to get Windows 11 to shut down even without using the physical power button.

It could also be the case that there's nothing wrong with Windows or the power button, but instead a specific setting is turned off, making it appear as though you can't shut down even when pressing the power button.

Computer Stays on When Trying to Shut Down?

There are several ways to shut down Windows 11, which we'll go over below. But before getting started, it's important to know how the power button on your computer works.

There's a setting in Windows controlling what happens when you press the power button just once. If the button is configured to do nothing when pressed just once, then your computer will stay on when you try shutting down.

This setting exists to prevent accidental shutdowns. You know, when you reach across the desk for something and accidentally touch the power and the shutdown procedure begins. You're likely aware no amount of pleading will stop the process. It happened often enough, Microsoft added a setting to customize the behavior of the power button.

To check, open Control Panel and go to Hardware and Sound > Power Options > Choose what the power button does, change the action to Shut down, and then select Save changes


Windows 11 will now shut down normally after pressing the power button. If you still can't get it to turn off, continue with these steps.

What to Do If Windows Isn't Shutting Down

Depending on how you're used to shutting down, not being able to turn off the computer can usually be fixed by employing a different shutdown technique.

  1. Hold down the physical power button until the computer shuts off.

    Even if there's a software malfunction preventing you from turning off Windows 11 with the mouse or keyboard, most computers will respond to a press-and-hold of the power button. This works regardless of the power button setting in Control Panel.

    This isn't a normal way to turn off a computer because it doesn't give Windows the heads-up it needs to safely shut down. If you're able, ensure that open programs are shut down and all your work is saved.

  2. Alternatively, if you typically use the power button to shut down, try the normal way. It's possible that the power button is the source of the problem, in which case using any Windows 11 shut down method will turn it off.

    Open the Start menu and press the power icon to find Shut down


    Type Ctrl+Alt+Del and then select the power icon, followed by Shut down.

    One reason you can't shut down Windows 11 is if the Start menu isn't responding and therefore not opening, but Ctrl+Alt+Del might still work. 


    In some really specific situations, you might only have access to the command line, like Command Prompt. The power button, desktop, and mouse could all be broken and this will still work to shut off your PC.

    You can still shut down Windows 11 here with the shutdown command. Just enter this:

    shutdown /s 


    One of the previous steps should have been successful and turning off the PC, but if this is a recurring issue, make sure Windows and your device drivers are fully updated.

    Run Windows Update to check for OS updates, and use a driver updater tool to install outdated or missing device drivers. 


    1. Troubleshoot when Windows Update gets stuck or frozen. There are a number of things you can try if this is the reason your computer won't fully shut down.

    2. Run System Restore to restore the computer to a previous state, presumably one where it was letting you shut down normally.

    FAQ
  3. Is it safe to force shut down my laptop?

    Yes, it is safe to shut down your computer by pressing the power button. On older computers, a forced shut down could damage the hardware, but modern devices can be quickly turned on and off with a button.

  4. Why does it take so long for my Windows 11 computer to shut down?

    Windows may take longer to shut down if you have a lot of background processes, services, drivers, or applications running. Use the Task Manager to shut down background programs you don't need, then update all of your software and drivers. If you're still having problems, open Troubleshoot Settings and run the Power troubleshooter.

  5. How do I change my startup programs on Windows 11?

    Press Ctrl+Shift+Esc to bring up Task Manager and select the Startup tab. Select the Status column to sort applications by Disabled and Enabled. If you don't know what something is, leave it alone.

  6. How do I reboot my Windows 11 PC?

    Open the Start menu, select the Power icon, then choose Restart. Alternatively, press Ctrl+Alt+Del, then select Power > Restart.

  7. How do I make my Windows 11 computer shut down on a timer?

    Use Windows Task Scheduler to schedule routine shutdown events. Alternatively, open Command Prompt, type shutdown -s -t and the number of seconds you want, then press Enter.


How to Fix It When There is No Sound from Your Computer Speakers

 Has your computer gone quiet? Don't worry. This guide will teach you how to fix it when there is no sound from your computer. The solutions here should work with most Windows PCs sold in the last decade.


Why Aren't My Computer Speakers Working?

Dozens of issues can cause no sound from your computer, but we can group them into a few broad categories.

  • A problem or defect with the speakers connected to the computer.
  • There is a problem or defect with the physical connection between the computer and the speakers in use.
  • A software issue has disabled the computer's sound.
  • A driver issue has disabled the computer's onboard audio hardware.
  • A problem or defect with the computer's onboard audio hardware.

How Do I Fix It When There's No Audio on My PC?

While the cause of no sound on your computer can vary, the solutions are similar. You can resolve most sound issues through the fixes below.

We recommend you follow the fixes in order, as they move from easy, quick fixes that resolve most sound issues to more specific solutions.

  1. Check that the speakers are plugged in, powered on, and that the volume dial is set at an audible level.

  2. Verify that the speakers are connected to your PC. Most connect over USB or a 3.5mm audio jack (like headphones). Desktop computers have several 3.5mm audio jacks. The audio-out jack is often colored green. If it's not, or the green audio-out jack doesn't work, you may need to read the computer's manual to find the correct output.

  3. Check the volume and mute settings in Microsoft Windows.

    Find and click the Speakers icon on the right-hand side of the Windows taskbar. It will open the Volume Slider. Slide it towards the right to increase the volume.

    Alternatively, you can use the mute, volume-down, and volume-up buttons on your computer keyboard.

    The Volume slider in Windows may work independently of the volume dial on your computer speakers. It is most often true on a desktop PC with external speakers. Be sure to check both!

  4. Click the Speakers icon on the right-hand side of the Windows taskbar (as you did in the previous step). The active audio device will be listed above the Volume Slider. It should match the device you intend to use.

    If it doesn't, expand the list of audio devices by selecting the up arrow in older versions of Windows or, in Windows 11, the speaker icon to the right of the volume slider.

    Select the audio device you intend to use if it's listed. The change will take effect immediately.

    You can also view and change the output device by performing a Windows Search for Sound Settings. Select Sound Settings from the list of results. The Output drop-down box will be the first option listed in the Sound Settings menu.

  5. Close software running on your Windows machine one by one. Begin with software that has a Window open on the Windows desktop.

    Check if the computer's sound is working after closing each problem. It will let you isolate any software causing an issue with your computer's sound.

  6. Restart your computer. This process will fix any lingering issues caused by open software or a temporary configuration problem in Windows settings.

  7. Try the Windows Audio Troubleshooter. Perform a Windows Search for Audio Troubleshooter. Select Find and fix problems with playing sound from the list of results. Follow the troubleshooter's on-screen instructions and perform any fixes it recommends.

  8. Update your computer's audio driver in Windows. Doing this will fix issues caused by an out-of-date or malfunctioning audio driver.

  9. Try a different audio device that connects over another audio output. If you are using speakers connected to a 3.5mm audio jack, try a USB headset instead.

    If the new audio device works, there may be a hardware defect with the prior audio device or the audio output.

  10. If the problem persists, it's likely because of a hardware defect. While some older desktop computers may have a sound card, most modern computers use audio hardware built into the motherboard that the user can't repair. You will need to contact the computer's manufacturer or an independent computer repair shop.

FAQ
  • How do I get sound from my computer to my TV?

    If you own a Mac and an Apple TV, you can use AirPlay to send audio or mirror your desktop to your TV. Otherwise, if your computer has audio-out ports, you can use cables (and adapters, if needed) to connect it and your TV. If your TV uses a Bluetooth soundbar, you can also connect your computer to that.

  • How do I record sound from my computer?

    To record audio using your computer, use built-in software like Voice Recorder or QuickTime Player. You can also use third-party software like Audacity. To record the sound coming out of your computer, you'll need to use a different app or a capture card.


    Facebook 

    21thsoft 

How to Fix Freezing Issues on Windows 11


There’s nothing more frustrating than having your computer freeze without warning or explanation. Unfortunately, PC users are bound to run into this problem at one point or another. It could be a result of several reasons, and the fix may not be apparent at first.

Newer operating systems are prone to suffer from problems like this, and Windows 11 is no exception. If you’re looking for a solution for a Windows 11 PC that locks up a lot, or if individual apps keep going unresponsive. you have come to the right place. Here are possible causes and fixes to the Windows 11 freezing problem.


How to Quickly Fix a Frozen App or System on Windows 11

If a program on Windows 11 locks up, or if the entire operating system comes to a sudden standstill, there are a few tricks you can do to get things working again. Note that these are quick fixes and won't solve the underlying issue that's causing the freezing problem.

1. Launch Task Manager for Frozen Apps


This works if an application is frozen, but your system is still responsive. To launch Task Manager, press Ctrl + Alt + Del on your keyboard. This will bring up a menu with Task Manager as one of the options. Launching Task Manager should force you out of that application and enable you to end the task. Simply right-click on the app you want to close and press End Task.

2. Sign Out to Fix an Unresponsive Task Manager

If the application is unresponsive and you have a frozen screen after opening Task Manager, you can sign out of the session. Use Ctrl + Alt + Del to pull up the same menu as before, but select sign out. This will close any running application by force and return control to you.

3. Force a Shut-Down for a Completely Locked-Up System

This is an unhealthy process for your system, so you wouldn’t want to get into this habit. You should first try other methods of force closing programs without Task Manager. If those don’t work, hold down on your computer’s power button until you see a blank screen. Then, click the power button again to start up your system. This should temporarily remedy the frozen screen.


Long-Term Solutions for a Windows 11 Freezing Issue

The quick remedies may get you out of a bind, but they won’t prevent the problem from occurring again. The best way to fix the problem is to identify what might be causing it. Here are a few possible causes and their fixes.

1. Change the Screen Resolution

This might not seem like a problem initially, but it is worth noting that Windows 11 has different hardware requirements than its predecessor. Your current resolution may have been fine before, but depending on your graphics hardware, it may be causing your system to crash.

Here is how you can change your screen resolution.

  1. Open your Windows Settings
  2. Select System > Display
  3.  

  4.  


  1. You can change your screen resolution under the Display Resolution sub-menu.

Try a few different resolutions to see if any of them solve the freezing problem. If not, you can try common Windows screen resolution fixes.

2. Update Your GPU Drivers

It is important to keep all your display drivers up to date. Outdated drivers could interact negatively with Windows 11 and cause your system to freeze. As such, we've itemized the steps you can follow to update your drivers.


  1. Right-Click on the windows icon and open Device Manager.
  2. Scroll down to the sub-menu labeled Display Adapters.
  3. Here, you will see a list of the graphics processors currently running on your system.
  4. Right-click on the device and select Update driver.
  5.  


Update all display drivers to be on the safe side.

For dedicated graphics cards, it’s best to search for the latest driver on their website. Here is how you can update your Nvidia graphics card drivers on Windows. You can also update AMD graphics card drivers on Windows.

3. Adjust the Virtual Memory

Lack of memory resources is a common cause of freezing issues on any system. For example, you could be running tasks your system cannot keep up with. In a case like this, it is important to ensure that your virtual memory is set to the correct value. Here is how to go about it.

Open your system settings.


  1. Type Performance into the search bar and wait for the options to pop up.
  2. Select Adjust the appearance and performance of Windows.


  1. The Performance Options menu will pop up. Then, under the Advanced sub-menu, click Change.
  2. The Virtual Memory menu will appear. Make sure that the currently allocated memory matches or is higher than the recommended memory. 


Having the paging file size under the recommended value could be causing the freezing problems you are experiencing. Consequently, adjusting this figure appropriately would solve your freezing problem.

4. Run an SFC Scan

If your freezing problems started suddenly after an update, it could have damaged some essential files. You can fix this problem by running an SFC scan. This process will verify your system files and fix any lapses that it may detect. Here is how to run the scan.

  1. Click on the Start button and type cmd.
  2. Right-click on Command Prompt and run it as an administrator.
  3. Type sfc /scannow and hit Enter on your keyboard.


This process may take a while and shouldn’t be interrupted. You can also achieve this by setting up a file scan shortcut for Windows 11.

5. Clear Temporary Files

Everyday system processes generate temporary files. Unfortunately, one of these files may be corrupted, and it could be causing your system to freeze and crash. Luckily, you can eliminate this possibility by clearing your temporary files, and here’s how.


  1. Open your Windows Settings.
  2. Select System
  3. Navigate to the Storage submenu.


  Select Temporary Files.


  1. Ensure all the relevant temporary files are selected, then click Remove files.
  2. Restart your system.

This method should clear out any unnecessary files. You can also try other ways to delete temporary files on Windows 11.

6. Check for RAM Issues

Faulty RAM could be another reason why your Windows PC freezes often. Our guide on the signs and symptoms of a dying RAM stick covers the main ways to spot bad RAM, including some diagnostic scans you can try.

If it’s too much of a hassle, you can easily take your PC to a trusted technician for evaluation.

7. Reset Windows 11 to the Factory Defaults

If none of the above solutions remedies your problem, you can try resetting to a clean slate. Resetting your system should be a last resort, as backing up all of your important files can be a lot of work.

If you want to try it, here's how:

Open Windows Settings and select Recovery on the System tab.


  In the Recovery menu, choose Reset PC.


 Choose whether you prefer to keep your files or remove everything, then follow the on-screen prompts to reset your PC successfully.


This process could take anywhere from a few minutes to a few hours, depending on your system's specifications, so ensure you have enough time to do it.

Knowing the Problem Is Half the Solution

Sudden system freezes can be inconvenient, and it is important to identify the problem as early as possible. Checking each possibility may be a cumbersome process, but it will save you a lot in the long run.

The strenuous troubleshooting process is worth it to have Windows 11 running as smoothly as possible on your system at the end of the day.


 Facebook

21thsoft 

How to connect Multiple Bluetooth Speakers to One PC?

 You sometimes want to connect multiple wireless speakers to your PC. Maybe, you want to enjoy a better experience, or the reason can be anything else. But connecting multiple Bluetooth speakers to a PC can be hectic. Unlike wired speakers, there is no option to use a splitter or hub for the job. So, how can multiple Bluetooth Speakers be connected to one PC? Well, there are a few methods available for this. So let’s quickly go ahead and have a look at them.


How to connect Multiple Bluetooth Speakers to One PC?

Connecting multiple speakers is easy if your PC supports Bluetooth 5.0 or later and uses a few other options. For this tutorial, we will have a look at the following methods:

  1. Use A Windows PC with Bluetooth 5.0
  2. Use Bluetooth Devices That Can Pair With Each Other

Now let’s have a look at these two methods below:

1] Use A Windows PC with Bluetooth 5.0

 If your computer supports Bluetooth 5.0, you can easily connect multiple wireless speakers. As it is one of the features of Bluetooth 5.0 or later.

While modern-day computers might come with Bluetooth 5.0, older-generation computers might not have it. So how do you check that? For this, follow the below steps:

  • Right-click on the Windows Start menu.
  • Go to Device Manager.
  • Double-click on Bluetooth and expand it.
  • Right-click on your Device’s Bluetooth adapter and click on Properties.
  • Go to the Advanced Tab and have a look at the LMP value.


  • If the LMP value is 9, then your device has Bluetooth 5.0. Anything below nine means you have an older version of Bluetooth.

If your PC does not have Bluetooth 5.0, you can buy a Bluetooth 5.0 adapter and use it for the job.

Read: How to Split Sound between Speakers and Headphones in Windows

2] Use Bluetooth Devices That Can Pair With Each Other

You can also get speakers or devices that can pair with each other. Many new-gen speakers do allow you to pair them with each other. So if you happen to have such speakers, here is how you can connect them:


  • Go to Start Menu > Settings > Bluetooth & Other devices.
  • From here, turn on Bluetooth and click on the Pairing option on the first speaker.
  • Next, click on Add Bluetooth or other device buttons on Windows and select the Bluetooth option.
  • Now Windows will start searching for available Bluetooth devices. When it finds the device, click on the device you want to connect to and follow the onscreen steps.
  • Next, turn on the second speaker, and press the Connect button on the speaker. Repeat the same on the first speaker.
  • It will start looking for an existing speaker and connect to it.
  • Once done, any audio you play on your PC will be available on both speakers.

Conclusion

So those were two quick ways to connect multiple Bluetooth speakers to one PC. One good way would be to get a Bluetooth 5.0 adapter for your Windows PC. It is a small dongle that will use a USB port. Anyway, for any other questions, comment below.

Is there an app to connect multiple Bluetooth speakers?

There are a few apps that let you connect multiple Bluetooth speakers. However, these apps are mostly device based, which means you need to have a speaker from a specific manufacturer to use their app. Examples of such apps are Bose Connect and Ultimate Ears.

Read: How to set up Preferred Speaker & Microphone for different Apps in Windows

Can I connect two Bluetooth speakers at once to PC?

Yes, you can connect two Bluetooth speakers at once to your Windows PC. Whether it runs on Windows 11 or Windows 10, you can connect more than one speakers at once and use them simultaneously. However, the only condition is to have Bluetooth 5.0.


21thsoft

Facebook 

How to Check Computer History


What to Know

  • Browser history: Windows: Ctrl+H for history, Ctrl+J for downloads.
  • Mac: Command+Y for history, Command+Option+L for downloads.
  • In Windows, use File Explorer to see what files were accessed when, and in Mac, use the Finder app.

If you suspect someone was using your computer and you want to see what they were up to, here's how to check to see if there are some traces of what was accessed.

How Do I Check The Recent History Of My Computer?

To check the recent history of a computer, you should start with the web browser history and then move to the files itself. Remember, however, browser history can be revised or deleted, and Windows files can be hidden.

  1. To open a browser history:

    • On Windows browsers, including Microsoft Edge, Firefox and Opera use Ctrl+H.
    • In Google Chrome, use Ctrl+H or go to My Google Activity.
    • For Apple Safari use Command+Y. 

    This command will open a window with a list of websites viewed, with the most recent pages first. You can also find this in the menu of each browser, under History.

  2. At the top of the History window, use the search bar to find any specific sites you might be looking for. 


    1. Tip: Microsoft Edge will only retain browser history for up to 90 days, so what you're checking may not be available.

    2. To see what files may have been downloaded:

      • Press Ctrl+J in any Windows browser.
      • For Apple Safari, press Command+Option+L

      This also has a search function, which is useful for finding past downloads.

    3. Once you’ve checked the browser, look at files or programs that may have been accessed.

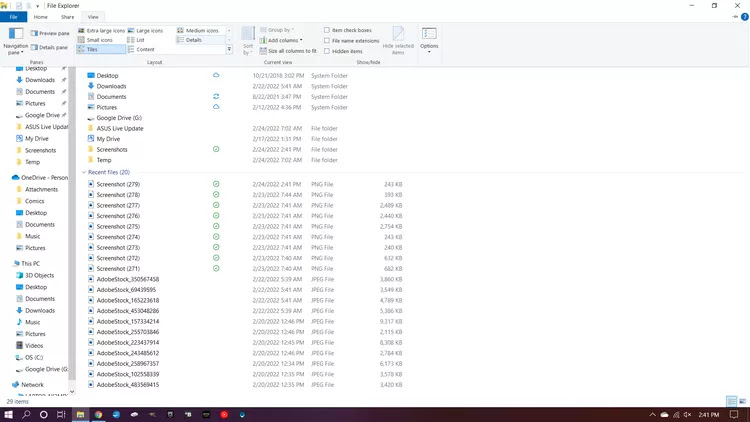
      • In Windows: Open the File Manager > Quick Access or log into your Microsoft account and scroll down to App And Service Activity.
      • On Macs: Click the Apple menu to see a short list of recently used files, drives, and servers. For a longer list, you can open the Finder app by pressing Command+Option+Space or click on your desktop and choose File > New Finder Window. In the Finder, select View > Show View Options > Sort By > Date Modified.

      This will show you all the files that have been accessed, most recent first. If your computer has multiple drives, look at each one to see if there are any changes.

      In Windows File Manager, use View > Details to show a column with the date and time a file was last changed.


      Can I See Recent Activity On My Computer?


      Generally, you should be able to view your computer’s recent history. However, if you’re not finding what you’re looking for, there could be a few reasons.

      • If a private mode, such as Chrome’s Incognito or Edge’s InPrivate, are used, the history won’t be recorded.
      • Data can be purged as part of regular maintenance or due to browser problems. Also, browsers can be configured to automatically erase browser history.
      • Windows privacy settings can be changed, so certain actions may not be documented.
      • Some third-party apps, like gaming tools, may only show in the File Explorer or Finder that they were used, not what was done on them. These apps may have separate history you can check when you open them.
      • Secondhand and used devices are often purged of any identifying data or other materials, both to protect the previous owner and offer the new one a “clean” device.
      • On Macs it's very easy for users to clear the Recent Activity menu (there's an option to clear the menu at the bottom of the menu itself).
      FAQ
      • How do I clear Google search history on my computer?

        You can delete your old Google searches on the My Activity page. Select Controls, and then click Manage all Web & App Activity. On the next page, choose the Delete menu and choose the timeframe to clear. Note that you can't use these settings unless the web and app activity option is active.

      • How do I delete browser history on my computer?

        How you clear the list of websites you've visited depends on which browser you're using. You can always open your history using either the Command + H or Shift + Command + H keyboard shortcut, and on that page, you can delete all or part of the list.


        21thsoft 

        Facebook 

How to Change the Windows Startup Sound


What to Know

  • Install Resource Hacker. Go to File > Open, select imageres.dll.mun in Windows\SystemResources.
  • Right-click WAVE > 5080 : 1033, select Replace Resource. Pick WAV file. Save edited MUN file to Desktop.
  • Boot to the ASO menu and run commands to back up the original MUN file and then copy the edited one in its place.


This article explains how to change the startup sound in Windows 11 and Windows 10. It also describes how to completely disable the Windows startup sound if you'd prefer, and how to pick a startup sound for other actions in Windows.

How to Change the Startup Sound in Windows 11 & 10

It's easy to change system sounds in Windows 11 or pick different sounds in Windows 10 because Microsoft provides a tool built right into the OS. Changing the startup sound is a different thing entirely.

Fortunately, however, since we know where the Windows startup sound file is located, we can replace it with a different file that we'd rather use instead. To make this change, we'll use a free program and some simple Command Prompt commands (via Advanced Startup Options).

  1. Install Resource Hacker. This program lets you edit the startup WAV sound.

    There are two versions of this tool on the download page. Choose the EXE link for a quicker installation.

  2. Open Resource Hacker and go to File > Open, and select this file:

    C:\Windows\SystemResources\imageres.dll.mun
    

    If you're using Windows 10, and it's not updated to v1903 or newer, choose this file instead:

    C:\Windows\System32\imageres.dll
    

    Open Run and enter winver to see which version of Windows 10 you have. If you're running Windows 11, just use the first path above.

  3. Expand the WAVE folder on the left, and then right-click 5080 : 1033 and select Replace Resource


     Choose Select File, select the WAV file you want to use as the startup sound, and then choose Open


    1. To use one of the audio files that comes with Windows, look in this folder:

      C:\Windows\Media
      

      This has to be a WAV file. If the file you have isn't in that format, run it though a free audio file converter.

    2. Select Replace in Resource Hacker.

      To preview the file you chose, select Play WAVE. You can always repeat these last two steps to replace it with something else if you don't like the way it sounds.

    3. Save it to the Desktop folder, and don't change the name. 


       Close out of the program, and then access the Advanced Startup Options menu. To do this in Windows 11, go to Settings > System > Recovery > Restart now (next to Advanced startup).


      If you see a prompt about saving your work, take note of what it says, and select Restart now.

      Go to Troubleshoot > Advanced options > Command Prompt on the ASO menu. 


      When Command Prompt opens, type these commands exactly as they're written here, pressing Enter after each one. These commands will make a backup of the original imageres file.

      Change the working path to the C drive:

      C:
      

      Change the working path to the SystemResources folder:

      cd Windows\SystemResources
      

      Remember that if you're using a version of W10 that's older than v1903, every command in this guide that refers to the above path and the file below should be replaced with this path and this DLL file: C:\Windows\System32\imageres.dll.

      Rename the original MUN file so Windows ignores it:

      ren imageres.dll.mun imageres.dll.mun.old 


      Before Command Prompt shows up, you might be told to enter your user account's password. Do that now, if so.

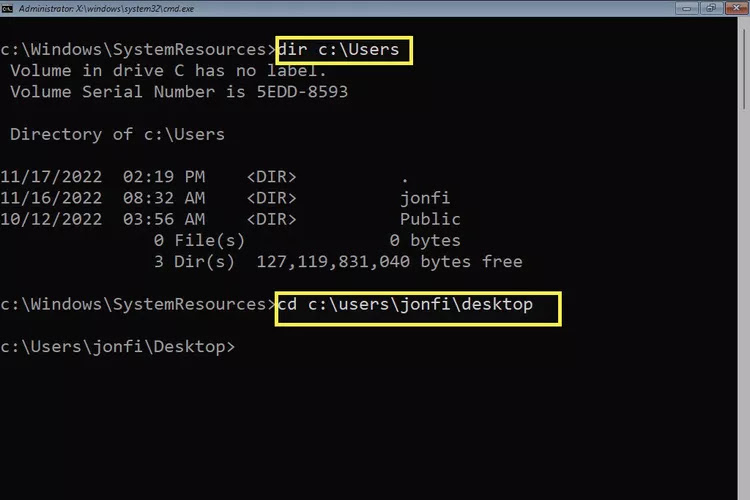
      You can now copy the modified imageres file you made earlier to the right folder so Windows will read from it to understand which WAV file to play at startup. However, before doing this, you need to identify your username.

      Get a list of all the users on your computer:

      dir C:\Users
      

      Find your username from the list, and then enter this (replace jonfi with your username) to change the working path to your Desktop folder:

      cd C:\Users\jonfi\Desktop 


       Now that Command Prompt is focused on the Desktop folder, which is where you saved the custom file you created, you can easily copy it to the SystemResources folder: 


      copy imageres.dll.mun C:\Windows\SystemResources


      f the command completed successfully, you'll see the message 1 file(s) copied.

      Exit Command Prompt, and select Continue to boot into Windows and test the sound. 


      If you don't hear it, keep reading. The startup sound might just be disabled.

      How to Turn the Windows Startup Sound on or Off

      Windows might not make it easy to change the startup sound, but it certainly doesn't complicate turning it on and off. There's actually a toggle you can switch off to disable the sound, or switch on to hear the startup sound.

    4. Open Settings, and then go to System > Sound.

    5. Scroll down and select More sound settings (Windows 11), or select Sound Control Panel (Windows 10) on the right.

    6. Go into the Sounds tab, and remove the check next to Play Windows Startup sound to turn it off, or place a check there to start hearing the sound. 


    7.  

      Select OK to save.

      Following these steps to turn the startup sound off will not undo the first set of directions above. All it does is prevent that sound file from being used during startup. If you turn the sound back on, it will revert to the custom sound you chose.

      How to Restore the Original Windows Startup Sound

      There are a few ways to do this. The first method is a reversal of the process described above.

      To restore the default startup sound, use the del command to remove the edited MUN file you put in the SystemResources folder, and then rename the backup file so Windows will read from it again, and thus play the original WAV file.

      After you get the Command Prompt open from the ASO menu (see the steps above for help), and you enter C: to focus on the local drive, enter these commands:

      cd C:\Windows\SystemResources
      
      del imageres.dll.mun
      
      ren imageres.dll.mun.old imageres.dll.mun
      

      If you'd rather not go that route, run the sfc /scannow command to attempt to restore the default imageres file. Some users have noted that updating Windows to a new build might break the edit, too.

      Changing Other Startup Sounds

      Windows also lets you change the startup sound for other parts of your PC. Unlike the Windows startup sound, which plays when you first land on the lock screen when the computer boots up, there are a few other times you can have a sound file triggered.

      From the Sound tool are options like Start Navigation and Open Program. If you choose the latter, for example, you can make Windows play a startup sound each time a program starts. To do this, check out our How to Change Windows 11 System Sounds article.

      You can also edit the sound that plays when you log on to Windows, meaning after you type your password and the Desktop first appears. To do that, follow the guide linked above to learn where to go in Control Panel to access the sound editor; you're looking for Windows Logon


      This is much easier to do in older Windows versions, but still very possible in Windows 11 & 10, though only after a registry edit. To see the logon sound option in the Sound tool in these Windows versions, find this entry in Registry Editor and change the value from 1 to 0:

      HKEY_CURRENT_USER\AppEvents\EventLabels\WindowsLogon\ExcludeFromCPL
      
      FAQ
    8. How do I get my sound back on Windows 10?

      To fix the problem of no sound on Windows 10, check your cables and volume levels, and verify that the current audio device is the system default. If you're still having issues, restart the computer, try a system restore, and run the Windows 10 Audio Troubleshooter.

    9. How do I turn off Windows 10 notification sounds?

      To turn off Windows 10 notifications, go to Start > Settings > System and select Notifications & actions. Underneath Notifications, turn off Get notifications from apps and other senders. You can also choose to allow notifications from specific senders.

    10. How do I update sound drivers on Windows 10?

      To update drivers in Windows to fix an audio problem, locate and download the correct drivers. Open Device Manager and go to the correct device. Right-click or press-and-hold on the hardware and choose Update Driver. The driver-update wizard will launch; follow the instructions.