What to Know
- Install Resource Hacker. Go to File > Open, select imageres.dll.mun in Windows\SystemResources.
- Right-click WAVE > 5080 : 1033, select Replace Resource. Pick WAV file. Save edited MUN file to Desktop.
- Boot to the ASO menu and run commands to back up the original MUN file and then copy the edited one in its place.
This article explains how to change the startup sound in Windows 11 and Windows 10. It also describes how to completely disable the Windows startup sound if you'd prefer, and how to pick a startup sound for other actions in Windows.
How to Change the Startup Sound in Windows 11 & 10
It's easy to change system sounds in Windows 11 or pick different sounds in Windows 10 because Microsoft provides a tool built right into the OS. Changing the startup sound is a different thing entirely.
Fortunately, however, since we know where the Windows startup sound file is located, we can replace it with a different file that we'd rather use instead. To make this change, we'll use a free program and some simple Command Prompt commands (via Advanced Startup Options).
-
Install Resource Hacker. This program lets you edit the startup WAV sound.
There are two versions of this tool on the download page. Choose the EXE link for a quicker installation.
-
Open Resource Hacker and go to File > Open, and select this file:
C:\Windows\SystemResources\imageres.dll.munIf you're using Windows 10, and it's not updated to v1903 or newer, choose this file instead:
C:\Windows\System32\imageres.dllOpen Run and enter winver to see which version of Windows 10 you have. If you're running Windows 11, just use the first path above.
-
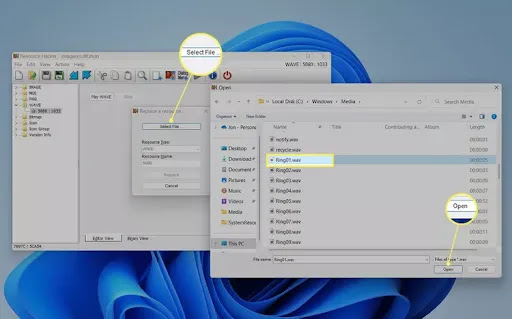
Expand the WAVE folder on the left, and then right-click 5080 : 1033 and select Replace Resource.
Choose Select File, select the WAV file you want to use as the startup sound, and then choose Open.
To use one of the audio files that comes with Windows, look in this folder:
C:\Windows\MediaThis has to be a WAV file. If the file you have isn't in that format, run it though a free audio file converter.
-
Select Replace in Resource Hacker.
To preview the file you chose, select Play WAVE. You can always repeat these last two steps to replace it with something else if you don't like the way it sounds.
-
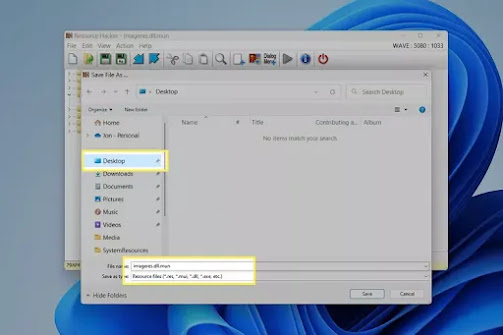
Save it to the Desktop folder, and don't change the name.
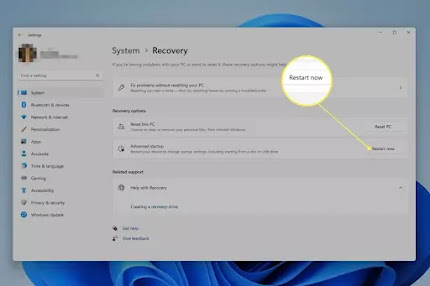
Close out of the program, and then access the Advanced Startup Options menu. To do this in Windows 11, go to Settings > System > Recovery > Restart now (next to Advanced startup).
If you see a prompt about saving your work, take note of what it says, and select Restart now.
Go to Troubleshoot > Advanced options > Command Prompt on the ASO menu.
When Command Prompt opens, type these commands exactly as they're written here, pressing Enter after each one. These commands will make a backup of the original imageres file.
Change the working path to the C drive:
C:Change the working path to the SystemResources folder:
cd Windows\SystemResourcesRemember that if you're using a version of W10 that's older than v1903, every command in this guide that refers to the above path and the file below should be replaced with this path and this DLL file: C:\Windows\System32\imageres.dll.
Rename the original MUN file so Windows ignores it:
ren imageres.dll.mun imageres.dll.mun.old
Before Command Prompt shows up, you might be told to enter your user account's password. Do that now, if so.
You can now copy the modified imageres file you made earlier to the right folder so Windows will read from it to understand which WAV file to play at startup. However, before doing this, you need to identify your username.
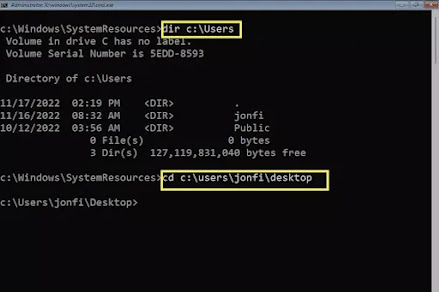
Get a list of all the users on your computer:
dir C:\UsersFind your username from the list, and then enter this (replace jonfi with your username) to change the working path to your Desktop folder:
cd C:\Users\jonfi\Desktop
Now that Command Prompt is focused on the Desktop folder, which is where you saved the custom file you created, you can easily copy it to the SystemResources folder:
copy imageres.dll.mun C:\Windows\SystemResources
Exit Command Prompt, and select Continue to boot into Windows and test the sound.
If you don't hear it, keep reading. The startup sound might just be disabled.
How to Turn the Windows Startup Sound on or Off
Windows might not make it easy to change the startup sound, but it certainly doesn't complicate turning it on and off. There's actually a toggle you can switch off to disable the sound, or switch on to hear the startup sound.
-
Open Settings, and then go to System > Sound.
-
Scroll down and select More sound settings (Windows 11), or select Sound Control Panel (Windows 10) on the right.
-
Go into the Sounds tab, and remove the check next to Play Windows Startup sound to turn it off, or place a check there to start hearing the sound.
Select OK to save.
Following these steps to turn the startup sound off will not undo the first set of directions above. All it does is prevent that sound file from being used during startup. If you turn the sound back on, it will revert to the custom sound you chose.
How to Restore the Original Windows Startup Sound
There are a few ways to do this. The first method is a reversal of the process described above.
To restore the default startup sound, use the del command to remove the edited MUN file you put in the SystemResources folder, and then rename the backup file so Windows will read from it again, and thus play the original WAV file.
After you get the Command Prompt open from the ASO menu (see the steps above for help), and you enter C: to focus on the local drive, enter these commands:
cd C:\Windows\SystemResourcesdel imageres.dll.munren imageres.dll.mun.old imageres.dll.munIf you'd rather not go that route, run the sfc /scannow command to attempt to restore the default imageres file. Some users have noted that updating Windows to a new build might break the edit, too.
Changing Other Startup Sounds
Windows also lets you change the startup sound for other parts of your PC. Unlike the Windows startup sound, which plays when you first land on the lock screen when the computer boots up, there are a few other times you can have a sound file triggered.
From the Sound tool are options like Start Navigation and Open Program. If you choose the latter, for example, you can make Windows play a startup sound each time a program starts. To do this, check out our How to Change Windows 11 System Sounds article.
You can also edit the sound that plays when you log on to Windows, meaning after you type your password and the Desktop first appears. To do that, follow the guide linked above to learn where to go in Control Panel to access the sound editor; you're looking for Windows Logon.
This is much easier to do in older Windows versions, but still very possible in Windows 11 & 10, though only after a registry edit. To see the logon sound option in the Sound tool in these Windows versions, find this entry in Registry Editor and change the value from 1 to 0:
HKEY_CURRENT_USER\AppEvents\EventLabels\WindowsLogon\ExcludeFromCPLFAQ-
How do I get my sound back on Windows 10?
To fix the problem of no sound on Windows 10, check your cables and volume levels, and verify that the current audio device is the system default. If you're still having issues, restart the computer, try a system restore, and run the Windows 10 Audio Troubleshooter.
-
How do I turn off Windows 10 notification sounds?
To turn off Windows 10 notifications, go to Start > Settings > System and select Notifications & actions. Underneath Notifications, turn off Get notifications from apps and other senders. You can also choose to allow notifications from specific senders.
-
How do I update sound drivers on Windows 10?
To update drivers in Windows to fix an audio problem, locate and download the correct drivers. Open Device Manager and go to the correct device. Right-click or press-and-hold on the hardware and choose Update Driver. The driver-update wizard will launch; follow the instructions.


No comments:
Post a Comment