he Nvidia Control Panel allows you to access all the features of your graphics card, so knowing how to open the Nvidia Control Panel allows you to quickly change your monitor and graphics card settings.
Although the Nvidia Control Panel isn’t readily apparent on your desktop, opening it is simple. We have a handful of ways to access it, as well as some tips for how to get the most out of the software.
Before getting started, make sure to download the latest version of Nvidia Control Panel. Even if you have a previous version installed, we recommend selecting the Clean Installation option to make sure you don’t have any conflicting drivers or software.
If you’ve recently updated your graphics card drivers, you shouldn’t need to worry about that. When you update your drivers, Nvidia Control Panel should automatically install. Regardless of how you got it, you can open the Nvidia Control Panel by following these steps:
Step 1: Right-click anywhere on your desktop.
Step 2: (Windows 11 only) Select Show More Options.
Step 3: Select Nvidia Control Panel.
That’s the quickest and easiest way to pull up the Nvidia Control Panel, but there are a few other ways to access it. It should be open any time you’re using your graphics card, so you can also find it by following these steps:
Step 1: Expand the system tray in your taskbar.
Step 2: Find the Nvidia logo (called Nvidia Settings).
Step 3: Right-click it, and select Nvidia Control Panel.
You can also find the Nvidia Control Panel through the Control Panel in Windows 10. However, recent versions of Windows have adopted a different look, making this route the most difficult. If you’re a hotkey fanatic, you can also use Windows Key + S and quickly search for the Nvidia Control Panel to pull it up.
What you can do in Nvidia Control Panel
Nvidia Control Panel is focused entirely on your graphics card. That includes the card itself, how it uses settings in games and applications, and how your monitor behaves. It’s a dense piece of software, so we can’t cover everything here, but we’ll hit the most important parts.
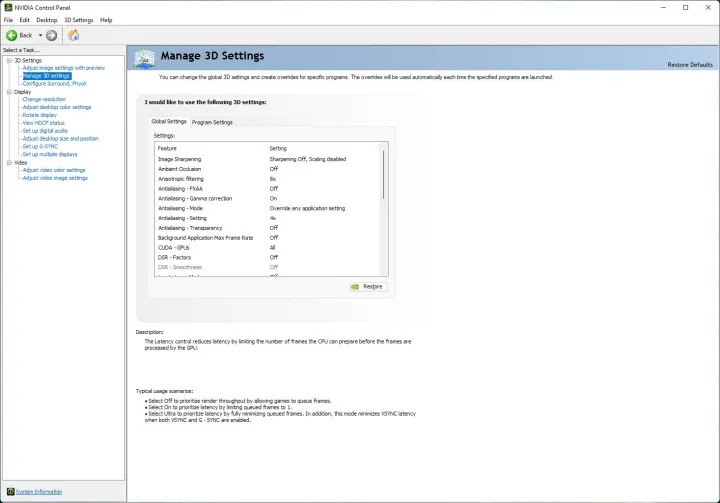
The Manage 3D Settings area is where you’ll spend a lot of your time. Here, you can tweak global settings like your antialiasing mode, max frame rate, and if you want to use G-Sync with your monitor. You can change these settings globally or on a program-by-program basis by switching the tab.

After that, the Change Resolution section is very important. As the name implies, you can change the resolution of your display here. More importantly, you can also change the refresh rate and color settings of your monitor. It’s important to check this section out when you buy a new monitor, especially if it has a high refresh rate.
Finally, the Set Up Multiple Displays option is critical if you have a multi-monitor setup. It allows you to quickly identify displays and drag them around to match how they’re sitting on your desk. You can also manage Nvidia Surround settings here if you want to stretch applications across multiple screens.
No comments:
Post a Comment