
The Inaccessible_Boot_Device error is another BSOD (stop code) issue that can arise due to various causes. This particular error has a 0x0000007b stop code and often arises during the system startup.
As the Inaccessible_Boot_Device error occurs in such a moment, it’s more serious than random BSOD errors because it stops PCs from booting correctly. Consequently, some users can’t log in to and utilize their computers when this error arises.
What is an inaccessible boot device in Windows 11?
In general, a boot device is any piece of hardware that holds or is capable of reading the files and drivers necessary for a computer launch. To start your computer, the operating system is usually loaded from the boot media, which can be a hard disk, a CD/DVD, or a USB drive.
In a nutshell, the inaccessible boot device error informs the PC that it has met a problem and must restart to address it. If you notice an Inaccessible Boot Device this implies that your computer is unable to read the Windows 11 partition on the hard drive from which it boots.
This problem might lead to hard disk failure. It might also be a simple driver issue or a boot record failure.
When Windows boots up, it may fail to reach the memory partition containing the system files. This results in the Inaccessible_Boot_Device error message in Windows 11 and stops your PC from booting.
What causes an inaccessible boot device?
Although many many reported seeing this error message as a consequence of a failed update, the boot device problem can be caused by a variety of factors, including BIOS upgrades and overclocked CPUs. In most cases, an inaccessible boot device signifies more than just one reason.
One of your SSDs is not showing, which might be unlikely but not impossible. You can always try plugging it into another computer to see if the SSD appears. Another aspect to consider is something in the BIOS has been modified, preventing the computer from accessing the SSD.
The good news is that, due to its proximity to the Windows Update, this is easily fixable and will result in no data loss. It’s only that Windows can’t locate the disk, but all of the data on the drive is still present and will remain. These are the most common scenarios in which you may encounter this error:
🚩Inaccessible boot device Windows 11 after driver update failure
🚩Inaccessible boot device Windows 11 after clone is made
🚩Inaccessible boot device after BIOS update not successful
🚩Inaccessible boot device Windows 11 SSD is missing
As stated by many users, Lenovo and Dell are the most afflicted PC manufacturers by the inaccessible boot device windows 11 error, but that doesn’t mean it’s standard only on these PC brands.
The worst aspect about it all is that these are caused by necessary updates without notice. This is a complex fix, but it is achievable once you have access to the Advanced Boot settings and the command prompt.
The same Inaccessible_Boot_Device error appears on Windows 10 too. There are, however, a few ways you can feasibly fix it. To do so, you’ll need to make the most of Windows 11’s built-in system tools, which often provide the best solutions for BSOD issues.
Is this a blue, green, or black screen error?
In Windows 10, the Inaccessible_Boot_Device error is a Blue Screen of Death error. However, Microsoft has changed the background color of BSOD errors to black in Windows 11. Therefore, this issue is a Black Screen of Death one in the latest desktop platform, but it’s still the same error.
To make things a bit more confusing, Windows 11 Insider Preview builds have Green Screens of Death errors instead of black ones. They’re the same errors with a different background color. Thus, the Inaccessible_Boot_Device error screen can also have a green background for some users.
Therefore, the Inaccessible_Boot_Device is a blue, green, and black screen error. It’s still the same issue on Windows 11 and 10 irrespective of its background color.
How can I enter Windows 11’s Advanced Recovery Options?
If you can’t get into Windows 11 because of the Inaccessible_Boot_Device error, you’ll need to enter Advanced Recovery Options during the system startup. Advanced Recovery Options is a centralized blue menu outside of Windows that includes numerous system tools and options.
Some users may be able to enter Advanced Recovery Options with the F11 keyboard key. Try pressing it shortly after turning on your PC. Then the blue Choose an option menu might open, but that’s not a universal method.
If that doesn’t work, restart the computer by pressing and holding its Power button for about 5 to 10 seconds when you see the Windows logo during the startup. Force the shutdown in that way three times. After you restart your PC like that three times in a row, an Automatic Repair screen will appear.
This screen includes an Advanced options button. Click that button to enter the Advanced Recovery Options menu. From there, you can access system tools that can feasibly fix the Inaccessible_Boot_Device error or activate Safe Mode.


Thereafter, you will be able to apply the potential fixes below as outlined in Safe Mode. That mode is a special diagnostic one for Windows 11, which loads with only minimal driver sets and services.
How can I fix Windows 11’s Inaccessible_Boot_Device error?
Run a system file scan
- Click the magnifying glass icon for the search tool on Windows 11’s taskbar.

- Type cmd in the search text box.
- Select the Run as administrator option to open an elevated Command Prompt window.

- First, input this command and press Enter:
DISM.exe /Online /Cleanup-image /Restorehealth - Then type in this SFC command and press Return:
sfc /scannow
- Wait for the scan to reach 100 percent verification to view its outcome.

2. Run a Check Disk scan
- Open an elevated Command Prompt as outlined within steps one to three of the previous resolution.
- Type the following command in the Prompt’s window:
chkdsk /r C: - Press the Enter keyboard key to start the scan.

- Thereafter, wait for the Check Disk scan to finish.
- Open the Start menu, and click the Power, then Restart.
3. Remove recent Windows 11 updates
- Click the taskbar’s Start button.
- Select the Settings app that’s pinned to the Start menu.

- Next, click the Windows Update tab.
- Select Update history on that tab.


Select the most recently installed update on the window that you can see below:

- Then click the Uninstall button.
4. Run the Startup Repair utility
- Click the taskbar’s Start menu button.
- Select the Power option.
- Then click the Restart option whilst pressing and holding the Shift key.
- Next, select Troubleshoot and Advanced options.

Select the Start-up Repair option.

Update device drivers
- Right-click the Start menu’s button to select Device Manager.
- Look for devices with yellow exclamation marks by them in Device Manager.
- If you find a device with a yellow exclamation mark, right-click it and select Update driver.

Then select the Search automatically for updated driver software option within the window that opens.
Roll Windows 11 back to a restore point

NOTE
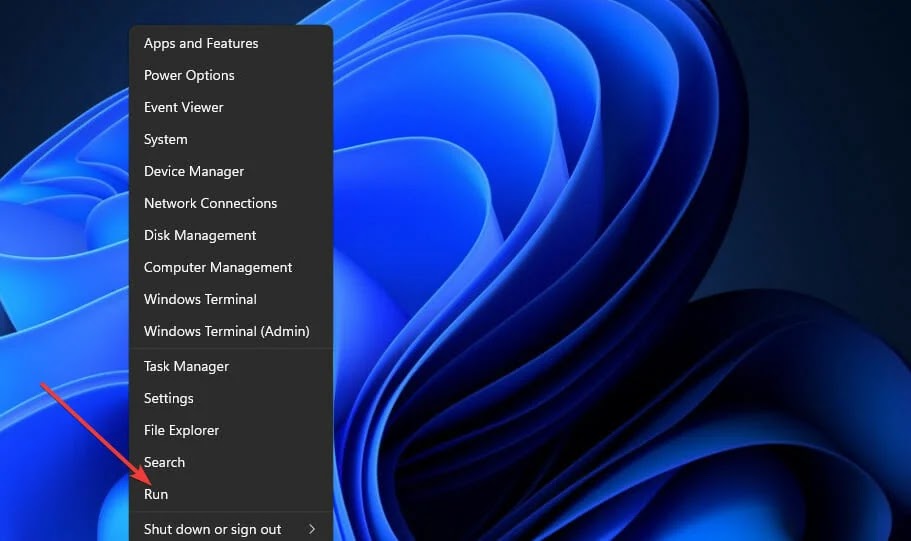
- Press the Windows key + R keyboard shortcut, which will open Run.
- Type this text in Run’s Open box:
rstrui - Click OK to bring up System Restore.
- Press the Next button.

- If there’s a Show more restore point option available, select that checkbox.
- Choose a restore point that will roll Windows 11 back to a time that predates the Inaccessible_Boot_Device error on your PC. Or select the oldest restore point available.

- Select the Next option.
- Click Finish to start the restoration process.
7. Reset Windows 11
- Click Start, then Settings in Windows 11.
- Select Recovery on the System tab.

Press the Reset this PC button.
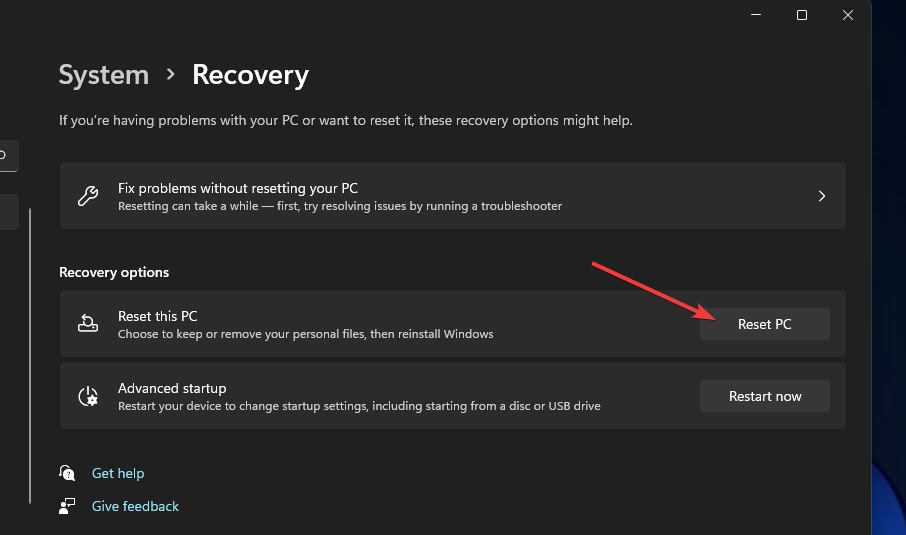
Select Keep my files in the Reset this PC utility.

- Next, click the Local reinstall option.
- Select the Next option to continue.
- Click Reset to confirm.
Can I apply the potential fixes above without entering Safe Mode?
The Advanced options menu outside of Windows includes System Restore, Command Prompt, Startup Repair, and Uninstall Updates tools. So yes, you can apply most of the resolutions above by opening the required tools for them from there.
To reset the platform outside of Windows, you’ll need to select Troubleshoot and Reset this PC within Advanced Recovery Options. Then the Reset this PC utility open. Thereafter, you can select the options to reset Windows 11 as required.
The Advanced options menu also includes a System Image Recovery utility. If your PC has a system image backup, that option could resolve the Inaccessible_Boot_Device error.
If those potential resolutions aren’t enough to fix the Inaccessible_Boot_Device error on your computer, the issue might be due to faulty hardware. In which case, you might need to remove and replace faulty internal hardware modules to solve it.
It’s not recommended for home users to remove faulty internal components themselves. So, consider returning your PC to its manufacturer for repairs if the above resolutions don’t resolve the error. If your computer is still within its warranty period, its manufacturer might fix the issue free of charge.
However, give the potential resolutions above a try first before turning to any IT support or repair services. Although they’re not entirely guaranteed fixes, there’s a good chance at least one of them will resolve the Inaccessible_Boot_Device error on your PC.
Even more, take a look at this article dedicated to solving No boot device available errors. Even if it’s for Windows 10, rest assured that the solutions may be applied on Windows 11 PCs too.
If you have any questions, don’t hesitate to leave them in the comments section below and we’ll be sure to take a look.
No comments:
Post a Comment