What to Know
- WIN + A is the fastest way to open Quick Settings.
- Choose a button from the menu to toggle that feature on/off. Arrows provide additional options.
- Select the pencil icon to edit an item's position or visibility in the panel.
This article explains how to open Windows 11 Quick Settings, what all the available options are for, how to edit what you see in the menu, and in which ways it's both useful and limited.
How to Use the Quick Settings Menu in Windows 11
We'll go over all of what the Quick Settings menu can do further down
this page, but let's start with how to open it and use it for something
simple like turning Bluetooth on and off.
Specific steps may differ based on the operating system version you're running, but the basic process will be the same.
Open Quick Settings by selecting the network, volume, or battery icon next to the clock on the taskbar. You can also use the Windows key + A shortcut, or if you're on a touchscreen, swipe up from the lower right bottom of the screen.

Select the Bluetooth icon to turn it on (colored) or off (white).
The Not connected message is seen directly below the toggle when Bluetooth is on but isn't actively connected to a device. This is replaced by the device's name when it's connected to your computer.
This toggle should be visible by default. See the directions below if you don't see it.
-
Select the arrow next to the toggle to view available Bluetooth devices. This is also where you can see the estimated battery life remaining on your devices.
Not all toggles have an arrow because some of them are just simple on/off switches.
-
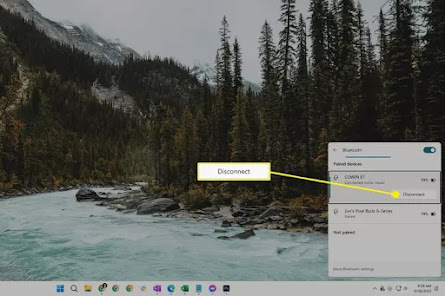
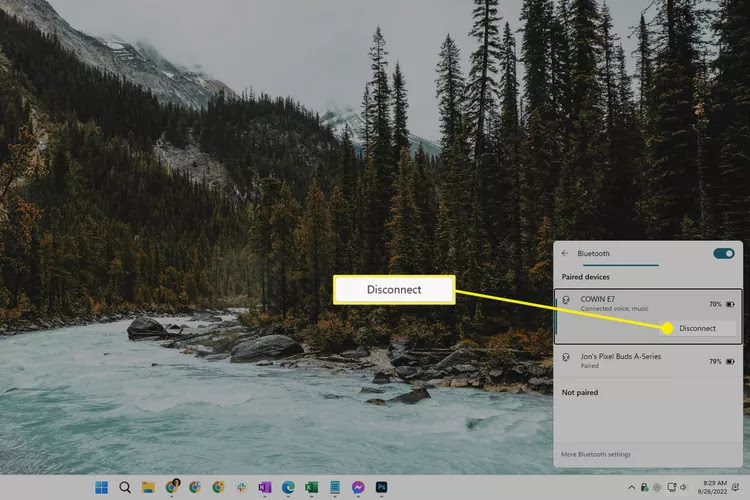
Select a device from the list to connect to it. Devices you've already paired are separated from ones that aren't yet paired.
Or, if you're currently connected, select it to find the Disconnect button to stop using that device (you won't need to repair the device later; this just terminates the connection right now).
This panel is one way to quickly access the other Bluetooth settings available in Windows 11. Use the More Bluetooth settings link at the bottom to do more, like view printers and other devices.
-
To close out of Quick Settings, select anywhere outside the panel or use the WIN+A shortcut.
Everything You Can Do With Quick Settings
There are several settings shortcuts available in this menu. A few are present only if your device runs on a battery.
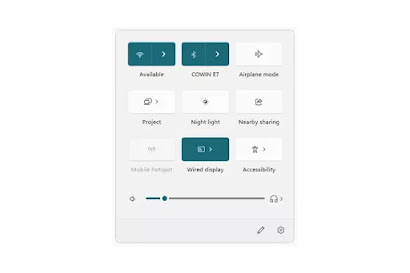
These are the primary toggles:
- Wi-Fi — choose a network to connect to, or turn Wi-Fi on or off
- Bluetooth — choose a device to connect to, or turn Bluetooth on or off
- Airplane mode — toggle Airplane mode on or off
- Accessibility — access magnifier, color filters, narrator, mono audio, live captions, and sticky keys
- Cast — show your screen on a different display
- Mobile hotspot — share your internet connection with nearby devices
- Nearby sharing — share files and website links over Bluetooth or Wi-Fi
- Night light — when turned on, this shows warmer colors at night that are easier on your eyes
- Project — decide how to use extra displays, like duplicate or extend from the primary display
- Rotation lock — allow or prevent the screen from rotating with the device (laptops only)

There's also sound control, and others for laptops:
- Sound icon — mute the sound
- Volume slider — adjust the volume
- Output device icon — switch to a different output device (e.g., headphones vs speakers)
- Brightness slider — adjust the screen brightness (laptops only)
- Battery life — open the power & battery settings (laptops only)
Finally, along the very bottom of the menu are two options:
- Pencil icon — triggers edit mode (this is covered below)
- Settings icon — opens Settings for a lot more options
You can also right-click or press-and-hold any toggle to find Go to Settings. This opens the specific window within the Settings app that pertains to that feature. Doing this for a night light, for example, will jump you right into Settings > System > Display, from where you can adjust the feature's strength and scheduling.
Shortcuts work for some of these things. For example, WIN+K for Cast, WIN+P for Project, and WIN+i for Settings.
How to Edit the Quick Settings Panel
You can hide toggles you don't want to see, add new ones you do want to see and reorganize the panel according to your preference.
-
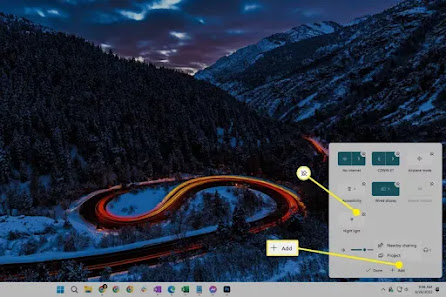
With Quick Settings open, select the pencil icon at the bottom. Or, right-click anywhere in the menu and select Edit quick settings.
-
Select the pin next to any toggle to instantly hide it. Or, select Add to see what else is available to include in Quick Settings.
To change how everything in the menu appears, select and drag one of the toggles. If you'd rather have Airplane mode's option on the bottom, for example, just drag it down and then let go.
-
Choose Done when you're finished to save and exit.
Quick Settings Benefits & Limitations
The name "Quick Settings" pretty much gives away its benefit: it's a quick way to access the most important system settings. The alternative would be to open the Settings app and make your way through its menus just to do something simple like connecting to a Wi-Fi network.
The fact that this menu can be accessed through keyboard shortcuts also means it's easy to use. WIN+A opens the panel, arrow keys let you move to a specific toggle, and the space bar triggers whatever you've selected. Doing this means you could very easily turn on Bluetooth, enable night light, etc., without ever reaching for your mouse.
Quick Settings is just a shortcut menu. Everything you can do within it, you can also do elsewhere in Windows. You can turn on Bluetooth and connect to a network in Windows 11 through Settings, for example. The same goes for all the other toggles listed above; they're all accessible in Settings.
This also means this menu is very limited. With regard to what else you can do in Windows, this panel provides just a glimpse. Open the Settings app to accomplish other tasks, like updating the operating system, adding a printer, etc.
FAQ -
How do I change my Quick Access settings in Windows 10?
To add something to Quick Access, find the file or folder in File Explorer and right-click it, then select Pin to Quick access from the drop-down menu. To remove something, right-click it and select Remove from Quick access. If you want to adjust viewing options so only pinned items appear, select View > Options > Privacy and turn off the options for recently used files and recently viewed folders.
-
How do I change my Quick Print settings in Windows 10?

No comments:
Post a Comment