How to Manage System Sounds on Windows 11
Windows 11 has a new design, new features, and new sounds to enjoy. If you don’t like the Windows 11 system sounds, you can change them using these steps.
With a refreshed user interface, Windows 11 also comes new system sounds to alert you to actions and notifications. You can even switch up your system sounds depending on your display choices, including working in dark mode.
While the changes are subtle and, in most cases, pleasing, you might want to change them. Here’s a look at how to manage system sounds on Windows 11.
Change System Sounds on Windows 11 Using Settings
You can easily change system sounds on Windows 11 using the Settings app.
To change system sounds in Settings, use the following steps:
Hit the Windows key or click the Start button to launch the Start menu and open Settings.
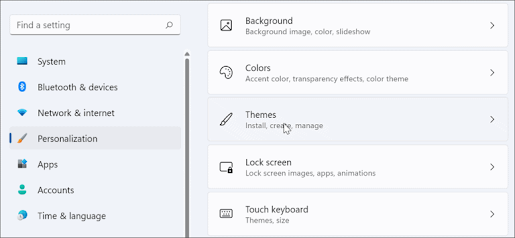
When Settings opens, click on Personalization from the list on the left and select Themes on the right.
On the following screen, click on the Sounds Windows Default button.
When the Sound screen appears, make sure the Sounds tab is selected.
- Under the Program Events section, select an event you want to change the sound for and choose the new sound from the Sounds dropdown. For example, below we’re changing the sound for a New Mail Notification to Windows Notify.wav.
- To verify you’ll like the sound, click the Test button.
- Note that there are plenty of sounds to choose from, so it might take several minutes to complete. After you finish, click Apply and OK.
How to Turn Off All System Sounds on Windows 11
As the PC’s admin, you might want to eliminate all system sounds. To turn off all system sounds, do the following:
- Press the Windows key and click the Settings icon.
- When Settings opens, navigate to Personalization > Themes.
- When the Sound window opens, verify the Sounds tab is selected.
- Under the Sound Scheme section, make sure to set it to No Sounds from the dropdown.
- After that, click Apply and click OK.
That’s all there is to it. Now, system sounds will no longer play during any operating system events.
How to Disable Startup Sounds on Windows 11
The startup sound on Windows 11 is not as annoying as older systems like XP, for example. Still, you might want to disable startup sounds.
To disable startup sounds on Windows 11, use the following steps:
- Hit the keyboard shortcut Windows key + R to launch the Run dialog.
- In Run, type control mmsys.cpl sounds and hit Enter or click OK.
- Select the Sounds tab when the window opens and uncheck the Play Windows Startup Sound option.
- Click Apply and OK.
Once you complete the steps above, Windows 11 will no longer play a sound when it boots up.
How to Create Your Own Sound Scheme on Windows 11
Another Windows 11 feature is the ability to create your own sound scheme. This allows you to switch between different sound configurations with ease.
To create a custom sound scheme on Windows 11, do the following:
- Click the Start button and open Settings.
- Select the Personalization option on the right and click Themes from the right.
Now, click the Sounds tab if it isn’t open already.
- Under the Program Events section, choose the event you want to change the sound.
- Click the dropdown menu under the Sounds section and select the sound you want to use.
Once you have your sound scheme established, click the Save As button, type in a name for your new sound scheme, and click OK.
Managing Sounds on Windows 11
If you want to manage your system sounds on Windows 11, you won’t find much has changed compared to earlier versions of Windows. However, if you haven’t done it before, the steps above should help you get started.
Just because you’re running Windows 11, you can restore the classic volume mixer. It’s also worth noting that if you’re not on Windows 11 yet, you can disable app notification sounds on Windows 10. You can also turn on Windows Sonic Spatial Sound on Windows 11.
21thsoft


No comments:
Post a Comment