If you want to share your Windows 11 laptop’s internet data with your other devices over Wi-Fi, there is a piece of good news for you. Like Windows 10, you can use a built-in tool to turn your Windows 11 computer into a Wi-Fi hotspot. This built-in feature to turn Windows PC into a hotspot is still available on Windows 11 that means without a third-party tool; you can enable your laptop into a WiFi hotspot.
Windows 11 built-in hotspot feature may become handy in several situations. Suppose you use an Ethernet connection to access the internet, or you’re limited to one login for a Wi-Fi network. That means using that Ethernet or WiFi network, you can not connect your tablets, smartphones, and other WiFi-enabled devices. Of course, you can purchase more internet connections for each device, but you have to pay extra money. Why not turn your PC into a hotspot and save money? Most modern Windows computers or laptops have a built-in WiFi adapter, and you can use that for a hotspot. That means using a single internet connection; you can use the internet on all WI-Fi-enabled devices.
How to Make your Windows 11 PC as a Wi-Fi Hotspot?
To turn on the WiFi hotspot feature on your Windows 11 PC/laptop, use the following steps:-
Step 1. First, launch the setting apps by pressing Windows + I hotkey.
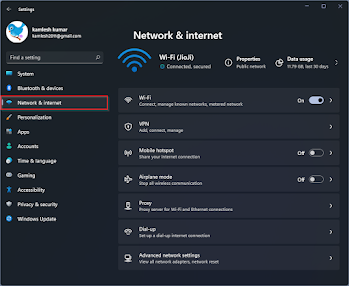
Step 2. Then, select the Network & internet category in the left sidebar of the Settings window.
Step 3. After that, on the opposite side of the “Network & Internet,” turn the toggle switch Mobile hotspot On. Now, your Windows 11 will start broadcasting the SSID. Click anywhere under “Mobile hotspot” to configure its settings.
Step 4. In the following screen, you can turn the toggle switch On beside the “Power saving” option. Once you turn on the “Power saving” feature when no devices are connected to the hotspot, your PC’s mobile hotspot will automatically turn Off. If you want to keep broadcasting the SSID even if no devices are connected, you should turn Off the “Power saving” feature. It is an optional feature, which means you can turn it On or Off according to your requirements.
Next, you should configure the critical setting is the Network name and password. For that, click on the Edit button under the Properties section.
Step 5. On the “Edit network info” pop-up window, change the “Network name” according to your choice. Your PC will use this network name to broadcast WiFi SSID. Now set a strong Network password and then click on the Save button.
Now all the settings have been configured, you’re ready to share the
internet with any other WiFi-enabled device. Turn On the WiFi on your
WiFi-enabled device on which you want to browse the internet. On the
list, click on the SSID name that you have configured on your Windows 11
PC. Input the password and then enjoy the internet.
21thsoft


No comments:
Post a Comment